background image

IB-PDV722-WM-E-012007

REMOTE CONTROL OPERATION

NOTE:

Point the remote control unit from less than 20 feet (6 m) from the remote sensor and within
about 60

of the front of the unit.

Batteries should be changed by an adult for safety.

Reversing  polarities  will  damage  the  batteries  and  possibly  your remote. Be sure to follow
polarities ( + and 

) as indicated.

Do  not  mix  different  types  of  batteries  together  (Alkaline,  Carbon-Zinc,  Nickel-Cadmium
etc.), or old batteries with new ones.

When the batteries have become discharged, they must be disposed of in a safe manner that
complies with all applicable laws.

When the batteries becomes weak, the operating distance of the remote control decreases
and you will need to replace the batteries.

When the remote control is not to be used for a long time (2 months or more), remove the
batteries to avoid possible damage that may be caused by battery leakage.

Avoid keeping the remote control in extremely hot or humid locations.

Do not point bright lights at the remote control sensor (like laser pointers).

Do not place objects between the remote control unit and the remote control sensor.

Do not use this remote control while using the remote control unit of any other equipment at
the same time, the signals may mix.

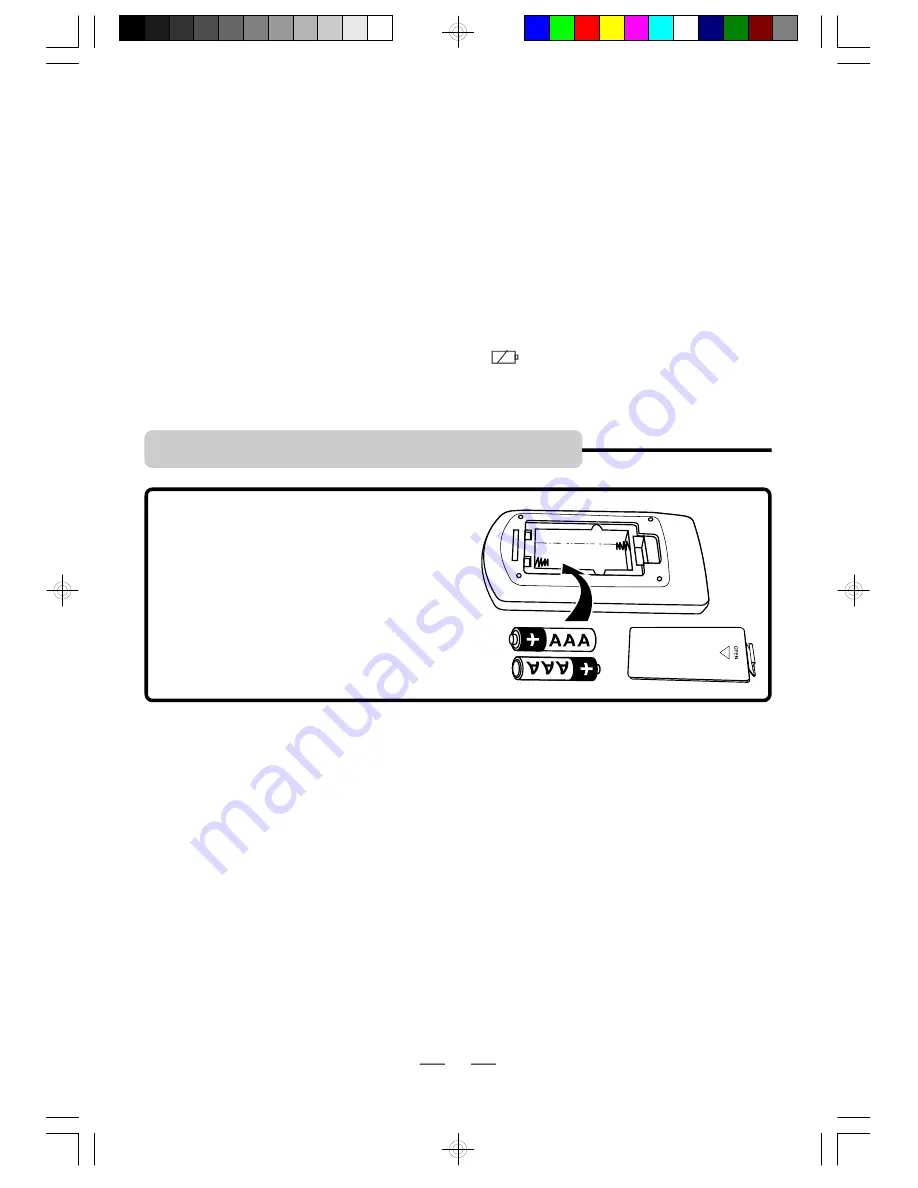
1. Push the tab to open the battery cover.

2. Insert  2  size 

AAA

  alkaline  batteries

(included)  into  the  battery  compartment
according  to  the  +  and 

  markings

inside  the  battery  compartment,  then
replace  the  battery  cover.

C. Using the built-in rechargeable battery

The  built-in  rechargeable  battery  is  suitable  for  portable  use  which  allows  you  to  enjoy  the
unique functions of the main unit outdoors.
Remember to charge the battery fully before initial use (about 5 hours).

NOTE:

The  built-in  rechargeable  battery  only  provides  power  to  the  main  unit.  The  slave  unit
cannot play on the built-in rechargeable battery.

To charge the battery

1. Connect  the  DVD  player  and  the  power  source  as  point  A  and  point  B  on  the  previous

pages. After 5 seconds, the battery LED indicator will turn on and start to flash.

2. The  battery  LED  indicator  will  flash  when  the  battery  is  charging  and  remain  steadily  on

when the battery is fully charged.

3. Charging time is about 5 hours. A fully charged battery delivers about 2.5 hours of viewing time.
4. When  the  battery  is  weak,  the  low  power  icon 

  will  appear  on  the  LCD  screen  and

after that the power automatically turns off. If this occurs, please use the AC adaptor or car
adaptor to recharge the battery or play the set on AC power.

11

IB-PDV722-WM-E-012007.pmd

2/12/2007, 1:19 AM

12

Summary of Contents for PDV-722

Page 1: ...nting Straps for Car use Built in Rechargeable Battery for Portable Use Anywhere Includes AC Adaptor for Home Use universal voltage Includes Car Adaptor for Travel Connects to Your Larger Screen Home...

Page 2: ...upply cord or plug is damaged liquid has been spilled or objects have fallen into the apparatus the apparatus has been exposed to rain or moisture does not operate normally or has been dropped 14 This...

Page 3: ...iver Connect this equipment into an outlet on a circuit different from that to which the receiver is connected Consult the dealer or an experienced radio TV technician for help Do not apply oil or pet...

Page 4: ...on Corporation Reverse engineering or disassembly is prohibited CAUTION Use of controls or adjustments or performance of procedures other than those specified herein may result in hazardous radiation...

Page 5: ...rch for Preferred Play 19 8 Slow Motion Play 20 9 Zoom Play 20 10 Viewing Angle Shots 20 11 MP3 Disc Operation 21 12 CD Programmed Play 21 13 JPEG or Picture Disc Operation 22 Initial Setting System S...
Page 6: ...sh when the battery is charging and remain steadily on when the battery is fully charged 13 POWER ON OFF SWITCH Slide to switch the DVD player ON or OFF 14 POWER INDICATOR Will light up when the set i...

Page 7: ...JACK For connecting to the supplied AC adaptor or car adaptor so that the slave unit has power and then can provide power to the main unit and the two units can work together 10 DC OUT JACK For connec...

Page 8: ...GRAM button In DVD mode press to display angle menu if present on the DVD disc Press to program your favorite track in CD mode 10 VOLUME buttons Press to adjust the volume level remember to also adjus...

Page 9: ...slave units the middle compartment is for accessories and cables Audio video cable to connect main and slave units or main unit and your TV set DC power cord to connect the main and slave units for p...

Page 10: ...100 volts to 240 volts 1 Viewing movies only on the main unit Main Unit 2 Viewing movies on the main unit and the slave unit at the same time Insert the AC adaptor plug to the DC IN jack on the slave...

Page 11: ...he other to the main unit s DC IN jack CAUTION 1 The included car adaptor is for use with this unit only Do not use it with other equipment 2 Use this unit only with the included car adaptor using wit...

Page 12: ...ontrol unit of any other equipment at the same time the signals may mix 1 Push the tab to open the battery cover 2 Insert 2 size AAA alkaline batteries included into the battery compartment according...

Page 13: ...ng when connecting audio and video cable Using the attached A V cables 2 Connecting the DVD player to your TV This DVD player can also be used to view movies on your large screen TV For viewing movies...

Page 14: ...headphones headphones are not included Turn down the volume of the DVD player main unit or slave unit depend on which unit you are using and connect the headphones optional not included to the DVD pl...

Page 15: ...r vehicle be sure that it is secured and doesn t obstruct any safety device such as airbag or seat belts 3 All passenger should wear seat belts when using this unit in a moving vehicle 14 Loop the mou...

Page 16: ...DIVX MPEG 4 DVD discs HD layer on SACDs or discs recorded in another format such as SECAM and regions other than your region This set will also not play damaged scratched or dirty discs NOTE A symbol...

Page 17: ...Also you can buy a disc polisher to try to repair the scratched disc 8 To pause the playback press the OK button on the remote control or the PLAY PAUSE button on the main unit To resume playback pres...

Page 18: ...has a screen saver which will display a bouncing DVD logo if no video is played for a while press any button on the remote or on the main unit the screen saver will disappear 1 PLAYING A DISC NOTE Thi...

Page 19: ...TITLE REP A REP A B A B OFF For CD REP 1 REP ALL REP OFF REP A REP A B A B OFF For MP3 In FOLDER mode REP 1 REP DIR In FILELIST mode REP 1 REP ALL 18 5 DISPLAYING DISC INFORMATION If you want to know...

Page 20: ...ng play the screen will show as below When playing an MP3 disc 1 Press the GOTO button during play the screen will show as on the right 2 Press the numeric buttons on the remote control to input the f...

Page 21: ...respond to the zoom feature and during some zoom functions the picture edges may seem fuzzy this is normal NOTE 2 When reducing to smaller sizes the black area around the picture will enlarge this is...

Page 22: ...00 003 061 Elapsed time Total time Total tracks Currently playing track Diagram B NOTE There are two display modes folder and filelist you can switch them by pressing the ANGLE PROGRAM button MP3 MP3...

Page 23: ...our folder 2 Press the or button to select the desired folder then press OK button to open it 3 Press the or button to select the desired JPEG photo in the current folder then press OK button to start...

Page 24: ...ystem is in the full STOP mode NOTE 2 Leaving the set in the stop mode for a longer time will drain the battery the same as during normal play remember to shut off the power after use 11 To skip to an...

Page 25: ...this mode You can get to the SETUP menu by following the below steps SYSTEM LANGUAGE AUDIO VIDEO SYSTEM SETUP TV SYSTEM TV TYPE SLEEP CONTROL DEFAULT EXIT SETUP LCD MODE Setting the TV SYSTEM only whe...

Page 26: ...you will see everything to the left right of the center as in a movie theater 4 X 3 Standard 4 3 PS PAN and SCAN Choose this setting if you want to see the movie fill the entire screen of your TV Thi...

Page 27: ...ntrast of the video signal the dark portions of pictures COLOR The color of the video signal the vivid ness of the color All above can be adjusted to your tastes Select the option you want to adjust u...

Page 28: ...or the player may malfunction Cleaning the Cabinet Clean the cabinet panel and controls with a soft cloth slightly moistened with a very mild detergent solution or a plain damp cloth Do not use any ty...

Page 29: ...e both the TV and DVD player are on Play fails to start even when PLAY is pressed Play starts but then stops immediately No picture on your external TV s screen 1 Picture is distorted during rapid adv...

Page 30: ...s which prohibit rapid advance or rapid reverse or even pause especially on opening screens or during FBI warnings etc No rapid advance or rapid reverse play 1 Press AUDIO button several times The dis...

Page 31: ...up again see Page 26 No subtitles Subtitles appear only on discs which contain them If subtitles don t show press the SUBTITLE button to display the subtitles Alternative audio soundtrack or subtitle...

Page 32: ...mat This set will not play pic tures encoded in formats other than JPG VIDEO CABLE This is a wire with plugs on each end which is used to transfer the picture information into your TV set NTSC Nationa...

Page 33: ...50 60Hz DC 9V 2A output included TFT LCD screen size Main unit 7 Slave unit 7 PROTECT YOUR FINE FURNITURE WE RECOMMEND A PROTECTIVE MATERIAL BE PLACED UNDER THE SET WHEN PLACING IT ON SURFACE WITH A N...

Page 34: ...m original purchase we will repair the unit covering any part s that need to be replaced at no charge but will charge for the cost of labor return postage paid by Lenoxx This warranty does not apply t...

Reviews: