3- MOUNTING THE LAMPS
Warning: Switch off the unit before replacing the lamp.
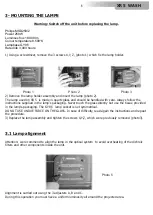
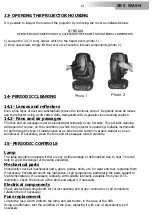
1) Using a screwdriver, remove the 3 screws X,Y, Z, (photo 1) which fix the lamp holder.
2) Remove the lamp holder assembly and insert the lamp (photo 2).
The lamp used on XR 5 is made in quartz glass and should be handled with care. Always follow the
instructions supplied in the lamp's packaging. Never touch the glass directly but use the tissue provided
in the lamp's packaging. The GY9,5 lamp socket is not symmetrical.
DO NOT USE UNDUE FORCE ON THE GLASS. In case of difficulty, read again the instructions and repeat
the procedure.
3) Replace the lamp assembly and tighten the screws X,Y,Z, which were previously removed (photo3).
3.1 Lamp alignment
Attention: we recommend to align the lamp in the optical system to avoid overheating of the dichroic
filters and other components inside the unit.
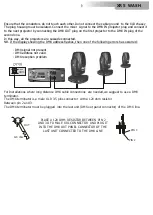
Alignment is carried out using the 3 adjusters A, B and C.
During this operation you must have a uniform luminosity all around the projected area.
Philips MSD250/2
Power 250W
Luminous flux 18.000 lm
Colour temperature 8.500°K
Lampbase GY9,5
Rated life 3,000 hours
6
Photo 2
Photo 1
Photo 3
Photo 5
ARC 1200
XR 5 WASH


