


I
2
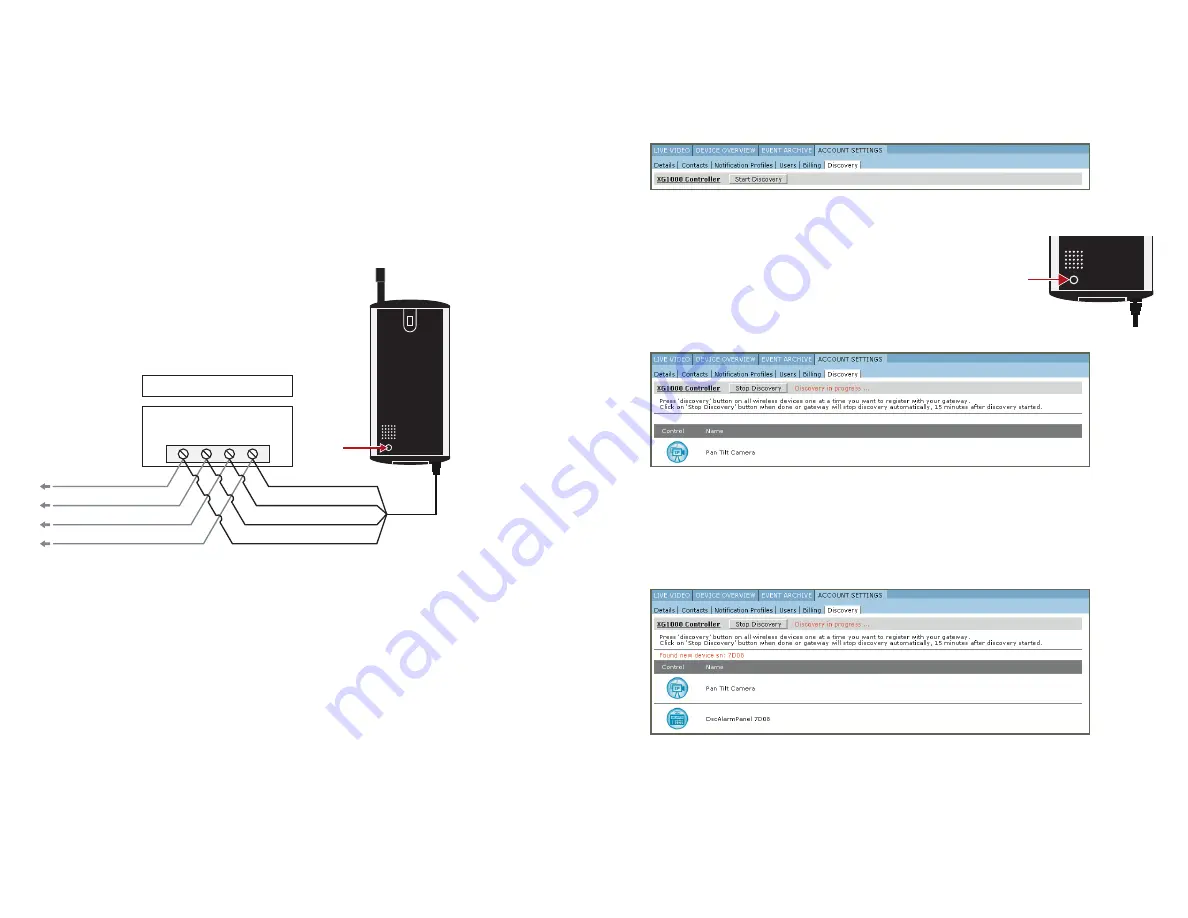
CONTROL TERMINAL STRIP
DSC
BRIDGE
RED BLK
DSC CONTROLLER
YEL GRN
BRIDGE BLK WIRE
BRIDGE GRN WIRE
BRIDGE YEL WIRE
TO KEYPAD GRN WIRE
TO KEYPAD YEL WIRE
TO KEYPAD RED WIRE
TO KEYPAD BLK WIRE
BRIDGE RED WIRE
DISCOVERY
INSTALLING THE COMMUNICATIONS BRIDGE ///
The
DSC Bridge
allows your Alarm System to communicate with the XG1000 controller.
You must complete the installation of your XG1000 controller before proceeding with
this installation. Refer to the documentation that came with your XG1000 kit to access your
remote account and register the XG1000 controller. You will also need access to a PC and
the remote account information to complete the installation procedure.
1. Remove power from the DSC Alarm Panel. Refer to the DSC documentation if needed.
2. Connect the
DSC Bridge
to the DSC Alarm Panel (or a Keypad). The Bridge connects
just like an additional Keypad. Follow the wire colors used for the existing Panel,
as shown in the diagram below:
■
Red wire to Pin 7
■
Black wire to Pin 8
■
Yellow wire to Pin 9
■
Green wire to Pin 10
NOTE:
The existing keypad will remain connected. Mount the Bridge device near the alarm panel away
from large metal objects. If necessary, you can extend the length of the wire using four conductor cable
and wire nuts. For best results the Bridge device should be mounted as high as possible, preferably at
least 6 feet above the floor.
3. Re-connect power to the Alarm Panel.
4. The LED on the
DSC Bridge
should light up and display either
RED
or
GREEN
–
If the LED does not light up, the bridge is not receiving power, please check all connections
(see
Troubleshooting Section
). If the LED changes from solid GREEN to solid RED within
the first 60 seconds after applying power and remains solid RED the Controller and the Bridge
may be having difficulty communicating. Please perform the
Range Test
described in the
Troubleshooting Section
of this manual.
DISCOVERY
BUTTON
DEVICE DISCOVERY PAGE
DSC ALARM PANEL DISCOVERED
DEVICE DISCOVERY IN PROGRESS
5. Log into your remote account via a PC browser. Click on the
Account Settings
tab on the
interface and then select the
Discovery
sub-tab, to access the
Discovery
page.
NOTE:
If your XG1000 Controller is not registered to your account you
must register it prior to proceeding.
On the
Discovery
page, click on the
‘START DISCOVERY’
button
to start the Bridge registration process. When the page heading
indicates that discovery is in process, press the
‘DISCOVERY’
button on the lower left corner of the
DSC Bridge
device
as shown.
When the Discovery process has finished for the
DSC Bridge
, it will appear on the list
of your devices on the
Discovery
page, and the LED on the
DSC Bridge
should turn GREEN.
At this point you may press the
‘STOP DISCOVERY’
button to stop the Discovery process.
After the system has registered the
DSC Bridge
device, go to the
Device Overview
page and
verify that the
DSC Bridge
device was properly discovered.


