background image

7

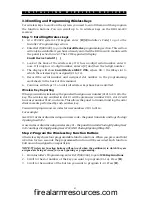
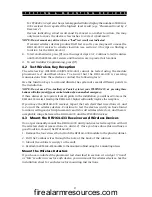
4. Enter the 2-digit number of the function you want to select, or scroll to the

function you want to assign to that button and press [

]. The following

functions may be programmed:

00 Null Key

07

Arm Interior

01 Stay Arm

08-15 [

][7] Command Outputs 1-8

02 Away Arm

16

Fire Alarm

03 No-Entry Arm

17

Auxiliary Alarm

04 Chime On/Off

18

Panic Alarm

05 System Test

19

Disarm (Off)

06 Quick Exit

NOTE: If programmed, these options do not require access code entry regardless of other

system options. The programmed function will be executed immediately.

5. The LCD keypad will show 

Select (01) Partition 1

. Scroll to the partition you want

the button to work in and press [

] to select.

6. Repeat steps 3 to 5 until all the buttons are programmed.
7. Repeat steps 4 to 6 until all the wireless keys are programmed.
8. To exit, press [#].

NOTE: When a wireless key is used to disarm a partition, all courtesy pulse outputs enabled

for that partition will activate for two minutes.

Now that you have enrolled and programmed all the wireless devices, you will need to
test the devices and mount wireless devices using zones. See section 4 for more
information.

I   N   S   T   A   L   L   I   N   G     W   I   R   E   L   E   S   S     D   E   V   I   C   E   S

firealarmresources.com

Summary of Contents for MAXSYS RF4164-433

Page 1: ...d function and information on the limitations as to liability of the manufacturer The entire manual should be carefully read RF4164 433 v4 0 Installation Manual This RF4164 433 V4 0 receiver version is currently supported by all PC4020 DLS 3 downloading files firealarmresources com ...

Page 2: ...tes and uses radio frequency energy and if not installed and used properly in strict accordance with the manufacturer s instructions may cause interference to radio and television reception It has been type tested and found to comply with the limits for Class B device in accordance with the specifications in Subpart B of Part 15 of FCC Rules which are designed to provide reasonable protection agai...

Page 3: ...Wireless Key Reception 9 4 3 Mount the RF4164 433 Receiver and Wireless Devices 9 Deleting Replacing Devices 10 5 1 Replacing Devices 10 5 2 Deleting Devices 10 5 3 Deleting Device Serial Numbers 11 5 4 Deleting a RF4164 433 Module 11 Additional Programming Notes 12 6 1 Device Fail Time 12 6 2 Trouble Conditions 12 Troubleshooting 14 Programming Worksheets 15 INDUSTRYCANADASTATEMENT This class B d...

Page 4: ...perly alert occupants of a fire for a number of reasons some of which follow The smoke detectors may have been improperly installed or posi tioned Smoke may not be able to reach the smoke detectors such as when the fire is in a chimney walls or roofs or on the other side of closed doors Smoke detectors may not detect smoke from fires on another level of the residence or building Every fire is diff...

Page 5: ...a PC4020 system LCD keypad or using DSC downloading software DLS 3 or higher See the PC4020 Installation Manual Section 3 How to Program 1 2 How to Use This Manual To install and set up the RF4164 433 and wireless devices follow these steps 1 Enroll and temporarily mount the RF4164 433 module see Section 2 2 Enroll and program wireless devices using zones and wireless keys see Section 3 3 Complete...

Page 6: ... Location can be wired up to 750 ft 230 m from the main panel with 22 gauge wire connects to Combus for longer wire runs thicker gauge wire must be used 1 4 Wireless Devices Please refer to the Installation Instruction sheets of the following devices for more information The RF4164 433 v4 0 can receive signals from the following devices WLS912L 433 Glass Break Detector WLS914 433 Pet Immune PIR WS...

Page 7: ... as high and as close to the underside of the first floor as possible The range of the module will be reduced if the unit is mounted below ground level 2 3 Connecting the RF4164 433 The RF4164 433 is connected to the control panel via the Combus CAUTION Remove all power from the panel while connecting modules to the Combus Wire the RF4164 433 to the Combus of the PC4020 according to diagram 1 2 4 ...

Page 8: ...per on Desired Unit 4 Tamper the RF4164 433 i Remove the cover of the RF4164 433 ii Press the case tamper switch located to the right of the terminal strip and release NOTE If equipped the wall tamper will also need to be depressed with the case tamper However it does not need to be released to complete the enrollment 5 The LCD keypad will display RF4164 433 Zn Ex Mod XX Enrolled Record the module...

Page 9: ... system LCD keypad enter 8 Installer s Code 2 EnterRef 001300 togototheEnrollDeviceprogrammingsection This section will only be available if you have already enrolled the RF4164 433 module with the panel see Section 2 5 The LCD keypad will display Enroll Device Serial 3 Lookatthebackofthefirstwirelessdeviceyouwanttoenroll Ifthedevicehasa6 digit serialnumber enteritnow Ifthedeviceonlyhasa5 digitnum...

Page 10: ... key the panel will assign a user number 0101 to 0116 to the key The wireless key enrolled in slot 01 will be given user number 0101 slot 02 will have user number 0102 and so on This allows the panel to transmit and log the arm disarm events performed by each wireless key You can still program access codes for user numbers 0101 to 0116 For example User 0101 arms or disarms using an access code the...

Page 11: ...med function will be executed immediately 5 The LCD keypad will show Select 01 Partition 1 Scroll to the partition you want the button to work in and press to select 6 Repeat steps 3 to 5 until all the buttons are programmed 7 Repeat steps 4 to 6 until all the wireless keys are programmed 8 To exit press NOTE When a wireless key is used to disarm a partition all courtesy pulse outputs enabled for ...

Page 12: ...umber and press to select it The keypad will display Activate Device 6 Activate the device being tested A result will be displayed on the keypad or sounded by the keypad or bell WLS904 433 WLS904P L 433 WLS914 433 N A only Remove the detector from the backplate wait for the result to be presented then reattach the detector to its backplate WS4916 Hold the supplied magnet near the raised line on th...

Page 13: ...will always notify your central station of a nonmedical emergency If these devices do not operate from all points in the installation you will need to move the RF4164 433 receiver Moving the RF4164 433 higher will usually improve the reception If you move the RF4164 433 receiver repeat the tests described in sections 4 1 and 4 2 on all the wireless devices Continue to test the devices until you ha...

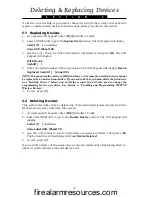
Page 14: ...ter If you need to do this you must delete the first device see Deleting Devices below and enroll the second You will also need to change the programming for the new device See Section 3 Enrolling and Programming WLS9XX Wireless Devices 5 To exit press 5 2 Deleting Devices This section describes how to delete any of the enrolled wireless devices from the RF4164 433 receiver and from the system 1 A...

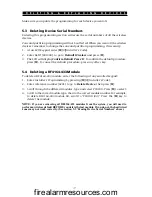
Page 15: ...leting a RF4164 433 Module To delete a RF4164 433 module enter the following at any enrolled keypad 1 Enter Installer s Programming by pressing 8 Installer s Code 2 Enter reference number 0201 to go to Delete Device then press 3 Scroll through the different modules type and select PC41XX Press to select 4 Scroll to the correct module type then to the correct module number For example to delete RF4...

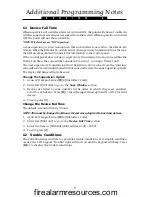
Page 16: ...on with that zone and restore the Zone Supervisory Fault The Device Fail timer will also be reset Change the Supervision Option 1 At an LCD keypad enter 8 Installer s Code 2 Enter Ref 001306 to go to the Supv Window section 3 Devices are listed by zone number in the order in which they were enrolled Scroll to each device Press to turn the supervision option ON or OFF for that device 4 To exit pres...

Page 17: ...vice from its backplate This creates a tamper condition on the zone 2 Refer to the battery installation instructions on the installation sheet of each component Ensure the proper orientation of the batteries as you install them 3 Whenthefreshbatteriesareinplace reattachthecovertothebackplate Thetamper is restored and the zone sends a battery trouble restoral signal to the RF4164 433 receiver The b...

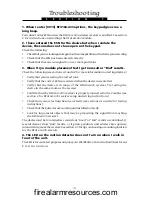
Page 18: ...enrolled Verify that the device is in range of the RF4164 433 receiver Try testing the device in the same room as the receiver Confirm that the RF4164 433 receiver is properly connected to the Combus see section 2 for RF4164 433 receiver setup and wiring instructions Check that you are testing the zone correctly see sections 4 1 and 4 2 for testing instructions Check that the batteries are working...

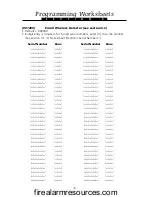
Page 19: ..._ _ _ _ _ l l_ _ _ _ _l_ _ _ _ _ l_ _ _ _ _l_ _ _ _ _l_ _ _ _ _ l_ _ _ _ _l l_ _ _ _ _l_ _ _ _ _ l_ _ _ _ _ l l_ _ _ _ _l_ _ _ _ _ l_ _ _ _ _l_ _ _ _ _l_ _ _ _ _ l_ _ _ _ _l l_ _ _ _ _l_ _ _ _ _ l_ _ _ _ _ l Serial Number Zone l_ _ _ _ _l_ _ _ _ _ l_ _ _ _ _l_ _ _ _ _l_ _ _ _ _ l_ _ _ _ _l l_ _ _ _ _l_ _ _ _ _ l_ _ _ _ _ l l_ _ _ _ _l_ _ _ _ _ l_ _ _ _ _l_ _ _ _ _l_ _ _ _ _ l_ _ _ _ _l l_ _ _ _ _l...

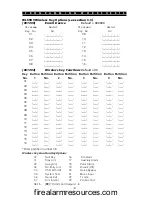
Page 20: ..._l l_________l l_____l_____l l_________l l_____l_____l l_________l l_____l_____l l_________l 06 l_____l_____l l_________l l_____l_____l l_________l l_____l_____l l_________l l_____l_____l l_________l 07 l_____l_____l l_________l l_____l_____l l_________l l_____l_____l l_________l l_____l_____l l_________l 08 l_____l_____l l_________l l_____l_____l l_________l l_____l_____l l_________l l_____l_____...

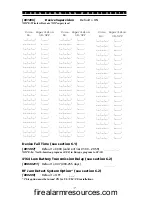
Page 21: ...__l l________l l_____l_____l_____l l________l l_____l_____l_____l l________l l_____l_____l_____l l________l l_____l_____l_____l l________l l_____l_____l_____l l________l l_____l_____l_____l l________l l_____l_____l_____l l________l l_____l_____l_____l l________l l_____l_____l_____l l________l Zone Supervision No ON OFF l_____l_____l_____l l________l l_____l_____l_____l l________l l_____l_____l____...

Page 22: ...ry devices 15 M Motion detector test 10 Mount devices 11 RF4164 433 11 N Number serial 7 slot 8 Numbers reference 3 P Partition programming forbuttons 9 Placement test 10 Power 5 Problems 16 Programming how to 3 R Reference numbers 3 Remove devices 12 Replace devices 12 S Serial numbers 7 Slot number wireless key 8 Supervision 14 T Testing door window contact 10 motiondetector 10 wireless key 11 T...

Page 23: ...puter software and may include associated media printed materials and online or electronic documentation Any software provided along with the SOFTWARE PRODUCT that is associated with a separate end user license agreement is licensed to You under the terms of that license agreement By installing copying downloading storing accessing or otherwise using the SOFTWARE PRODUCT You agree unconditionally ...

Page 24: ...ODUCT including all component parts themedia andprinted materials any upgrades and thisEULA and provided the recipient agreesto the termsof thisEULA If theSOFTWARE PRODUCT isan upgrade anytransfer must also include allprior versions of theSOFTWARE PRODUCT f Termination Without prejudicetoany other rights DSCmay terminate this EULAif You fail to complywiththe terms and conditionsofthisEULA In suche...

Reviews: