

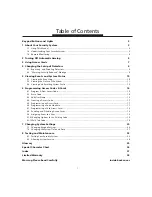


13
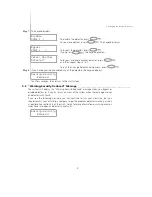
5.3 Viewing and Resetting System Faults ___________________________________________
NOTE:
A fault condition reduces the security your system is designed to provide. Call your
installation company or service technician to arrange service.
The control panel continuously checks for a number of possible faults. If one of these
faults occur, the keypad beeps twice every 10 seconds. To see a list of system faults, enter
your access code and follow the procedure below.
Basic users will only be able to view the following faults:
• Telephone line
• Seismic detector test
• Battery
• Fire trouble
• AC power
• General System Fault
The system will give Advanced, Supervisor and Master users additional information in the
fault messages.
If
(AC) Power Fault
is present, the system has lost its power. This trouble may be due to
a power outage and should be cleared once the power is restored. If the power on the
premises is running normally and the trouble condition persists, call your installation
company for service.
If
Telephone Line Fault
is present, there is a problem with the telephone line. If the
telephones on the premises are running normally and the trouble condition persists, call
your installer for service.
Any other trouble condition will require the assistance of your installation company. As
soon as a trouble condition occurs, call your installation company or service technician to
have the problem corrected.
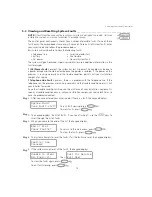
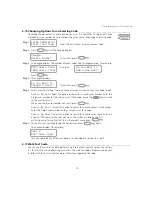
1.
After you have entered your access code, if there is a fault, the keypad displays:
System Fault
View Fault List?
To exit fault viewing, press
.
To view faults, press
.
2.
The keypad displays the list of faults. If you see a flashing
>
, use the
keys to
scroll through the list of faults.
3.
When you come to the end of the list, the keypad displays:
End of List
Clear Faults?
To return to the main menu, press
.
To clear the faults, press
.
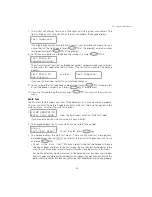
4.
The system attempts to reset the faults. If all the faults are reset, the keypad displays:
Fault(s) Now
Cleared!
5.
If the system cannot reset all the faults, the keypad displays:
Unable to Clear
Call for Service
All Fault(s)!
then,
Exit Now?
To view the faults again, press
.
To exit fault viewing, press
.
5: Viewing Events and System Status
Step
Step
Step
Step
Step