


8
Changing the Setup of Detectors
S E C T I O N 4
If you will need access to a protected area (i.e. a part of the premises covered by a detector)
while the system is armed, or if a detector is not working, you can either bypass or disable
the detector.
When you tell the system to bypass a detector, it will exclude the selected detector from
the armed areas the next time the system is armed.
Bypassed detectors will not be able to
sound an alarm.
The bypasses on the detectors are automatically cancelled each time the
system is disarmed. If you want the system to bypass the detectors again, you must set
the detectors to bypass before the next arming.
When you tell the system to disable a detector, it will exclude the detector from the
system until you turn it back on again.
Disabled detectors will not be able to sound
alarms, tamper conditions, or faults.
NOTE:
Bypassing and disabling detectors reduces your security protection. If you are
bypassing a detector because it is not working, call a service technician immediately so
that the problem can be resolved and your system returned to proper working order.
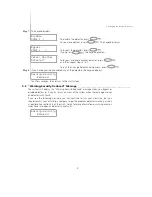
4.1 Bypassing and Disabling Detectors _____________________________________________
To bypass or disable one or more detectors:
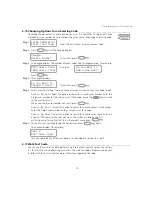
1.
12:00 2000/01/01
Enter Your Code
From the start screen, enter your access code.
2.
The keypad displays:
Do You Want To
Turn Areas On?
Press
until the keypad displays:
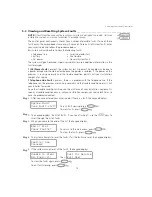
3.
Change Detector
Setup?
To confirm, press
.
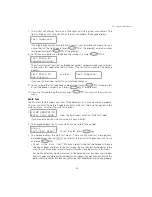
4.
The keypad displays the first area where you can bypass or disable detectors, for
example:
Area 1
In This Area?
If the detector is in this area, press
.
5.
The keypad displays the first detector you can bypass or disable, for example:
ZONE 1
Select Detector?
To select the detector, press
.
6.
The keypad displays the current status of the detector (i.e. normal, disabled, or
bypassed), for example:
ZONE 1
Is Normal >
To view the available options for the detector, press
.
Step
Step
Step
Step
Step
Step