


PROBLEM:
Stabilization not working properly.
SOLUTION:
(1) Battery voltage low. (2) Re-link. (3) Recalibrate the sensors.
PROBLEM:
Will not take off.
SOLUTION:
Rotor blades incorrectly installed. See Blade Replacement section.
PROBLEM:
Hovershot is shaking.
SOLUTION:
Check the canopy, chassis, motors and rotor blades for damage.
PROBLEM:
The Hovershot does not maintain altitude when the throttle stick is
in the center position.
SOLUTION:
Recalibrate the sensors.
VIDEO PROBLEMS
PROBLEM:
There are missing or corrupt files on the memory card.
SOLUTION:
Refer to RECORDING VIDEO AND PICTURES WITHOUT THE APP for
information regarding camera initialization and closing of files.
SOLUTION:
Allow 2-3 seconds between taking pictures.
PROBLEM:
The video button on the controller does not work or works intermittently.
SOLUTION:
The video button must be pressed and quickly released. The controller
will beep when the button works properly.
SOLUTION:
The video button on the controller toggles between start/stop video.
If using both the app and the video button to control video recording,
you may need to press the video button a second time in some
instances to get the correct start or stop command.
PROBLEM:
The WiFi connection is lost during flight.
SOLUTION:
There may be interference in the area. Try flying in a different location.
SOLUTION:
You are exceeding the WiFi range of the DroneView camera. Maintain
a closer proximity to your device during flight.
PROBLEM:
The app does not re-establish connection after the connection has
been lost.
SOLUTION:
Close the DroneView app and remove it from the background tasks.
Restart the DroneView app.
PROBLEM:
Exporting files was interrupted and the export function cannot be
restarted.
SOLUTION:
Close the DroneView app and remove it from the background tasks.
Restart the DroneView app. Run the export function again.
PROBLEM:
You recorded videos/pictures but there are no files on the memory card.
SOLUTION:
The memory card was incorrectly inserted into the camera. Refer to
RECORDING VIDEO AND PICTURES WITHOUT THE APP for instructions
on the proper installation of the memory card.
PROBLEM:
Horizontal scrolling lines appear in video or pictures.
SOLUTION:
Avoid aiming the camera directly into the sun or reflected sunlight.
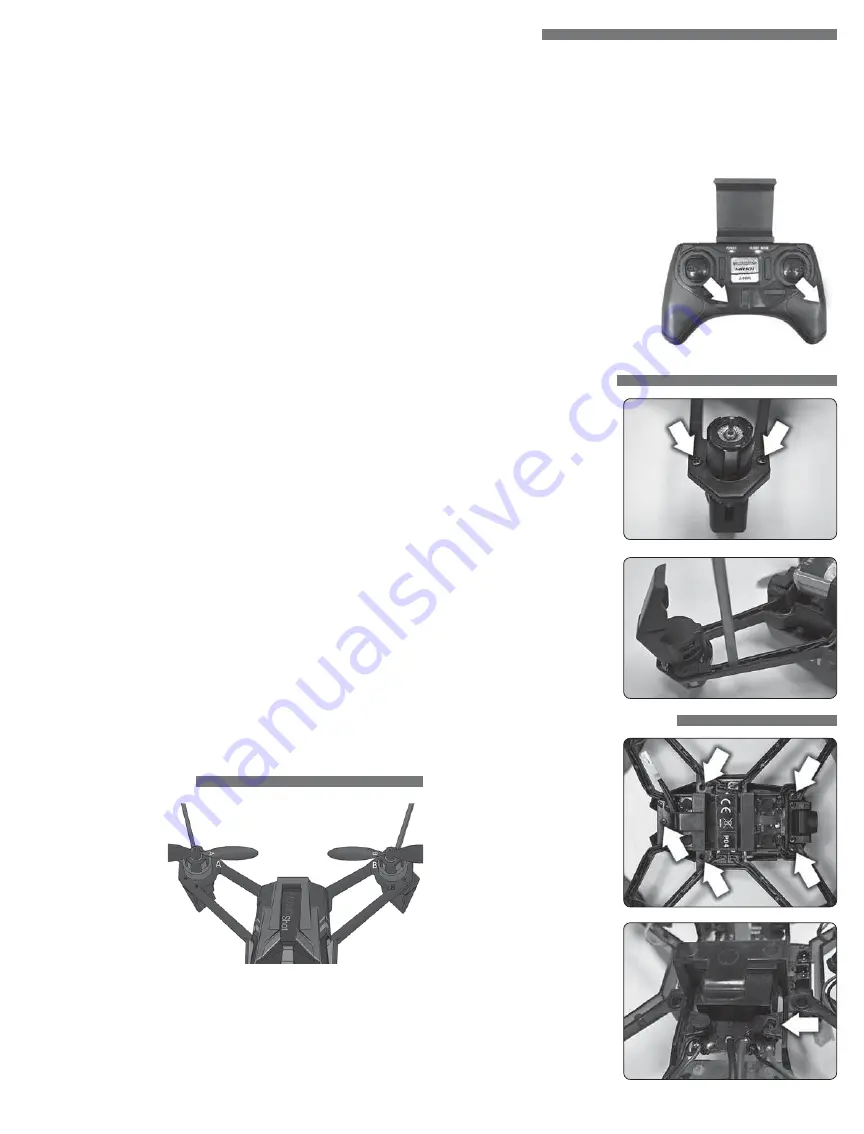
BLADE REPLACEMENT
Each arm and rotor blade
on the Hovershot is
marked with the letter “A”
or “B”. The blade must be
installed on an arm with
the same letter or the
quadcopter will not be
able to fly.
Carefully pry the blade off
of the motor with a flat
blade screwdriver.
Colored blades are on the front motors. Black blades are on the rear.
CALIBRATION
If the quadcopter is constantly drifting in the same direction or the quad is not
maintaining altitude, or any time a new fl ight control board has been installed,
the sensors on the Hovershot should be calibrated.
1.
Calibrate the sensors before the fi rst fl ight.
Center all the trim adjustments.
To center the trim settings, hold down one side of the trim button until you
hear a long beep. If the controller stops beeping, release the trim button
and hold down the other side.
2. Place your Hovershot on a level
surface and link the quadcopter
with the controller and arm the
transmit ter.
3. Press and hold the right stick in its
lower right corner.
4. Move the left stick down and to the
right. When the quad LEDs start
to fl ash, release both sticks. The
LEDs will stop fl ashing when the
calibration is complete.
MOTOR REPLACEMENT
1. Remove the rotor blade and
prop guard.
2. Remove the two screws next
to the motor.
3. Turn the Hovershot over and
carefully remove the motor
cover.
4. Unplug the motor from the
frame and remove the motor.
5. Replace the motor with a new
motor that has the same color
wires.
6.
Use a small flat blade
screwdriver to push the wires
inside the arm.
CONTROL BOARD REPLACEMENT
1. Remove the 5 screws that
secure the body and camera.
2. Unplug the camera cable.
3. Unplug the 4 motor wires.
4. Remove the 4 motor covers.
Please refer to the Motor
Replacement section for
details.
5. Remove the LED boards from
the motor covers and carefully
pull the wires out of the arms.
6. Push the 4 control board
dampeners out of the frame
and remove the control board.
Reverse these steps to install the
new control board.
5


