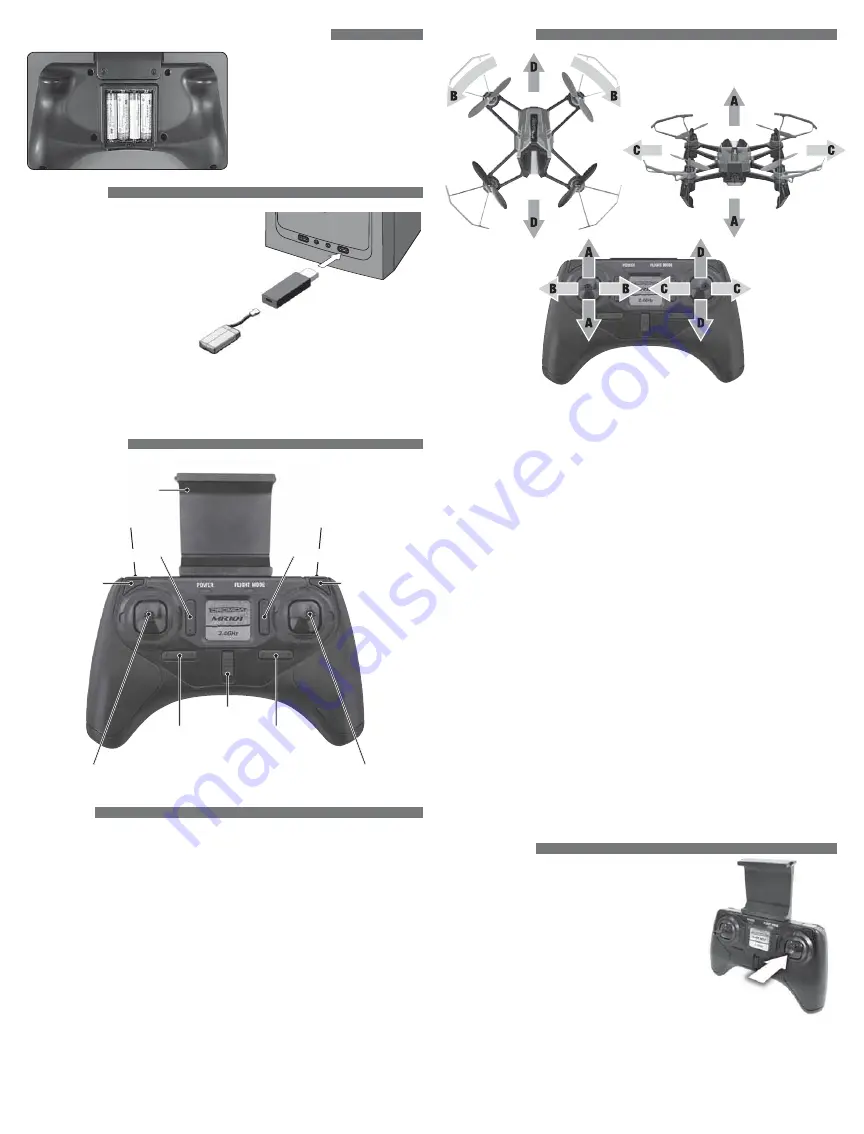
INSTALL BATTERIES IN THE CONTROLLER
Remove the screw and slide the cover
down to insert the included 4 AAA
batteries.
CHARGING
Plug charger into USB port or AC adapter
(DIDP1125 not included) as shown and connect
the battery. The red LED will flash slowly while
the battery is charging. The LED will be steady
when the battery is fully charged.
●
NEVER
leave the battery unattended
while charging.
●
DO NOT
allow the USB port to
power down while the
charger is connected to the battery.
●
ALWAYS
unplug the charger from the USB port and the battery when
charging is complete.
●
The battery connector will only fit in one way.
CONTROLLER
Phone Holder
Auto Takeoff/Land
Throttle/Rudder Stick
Rudder Trim
On/Off
Aileron Trim
Aileron/Elevator Stick
Motor Start/Stop
Picture Button
Video Button
Throttle Trim
Elevator Trim
LINKING
The controller must be linked to the Hovershot and armed each time it is turned
on. The Hovershot will NOT link with the controller until the quad is level and
has been stationary for 3 seconds.
1. Turn on the controller and connect the battery to the Hovershot.
2. Place the Hovershot on a level surface and do not move it until the controller
is armed. The LEDs on the quadcopter will flash rapidly while the sensors
are initializing. The LEDs will flash slowly when the Hovershot is linked to
the controller.
3. To arm the controller, move the throttle stick up to 100% and back down to
0%. Release the stick when the controller beeps. The LEDs on the Hovershot
will stop flashing when it detects that the controller is armed.
The Hovershot is now ready to fly.
ill be steady
ttended
o
att
t
t
t
t
t
t
ery
HOW to FLY
Basic Flight
NOTE:
If you see that the Hovershot is going to crash, hold the Motor
Stop/Start button to turn off the motors.
NOTE:
Before making the first flight with the Hovershot, please
perform the sensor calibration procedure described in the
Maintenance and Repair Section.
Place the Hovershot on a level surface without any nearby obstacles, spectators,
or pets. The quad should face away from you.
Hold down the Motor Stop/Start button until the motors start to spin.
Press the Auto Takeoff/Land button and the Hovershot will climb to about 3 feet.
As long as the throttle stick is not moved, the quad will try to stay at this height.
The Hovershot will also take off when the throttle stick is moved up. When the
quad is at the desired height, release the stick. The Altitude Hold function will
keep the Hovershot at that height until the throttle stick is moved again.
Pressing the Auto Takeoff/Land button while the Hovershot is flying will make
the quad descend. When the quad reaches the ground, the motors will stop.
Ground Effect
When the Hovershot is landing slowly and is very close to a
flat surface, it will often bounce up and down or slide away from the landing
point because some air is bouncing up off the landing surface. The Altitude
Hold function will turn off the motors when the Hovershot is just above any
solid object and the throttle stick is held below midpoint to make the landing
smoother. Unless the Hovershot is landing, keep the quad several inches above
the ground or other flat surfaces to avoid the ground effect.
WARNING:
To prevent damage to the motors, press the motor stop/start
button whenever control is lost or the props cannot spin.
DUAL RATES
Push in on the right stick to change the control
sensitivity. The default setting is low rates with a
blue Flight Mode Indicator. The indicator will change
to orange when the controller is in high rates.
The sensitivity of the high and low rate settings
can also be adjusted manually.
1. Select the setting to be adjusted.
2. Hold the throttle stick at the desired sensitivity.
(midstick is 50% of the maximum sensitivity).
3. Push down on the right stick until it beeps and release both sticks.
Please keep in mind that the low rate setting will be 50% less sensitive
than high rates for the same throttle stick position.
2


