

07-01549 F 2011-07 Warranty 07-00422
3
Dri-Eaz Products, Inc.
2. Follow a clear pattern, so you cover all floor surfaces but do
not repeat any area unnecessarily.
3. While extracting, create an overlapping pattern for best re-
sults. Overlap each pass by about half the width of the pre-
vious pass.
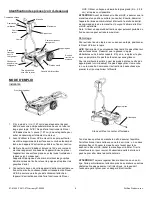
4. To turn the Rover HVE in another direction, gently move the
joystick in the direction needed. Do not do “wheelies” or jerk
the unit sideways; this may cause delamination damage to
carpet.
5. The Rover HVE will drive straight ahead, straight backward
and turn in a full circle. Ideally, extract with the grain of the
carpet. If the Rover HVE begins to track (i.e. stops moving in
the direction the joystick is moved) it needs to be re-
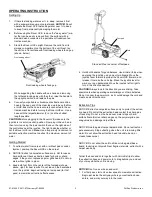
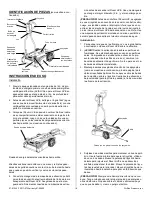
calibrated. To do this, push the joystick forward and press the
calibration button on the product label side of the control box
at the same time. (The calibration button is shown in the
drawing on page 1; look for mark indicating button location in
the center of the “H” on the product label).
6. Run the unit on Low speed if carpet and pad are extremely
wet, then on High speed as the carpet and pad become less
wet.
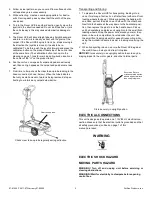
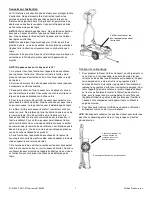
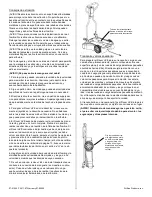
7. From time to time, check the clear take-up tube leading to the
hose connection (shown, below). When the tube indicates
that only a small amount of water is being removed, stop ex-
tracting to minimize any carpet delamination.
Check clear take-up tube regularly during extraction.
Transporting and Storing
1. To prepare the Rover HVE for transporting, loading into a
van or for storage, first lay it on a flat surface (with small front
loading wheels facing up). While supporting the handle with
one hand, pull out the pins on each side with the other hand.
Next fold the handle all the way down to the horizontal posi-
tion, then replace the pins to lock the handle down. Pick up
unit by handlebars and place unit upright onto the small front-
loading wheels. Wrap the power cord around your arm then
place in the cord compartment located under the unit. Use
the small front loading wheels for ease of transporting while
using the molded-in handle to assist in loading or carrying the
unit.
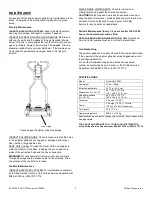
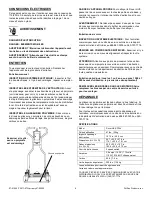
2.
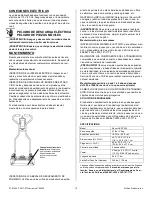
When transporting in a van, secure the Rover HVE against
the wall (Shown, below) and strap it into place.
NOTICE!
Store securely in an upright position to avoid any da-
maging impact to the motor, gears, and other internal parts.
Store securely in upright position.
ELECTRICAL CONNECTIONS
This unit is designed to operate on a 115V/60 Hz electrical con-
nection. Make sure that the electrical outlet is grounded and that
all safety precautions (outlined on page 1 of this
manual) are taken.
ELECTRIC SHOCK HAZARD
MOVING PARTS HAZARD
WARNING! Turn off and unplug unit before servicing or
clearing obstructions.
WARNING! Wait for electricity to dissipate before opening
control box.
Clear take-up tube
Secure the Rover’s
urethane plastic traction
wheels against wall and
then strap into place.
WARNING


