background image

Andco Eagle Actuator IOM NGS.IPG.0031| 5

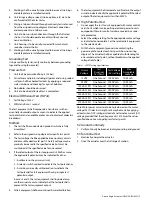
5.  Markings shall be visually inspected to be sure all warnings 

and data plates are installed correctly.

6.  Unit ratings (voltage, speed, stroke, options, etc) are to be 

confirmed with the Sales Order.

7.  Wiring is to be confirmed through continuity tests refenced 

from the assigned wiring diagram. Electrical connections 
and components are to be secure.

8.  Unit is to be run in both directions through the full rated 

stroke.  Unit should operate smoothly without unusual 
noise or vibration.

9.  Unit housing is to be visually inspected for mechanical 

soundness and esthetics.

10.  Markings shall be visually inspected to be sure all warnings 

and data plates are installed correctly.

Grounding Test: 

Using a continuity tester, verify continuity between grounding 
lugs and housing (bare metal).

Pressure Test:

1.  Unit shall be pressurized to 3psi (.02 bar)
2.  All surfaces and joints, including all gasket and o-ring sealed 

surfaces shall be checked for leaks by applying a soap and 
water solution and checking for signs of bubbles.

3.  No bubbles should be observed.
4.  Unit is to be dried after leak test is completed.

Electrical Withstand Test (Hi-Pot):

1.  Test Voltage: 1200V

2.  Withstand time: 1 second

The test equipment shall incorporate a transformer with an 
essentially sinusoidal output, a means to indicate the applied 
test potential, and an audible and/or visual indicator of dielectric 
breakdown.

Method:

1.  The test shall be conducted on products which are fully 

assembled.

2.  Refer to the assigned wiring diagram for specific test points.

3.  The test voltage shall be applied between primary circuits 

and accessible dead-metal parts. The test voltage may be 
gradually increased to the specified value but must be 
maintained at the specified value for one second. 

4.  If the rated output of the test equipment is 500VA or more, 

the applied test potential may be indicated by either:


1 - A voltmeter in the primary circuit;


2 -  A selector switch marked to indicate the test potential; or


3 -  A marking in a readily visible location to indicate the 

test potential for test equipment having a single test 
potential output.


In cases 2 and 3, the test equipment shall include a lamp 
or other visual means to indicate that the test potential is 
present at the test equipment output.

5.  All test equipment shall be maintained in current calibration.

6.  The test equipment shall incorporate a voltmeter in the output 

circuit to indicate directly the applied test potential if the rated 
output of the test equipment is less than 500VA.

5.1 High Potential Test

1.  Do not apply this test to units equipped with motor control 

cards. Tests which involve putting electrical power to units 
equipped with motor control cards are covered by a sepa-
rate procedure.

2.  Select the voltage setting for the appropriate motor voltage 

as indicated on nameplate. Set the selected test equipment 
to the selected volts.

3.  With the test equipment ground wire contacting the 

gear case plate, contact each test point shown on wiring 
diagram. The actuator shall be capable of withstanding for 
one second per test point, without breakdown, the applied 
voltage from Table 1.

Circuit 

Voltage

Test 

Duration/

Test Point

Test Voltage 

(AC) setting

Max 

Acceptable 

Leakage

12 VDC

One Second

1000 Volts

10.33 mA

24 VDC

One Second

1000 Volts

10.33 mA

120 VAC 1PH One Second

1200 Volts

10.33 mA

220 VAC 1PH One Second

1200 Volts

10.33 mA

220 VAC 3PH One Second

1200 Volts

10.33 mA

460 VAC 3PH One Second

1200 Volts

10.33 mA

575 VAC 3PH One Second

1200 Volts

10.33 mA

Note: Motor power circuits are to be tested based on the motor 
voltage (AC). Dielectric strength tests may be made by applying 
a direct current (DC) voltage instead of an alternative current (AC) 
voltage, provided that the voltage used is 1.414 times the values 
specified above. See wiring diagram for test points.

5.2 Ground Continuity

1.  Verify continuity between actuator ground lug and ground.

5.3 Functional Test

1.  Electrically energize the actuator.
2.  Drive the actuator over the full range of motion.

Table 1 - HIPOT Testing Specifications

Summary of Contents for 3100

Page 1: ...ntrols and light indication optional internal position process controls for positioning and motor control Our actuator solutions deliver ease of installation maintain constant output force and velocity and consume power only during movement These actuators feature High startingtorquemotorwiththermaloverloadprotection Non rotating extension rod Non back driving acme screw All metal gearing The info...

Page 2: ...is not recommended that the control compartment cover be positioned face down In order to maximize seal integrity the unit should be mounted with the extension rod pointed up vertical installations or with motor on top horizontal installations NOTICE 1 The body tube adapter 57 is used for face flange or trunnion type mounting 2 The actuator can be clevis mounted utilizing the clevis 29 in the exte...

Page 3: ... wiper 2 verify that the alignment between the actuator mounting support and the driven equipment places no side loading on the extension rod 6 at any point throughout the full stroke length Refer to Figure 2 on page 7 4 Do not hammer or gouge the outside surface of the extension rod 6 This may damage the plating integrity or cause surface irregularities which can damage rod seals 5 Face flange or...

Page 4: ...mit switch 52 lever 6 Repeat steps 4 and 5 to set the retract limit switch utilizing the slotted shaft 49 limit switch 53 and cam 51 Turn the motor shaft in a counterclockwise direction 7 Replace the motor pipe plug 46 8 Replace the limit switch compartment cover 38 9 Re energize electrical power to the actuator If damaged replace the complete geared position limit switch assembly rather than atte...

Page 5: ...uit 2 A selector switch marked to indicate the test potential or 3 A marking in a readily visible location to indicate the test potential for test equipment having a single test potential output In cases 2 and 3 the test equipment shall include a lamp or other visual means to indicate that the test potential is present at the test equipment output 5 All test equipment shall be maintained in curren...

Page 6: ...sted so the 0 and 1000 ohm resistance points correspond respectively to the fully extended and fully retracted rod positions Field adjustments may be made by loosening the jam nut holding the potentiometer 64 to the mounting bracket 65 Rotate potentiometer to the desired position and tighten the jam nut Potentiometer only to be connected to a class II power source For units that utilize the last p...

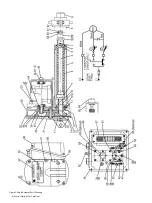
Page 7: ...AWING IS THE SOLE PROPERTY OF GE OIL GAS AND MAY NOT BE USED REPRODUCED PUBLISHED OR DISCLOSED TO OTHERS WITHOUT EXPRESS AUTHORIZATION THEREOF IT SHALL BE RETURNED TO THE OWNER UPON DEMAND PROPRIETARY AND CONFIDENTIAL INTERPRET P THIRD ANGL ASSEMBLY DESCRIPTION GE Oil Gas UNLESS OTHERWISE SPECIFIED MATERIAL WEIGHT REMOVE BUR MACHINED FI PRPSHEET Material DIMENSIONS ARE IN INCHES CHAMFERS AND FILLE...

Page 8: ...8 Dresser Natural Gas Solutions Figure 2 Eagle Actuator Parts Drawing ...

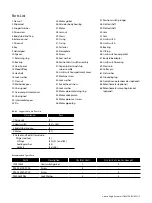
Page 9: ...x nut 19 Main drive gear 20 Unassigned 21 Gear compartment cover 22 Unassigned 23 Intermediate gear 24 Pin 25 Motor gasket 26 Actuator body housing 27 Motor 28 Jam nut 29 Clevis 30 O ring 31 O ring 32 Fastener 33 Nameplate 34 Screw 35 Seal washer 36 Position limit switch assembly 37 Capacitor terminal strip sub assembly 38 Limit switch compartment cover 39 Machine screw 40 Lock washer 41 Socket he...

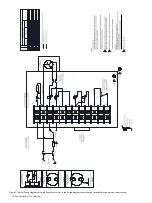
Page 10: ...am came with your units before you work on the actuators 1 2 DO NOT PERFORM HI POT TEST ON TERMINAL BLOCK LOCATIONS 10 11 12 CUSTOMER ALTERNATIVE FOR OPTIONAL DRY CONTACTS DETAIL A 1 2 3 4 CAPACITOR CONNECTIONS WITH OPTIONAL SERIES WIRE RESISTOR DETAIL C STANDARD CAPACITOR CONNECTIONS DETAIL B LEGEND E E 7 7 4 3 3 ...

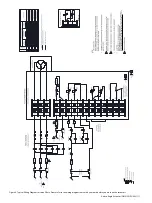
Page 11: ...agram for three Phase Please refer to the wiring diagram came with your units before you work on the actuators LEGEND 1 2 DO NOT PERFORM HI POT TEST ON TERMINAL BLOCK LOCATIONS 10 11 12 CUSTOMER ALTERNATIVE FOR OPTIONAL DRY CONTACTS DETAIL A 1 2 3 4 E E E 7 7 7 7 4 3 3 ...

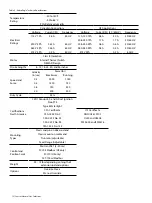
Page 12: ...24 30 and 36 inches Speed and Force Velocity in sec Force lbs Breakaway Running 0 2 2000 1000 0 4 1500 750 0 8 750 340 2 0 500 200 Duty Cycle 25 Certifications North America C2D1 Groups E F and G Dust Ignition Proof T5 Type 4 Watertight CSA Certificate US Certificate CSA C22 2 No 0 ANSI UL 61010 1 CSA C22 2 No 25 UL50 and UL50E CSA C22 2 No 94 FM 3600 and FM3616 CSA C22 2 No 142 Mounting Types Cle...

Page 13: ...Andco Eagle Actuator IOM NGS IPG 0031 13 ...

Page 14: ...14 Dresser Natural Gas Solutions ...

Page 15: ...Andco Eagle Actuator IOM NGS IPG 0031 15 ...

Page 16: ...the right to make changes in specifications and features shown herein or discontinue the product described at any time without notice or obligation Contact your Dresser Natural Gas Solutions representative for the most current information The Dresser Logo and all Trademarks containing the term Dresser are the property of Dresser LLC a subsidiary of Baker Hughes a GE Company www dresserngs com Andc...

Reviews: