background image

Wireless Light Control StarterKit 

Quick Start Guide


dresden elektronik ingenieurtechnik gmbh 

02-2014 

page 2 of 5


Add Lights to Wireless Network 

The  ZigBee  wireless  network  is  closed  by  default  and  has  to be  opened  during  setup  temporarily  so 
that new lights can join the network.  
 
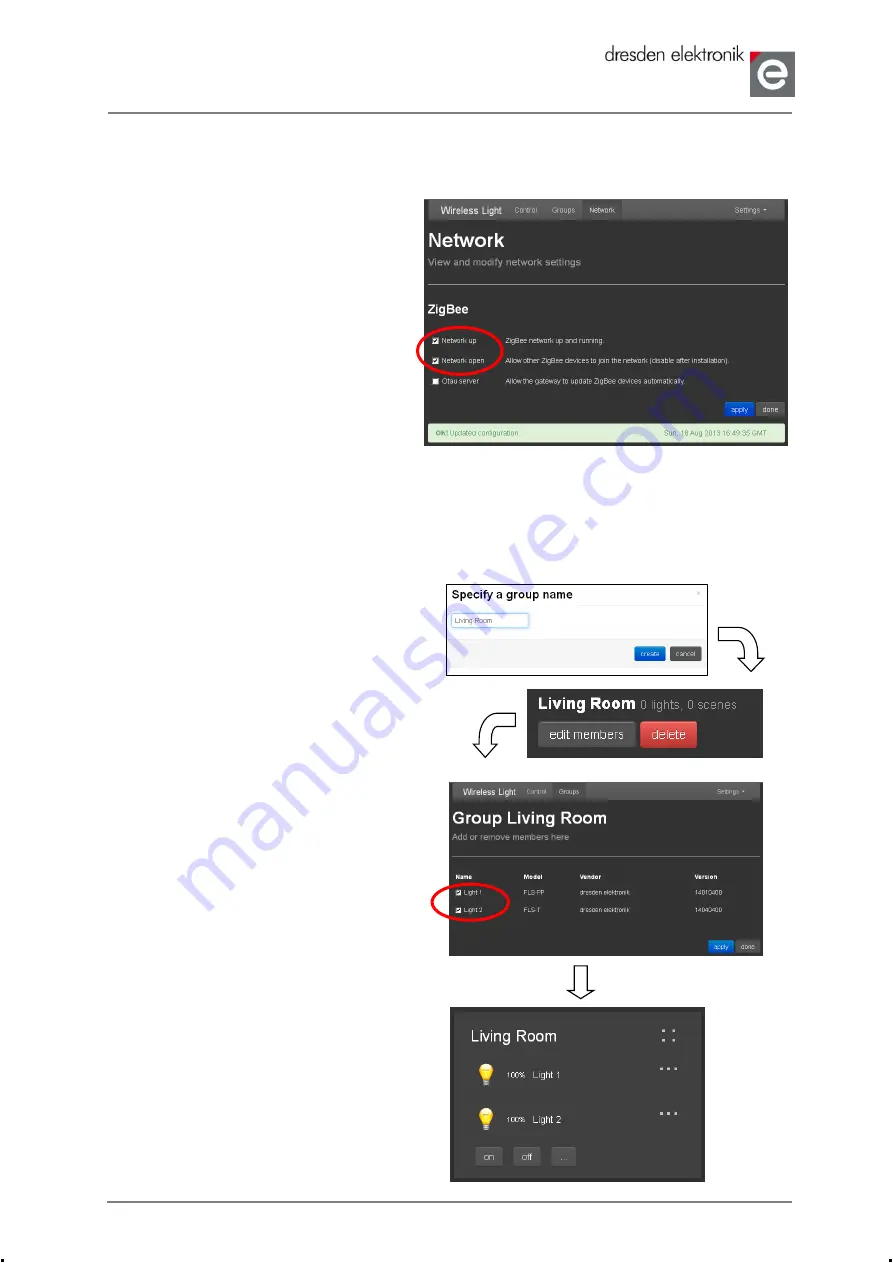
1.  Select menu 

‘Settings | Network‘. 

2.  Select 

‘Network up‘ and ‘Network open’; 

set checkmarks in these boxes. 

3.  Click button 

‘apply‘. The message ‘OK! 

Updated configuration.

‘ will be displayed. 

4.  Wait until the devices join the network 

(colored illuminants then shine green, 
monochromatic illuminants don

’t have a 

special indicator).  

5. 

Close network 

(remove checkmark in 

‘Network open‘ check box). 

6.  Switch back to the main page via button 

‘done‘. 


(Don´t use backward and forward buttons of your web browser. Use the buttons of the web app instead.) 


Group Lights 

To display and control the lights they have to be assigned to a group at first. 
 
1.  Select Menu 

‘Settings | Groups’. 

2.  Click button 

‘create new group’. 

3.  Enter group name and click button 

‘create’. 


The  new  group  is  now  displayed,  but  it  is  still 
empty. 

4.  Click button 

‘edit members’. 

5.  In the check boxes, set the checkmark for 

all lights that shall belong to the group. 

6.  Click button 

‘apply’. 

7.  Switch back to the main page via button 

‘done’. 


8.  The group and its associated lights are 

now shown and can be controlled. 


The group membership of the lights can be 
modified anytime using the group editor.


Summary of Contents for StarterKit

Page 1: ...ector beside SD card slot 4 Await the booting routine duration approx one minute Initially the LEDs on the RaspBee shield blink green for a short time and then shine continuously red Hardware Setup Wireless Electronic Ballasts 1 Connect FLS PP with LED stripe 2 Connect LED Power Supply to FLS Initially the illuminants shine monochromatic white They are automatically searching for an open ZigBee ne...

Page 2: ...5 Close network remove checkmark in Network open check box 6 Switch back to the main page via button done Don t use backward and forward buttons of your web browser Use the buttons of the web app instead Group Lights To display and control the lights they have to be assigned to a group at first 1 Select Menu Settings Groups 2 Click button create new group 3 Enter group name and click button create...

Page 3: ...rrent settings are stored as scene 6 Switch back to the main page via button done 7 Scene is shown next to buttons on off and can be opened by touch of the button Stored scene settings can also be overwritten or deleted anytime 1 Change settings 2 Switch in the scene editor with 3 Click button store next to the desired scene Using delete the scenes can be deleted Lights separately on off per bulb ...

Page 4: ...ightness scenes etc remain untouched from the update Reset FLS to Factory Settings Resetting the FLS is not necessary during normal operation Only if lights shall join a new network a reset is required before two options are possible If light and gateway can be moved within a range of less than 50 cm a touchlink reset can be performed Go to the Settings Touchlink menu and click the scan for device...

Page 5: ...in the user interface Expert Settings Via the General tab of the system menu you can change the name of your gateway you can determine a user defined password under Account and unlock the gateway temporary for searching by third party apps under Apps with the button unlock Notes 1 Each light can be a member of up to 8 groups 2 In the user interface any number of groups can be created with each up ...

Reviews: