12
13
EN
EN
1. Turn On/Off
3. Cleaning Mode
How to Use
Press and hold the button
for 3 seconds to turn on the robot. Once the
power indicator turns solid white, the robot is on standby. To turn off the
robot, press and hold the button for 3 seconds when the robot is not
moving.
Dreame Bot Z10 Pro has four cleaning modes: Quiet, Standard, Strong, and
Turbo. The default mode is Standard. You can specify the cleaning mode in
the Mi Home/Xiaomi Home app.
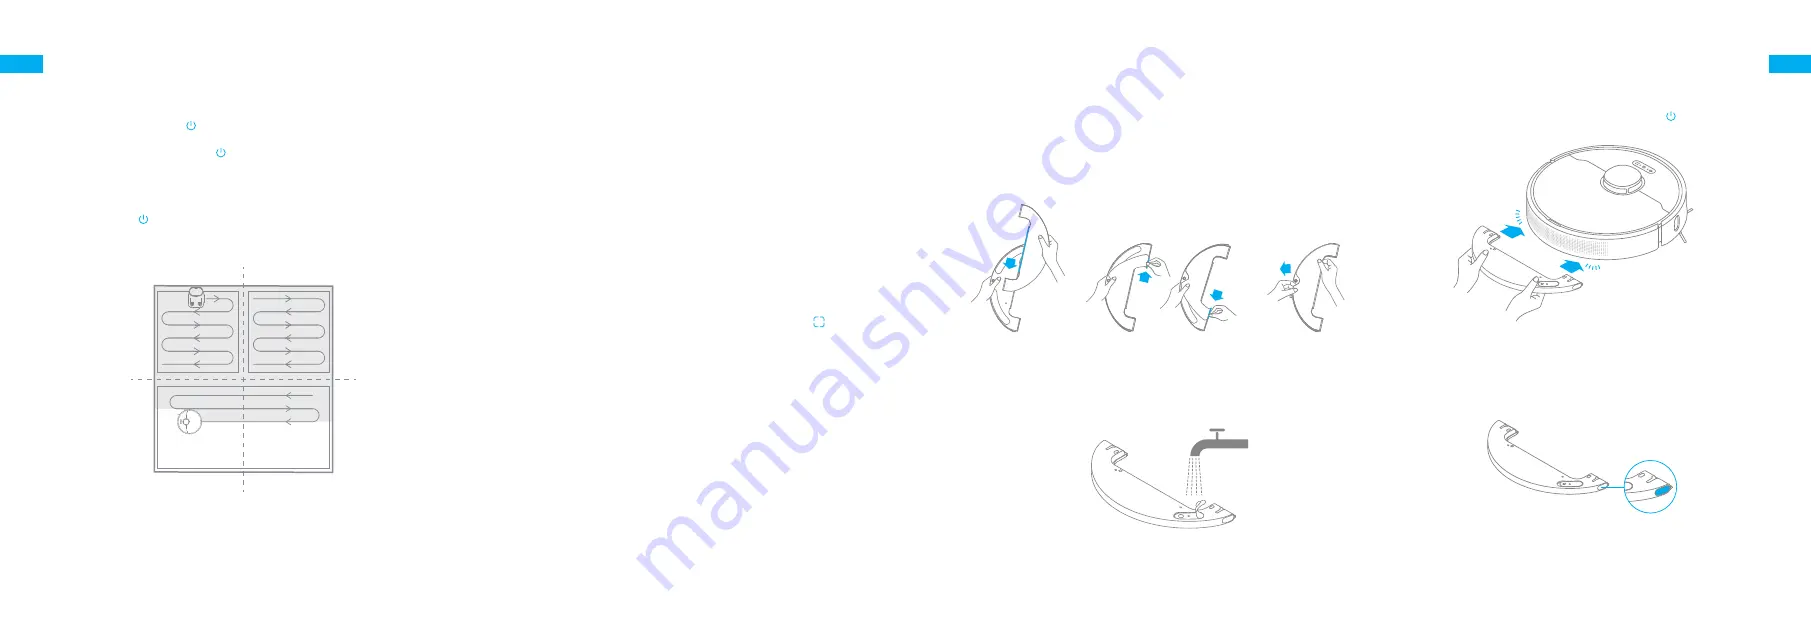
2. Start Cleaning
Press the button
briefly to turn on the robot. Upon activation, the robot
will accurately map out a route, methodically clean along the edges and
walls, then finish by cleaning each room in an S-shaped pattern to ensure
a thorough job.
5. Spot Clean Mode
When the robot is paused or in Standby Mode, press and hold the button for
3 seconds to start Spot Clean Mode. In this mode, it will clean a square-shaped
area of 1.5×1.5 meters directly around the robot. When the spot cleaning is
done, the robot will automatically return to its original location and power off.
Note:
Activating Spot Clean Mode will end the current cleaning task of the robot.
6. Additional App Functions
You can enable more functions via Mi Home/Xiaomi Home app such as
selected room cleaning, zone cleaning, forbidden area/virtual no-go
zones, etc.
Note:
• Follow the instructions on the app interface to use more functions.
• The version of the app might have been updated; please follow the instructions
based in the current app version.
4. Pause/Sleep Mode
Pause:
Press any button briefly to pause the robot during cleaning.
Sleep Mode:
The robot will automatically enter Sleep Mode after 10
minutes of inactivity, then the power indicator and charging indicator will
go off. To wake up the robot, press any button.
Note:
• The robot will turn off automatically if left in Sleep Mode for more than 12 hours.
• When the robot is paused, placing it onto the base will end the current cleaning
task.
7. Use the Mopping Function
How to Use
It is recommended that all floors are vacuumed at least three times before
the first mopping session to achieve a better cleaning effect.
1) Dampen the mop pad and wring out excess water. Insert the mop pad into
the slot of the water tank as shown in the figure, and paste the pad firmly.
3) Align the mopping module as indicated by the arrow, then slide it into the
back of the robot until it clicks into place. Press the button
or use the Mi
Home/Xiaomi Home app to start cleaning.
2) Open the water tank lid, fill the tank with water, then securely close the lid.
4) Press the two side clips inwards and slide the water tank backwards to
separate it from the robot.
Note:
• It is not recommended to use the mopping function on carpets.
• Use the app to adjust the water flow as required.
Note:
Do not use detergent or disinfectant.
Note:
When the robot is charging or not in use, remove the mopping module,
pour out all the remaining water in the tank, and clean the mop pad to prevent
mildew or odors.
Click
Click
①
②
③
Summary of Contents for Bot Z10 Pro
Page 63: ...122 123 RU RU 3 RCS2 https www dreame technology com pages user manuals and faqs...
Page 64: ...124 125 RU RU 3...
Page 65: ...126 127 RU RU 3 Wi Fi High Precision 3D 3D...
Page 66: ...128 129 RU RU e...
Page 69: ...134 135 RU RU 1 3 2 4 3 6 1 2 3 5 4...
Page 70: ...136 137 RU RU LDS High Precision 3D...
Page 71: ...138 139 RU RU 6 3 1 2 3 8 10 1 3 2 4...
Page 72: ...140 141 RU RU 0 C 40 C 0 C 40 C FAQ...
Page 87: ...170 171 HE HE RCS2 3 https www dreame technology com pages user manuals and faqs...
Page 88: ...172 173 HE HE 3...
Page 89: ...174 175 HE HE Wi Fi 3 LDS High Precision 3D...
Page 90: ...176 177 HE HE...
Page 93: ...182 183 HE HE 1 2 3 5 4 1 3 2 4 6 3...
Page 94: ...184 185 HE HE LDS High Precision 3D...
Page 95: ...186 187 HE HE 8 10 1 3 2 4 10 3 1 2 3...
Page 96: ...188 189 HE HE DND 40 0 40 C 0 C...
Page 99: ...194 195 SA SA RCS2 3 https www dreame technology com pages user manuals and faqs...
Page 100: ...196 197 SA SA 3...
Page 101: ...198 199 SA SA Wi Fi 3 LDS High Precision 3D 3D...
Page 102: ...200 201 SA SA...
Page 104: ...204 205 SA SA 1 3 3 2 5 3 1 5 1 5 6 Mi Home 4 10 12 7 3 1 3 Mi Home 2 4...
Page 105: ...206 207 SA SA 1 2 3 5 4 1 3 2 4 6 3...
Page 106: ...208 209 SA SA LDS High Precision 3D...
Page 107: ...210 211 SA SA 8 10 1 3 2 4 10 3 1 2 3...
Page 108: ...212 213 SA SA FAQ 40 0 40 0...


