background image

8

DRAWMER

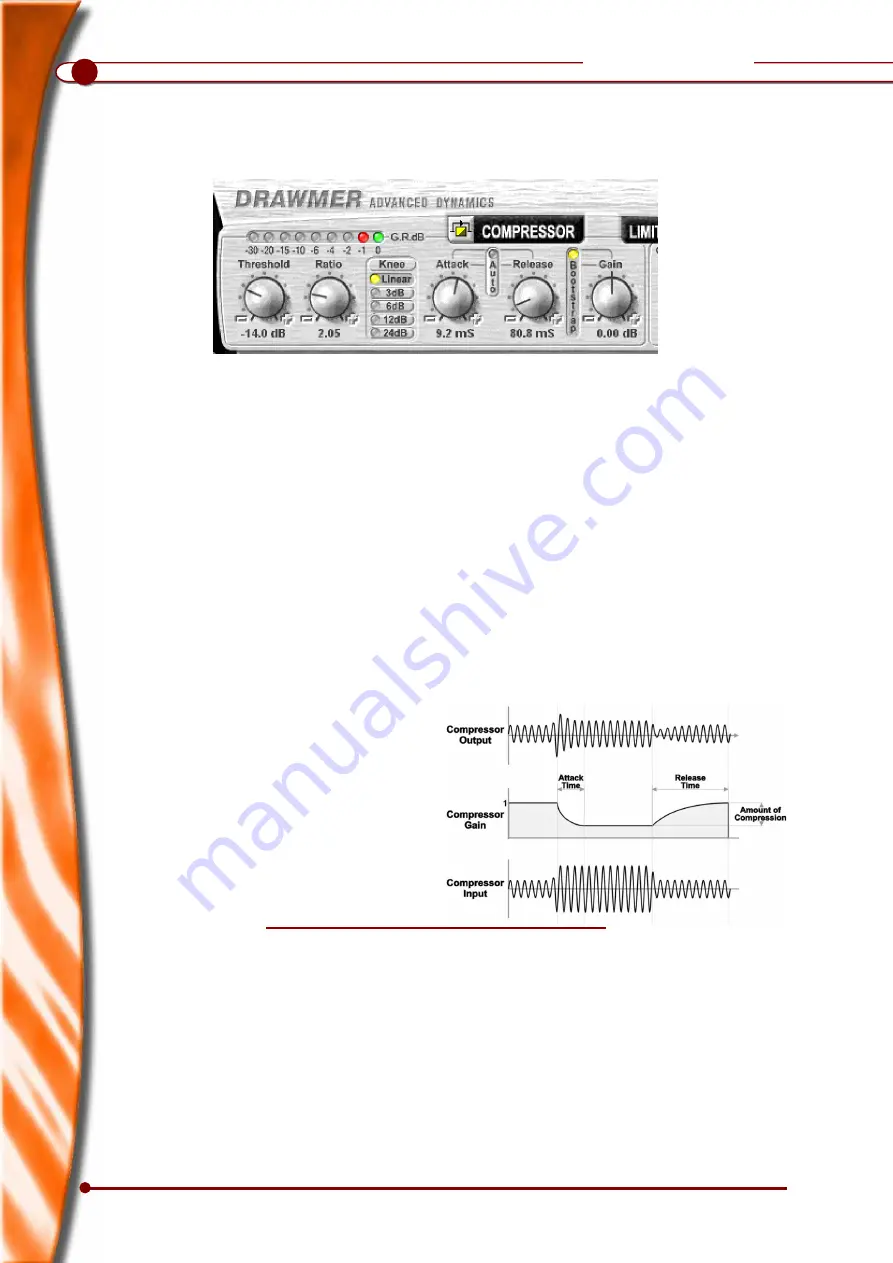
Compressor

Threshold


0.0 to -50.0dB.

Controls the level below which compression
starts to take place.

Ratio 

1:1 to 20:1

Ratio determines the amount of compression to
be used.

Knee Button


3,6,12 and 24dB

A softer knee (3dB) provides the least obtrusive
control.

Attack 

500uS to 2.0S.

Controls the speed that the compressor responds
to signals that exceed the level set by threshold.

Release 

50.0mS to 2.0S.

Sets the time taken for the signal to return to
normal after the input level has fallen below
threshold.

Auto

When selected, Auto disables the Attack and
Release controls and continually optimises the
attack and release times to suit the dynamics
of the material being processed. In general, this
setting will produce the least obtrusive level
control on signals with widely varying dynamics
or complete mixes.

A compressor attenuates high levels, thus effectively reducing the dynamic range, making it possible to
fit a large signal into a smaller space and also much easier to control signals and set appropriate fader
levels. Reducing the dynamic range also means that recording levels can be set higher, therefore improving
the signal-to-noise performance.

Gain


-5.0 to +20.0dB (Normal mode)

During compression the signal is attenuated,
gain may be required to produce the desired
output level. Only apply gain until the limiter
operates on signal peaks.

Bootstrap Button

Gain range alters: 

-12.5 to +12.5dB

The purpose of the Bootstrap Compressor is to
pull signals up towards digital full scale. This
combined with Program Adaptive algorithms
provides punch, enhances spectral detail and
delivers well controlled power.

G.R. Meter

 0.0 to -30dB

Bypass

Enables the compressor. When pressed in the
signal is passed directly to the limiter without
alteration.

Using the SDX100

Quick Start

The fastest parameter setup can be obtained
by using the factory presets. (See “Patches”)
Alternatively, setting of controls can be done
very quickly using the following suggestions:

• Bypass the Gate or Expander.

• Select Auto Attack & release

• Select Auto Gain Make-up

• Ensure the Limiter control is fully clockwise.

• From the programme material, decide how

severe compression is going to be. We
suggest less than 2.5:1 for vocals, even less
for full mixes, and more for dynamic single
tracks.

• Using the vertical VU meter and the

Compressor Gain Reduction (GR) meter,
rotate the Threshold until some GR activity
can be seen. As a rule, the Threshold will
need to be about 6dB to 10dB below the
average input level to both see, and hear,
much change.

Summary of Contents for SDX100

Page 1: ......

Page 2: ...ii...

Page 3: ...s may not apply to you This warranty gives you specific legal rights and you may also have other rights which vary in different jurisdictions This warranty is in lieu of all warranties whether oral or...

Page 4: ...iv...

Page 5: ...e SDX100 from Soundscape Introduction About DRAWMER DRAWMER DRAWMER DRAWMER DRAWMER About the SDX100 Plug in Using the SDX100 Front panel overview Input Expander Noose Gate Compressor Limiter Output P...

Page 6: ...ard for interfacing with sequencers or remote controllers RS422 card or Com port converter for interfacing with VTR s Tape Machines or other RS422 devices and or Video Capture card contact your Sounds...

Page 7: ...scape To use the Drawmer SDX100 plug in a mixer must first be created from within the Soundscape environment To do this select the Create tool enter mixer Edit mode and click in a free space in the mi...

Page 8: ...lope Controls as well as external trigger sources Control the speed at which the Gate opens and closes Compressor Limiter incorporating Bootstrap control Drawmer SDX100 Plug in for Soundscape Acknowle...

Page 9: ...is shown as well as input overload leds Input Gain Sliders 7dB to 18dB The input Gain Sliders directly correspond with the Input Meters above The sliders range from 7dB to 18dB with the level shown in...

Page 10: ...expander is closed Range is used to remove signals entirely or to attenuate signals that are too loud This can be used to prevent excessive expander activity and improve transparency G R Meter 0 0 to...

Page 11: ...d when green the gate is open and when yellow shows the that the gate is closing after the signal has dropped below the threshold value as set by Hold Gate Duck Button Toggles between normal gating an...

Page 12: ...performance Gain 5 0 to 20 0dB Normal mode During compression the signal is attenuated gain may be required to produce the desired output level Only apply gain until the limiter operates on signal pea...

Page 13: ...particular level A further feature of the SDX100 is a peak limiter which allows the user to set an absolute output signal level that will not be exceeded If the peak limiter threshold is exceeded for...

Page 14: ...cation Saving a Patch Patches Loading a Patch To retreive previosly saved paramter settings click on the load button A pop up window will appear showing the available patches in the DrwmSdx100 folder...

Page 15: ...ll not have been installed properly It may be that the password has not been entered correctly an error message Invalid Optional Pass word will appear check that the password is correct Entering the P...

Reviews: