DP VIDEO DBD805 Operating Manual Download Page 6

Before You Start

01

6

Replacing the Fuse

Make sure the amperage matches the 
specified value when replacing the fu-
ses. If the fuse is blown, check the po-
wer connection and replace with a n-
ew one. If the same problem occurs, 
it would be subjected to the malfun-
ction. In such cases, please consult 
to the nearest service dealer.

When the range of the remote control 
becomes short or stops functioning,
please replace the battery with a new 
one (CR2025). Check the polarity
when replacing.

Precautions on Using Lithium 
Battery 

Always keep the lithium battery beyond 
children s reach. In case 
swallowed, see a doctor immediately.

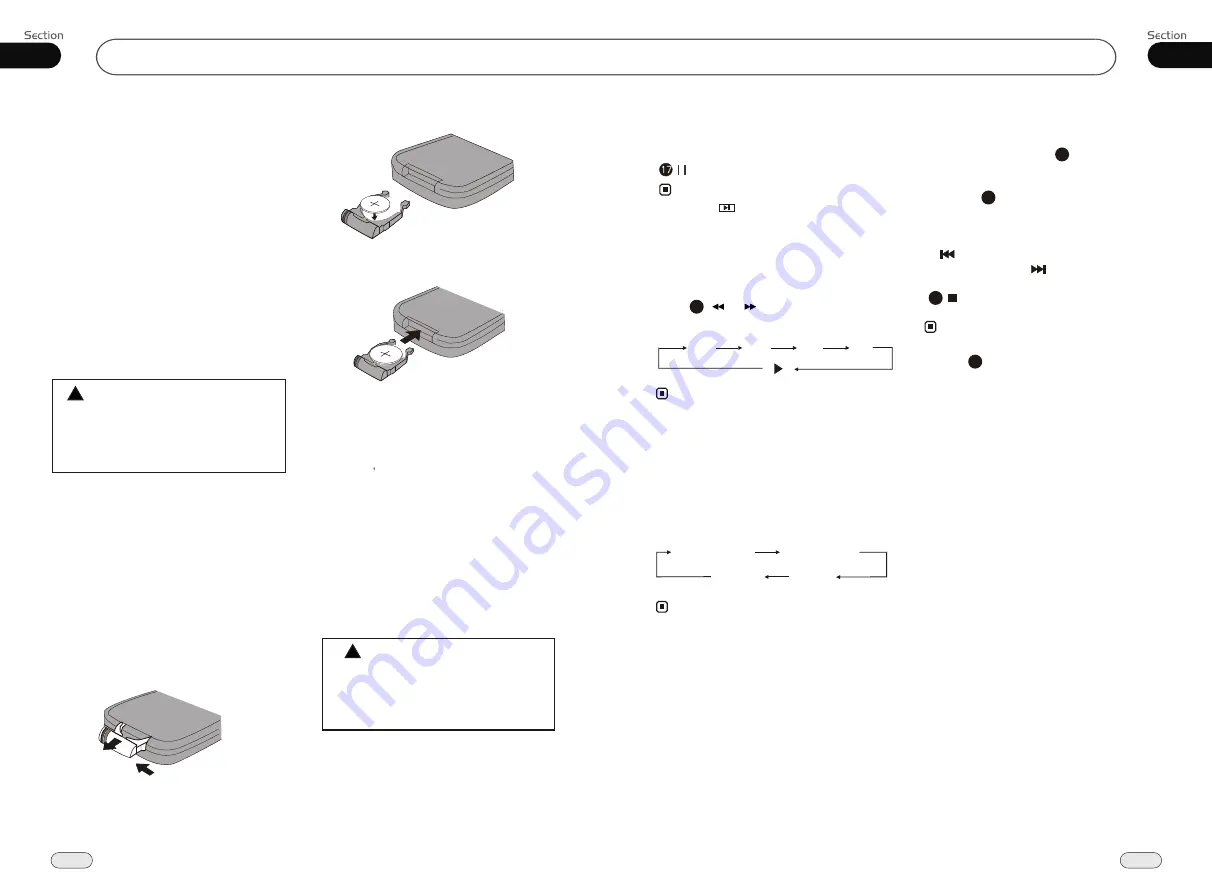
Gently pull out the Battery Holder while
pressing the Stopper. 

Put the button-type battery with mark(+) 
upward into the Battery Holder.

Replacing the Battery

Insert the Battery Holder into the Remote 
Control.

!

Maintenance


Warning

Never use the fuse with the rated 

amperage more than that supplied to 

your unit, otherwise it will damage the 

unit.

35

CD/MP3/SD/USB

06

Single elapsed 

Total 
elapsed

Total 
remain

Single remain 

Note:

*   This function is operated by using the remote 
     control.

On Screen Display

Program Playing

During CD mode, press      

PROG

, the TFT

displays the program menu. Press 

NUMBER 

BUTTONS

 to select the track Number and

then press      to move the cursor to 

START

,

press 

ENTER

 to start program playing; 

move the cursor to EXIT and press ENTER
to exit the program playing. Move the cursor
to       and press ENTER to the previous page; 
move the cursor to       and press ENTER to 
the next page. During this process, press
           to cancel the program playing.

13

18

The function is only valid on remote control.

Note:

*

27

*   Press      CLEAR to clear the mistake input.

22

¼ ò µ ¥

¹ Ê Õ Ï

Å Å ³ ý

Ö ¸ Ä Ï

Eject SD Card

Push SD card to eject it.
During SD playing mode, to eject SD card 
to switch to Disc mode; if there is no disc in 
the main unit, it will switch to USB mode, 
or else, it will switch to Radio mode.
During other modes, to eject SD card to keep
the previous mode.

¼ ò µ ¥

¹ Ê Õ Ï

Å Å ³ ý

Ö ¸ Ä Ï

Eject USB

Pull USB to eject it.
During USB playing mode, to eject USB to
switch to Disc mode; if there is no disc in 
the main unit, it will switch to SD Card mode,
or else, it will switch to Radio mode.
During other modes, to eject USB to keep
the previous mode.

*   Pressing       in the monitor performs the same 
     function.

Pause the Playback

During CD/MP3/SD/USB playback, Press
          to switch between play and pause. 
       

Note:

Press      (     or     ) on remote control to 
perform fast forward or rewind.  

Skip backward/forward/F.F

/REW the playback

20

    2 X           4 X           8 X           16 X      

Note:

*   This function is operated by using the remote 
     control.

Clean the battery with a dry cloth 
to maximize connectivity.

Check the   polarity when loading the 
battery.

To prevent short circuit, do not use 
metal tweezer to clip the battery. 

       Warning !

Improper handling of the battery 

may lead to malfunction or damage 

of the battery. It cannot be charged,

 disassembled or thrown into a fire.

!

During 

CD 

status, pressing the 

OSD


button

displays :

Summary of Contents for DBD805

Page 1: ...ates There is a safety feature on this device which enables viewing videos only when Parked All other features Professional installation is required may still be used while driving such as audio and radio but must be done with care Please contact an authorized installer for Professional Installation ...

Page 2: ...nging the Viewing Angle 25 Selecting Channel 25 Program Playing 25 Playing PBC Menu 25 Selecting Menu 26 DVD Setup Menu 26 09 39 Additional Information Simple Troubleshooting Guide No power Check and make sure whether the fuse is blown replace with the proper value if necessary Some errors occur in LCD or no function pressing the button the when Unable to receive stations CDs cannot be loaded Soun...

Page 3: ... 36 Manual Automatic Tuning 36 DX LOC Selector 36 Selecting The stored Station 36 MO ST Selector 37 Scanning Storing Stations Automatically 37 On Screen Display 37 Goto FREQ 37 Number Buttons 37 Additional Information Simple Troubleshooting Guide 39 9 08 38 AUX AUX SET Press SRC to switch to the AUX mode AUX Touch Screen Menu For more details to adjust AUDIO VIDEO and SYSTEM Auto 1 PAL NTSC SECAM ...

Page 4: ...umber Buttons to receive the stored stations 4 When receiving a station press and hold any one of the Number Buttons from 1 to 6 until the number app ears on the LCD which indicates that station is already stored in the corresp onding number button While listening toa station pressand hold a numberfor more than2 seconds to store thestation to thatnumber 1 2 3 Pressing in the monitor performs the s...

Page 5: ...s this button to select the signal source Note FM2 MW2 AM2 MW1 AM1 FM3 FM1 During radio status repeatedly press BAND button to select bands in lowing order the fol Band Selector 3 For Two Bands Pressing BAND on the monitor performs the same function LOC appears on the display and only local stations are available when it disappears both distant and local station can be received DX LOC Selector Dur...

Page 6: ...o exit the program playing Move the cursor to and press ENTER to the previous page move the cursor to and press ENTER to the next page During this process press to cancel the program playing 13 18 The function is only valid on remote control Note 27 Press CLEAR to clear the mistake input 22 ò µ Ê Õ Ï Å Å ý Ö Ä Ï Eject SD Card Push SD card to eject it During SD playing mode to eject SD card to swit...

Page 7: ...urrent time of your selection During MP3 SD USB mode first press GOTO and the TFT shows Then press NUMBER BUTTONS to input the MP3 SD track s Number to play it secondly press GOTO button and the TFT shows now input the desired time to play the current track at this point 2 ò µ Ê Õ Ï Å Å ý Ö Ä Ï Stop Play During CD MP3 SD USB playback Press to stop the playback 18 Pressing in the monitor perform th...

Page 8: ...ss this region and the screen shows the following menu number keys appears touch the number to select tracks Touch the X to exit this menu MP3 MP3 MP3 MP3 MP3 MP3 MP3 Demo amour Automatic Be natural_s_e Can you celebr clon_bing bing 00 00 001 105 00 00 1 2 3 4 5 6 7 8 9 0 X 00 00 001 105 00 00 MP3 MP3 MP3 MP3 MP3 MP3 MP3 Demo amour Automatic Be natural_s_e Can you celebr clon_bing bing Bit rate no...

Page 9: ...12 13 14 15 16 17 18 19 21 22 23 24 25 26 27 Preferencespage Default Example showing how to set load factory setting Press or thenpressENTER Press PreferencePage Go to language page Reset to the factory settings TVType Audio Subtitles DVDMenu Parental ChangePSW Default Auto Eng Eng Eng PreferencePage TVType Audio Subtitles DVDMenu Parental ChangePSW Default Auto Eng Eng Eng Reset ...

Page 10: ...erencePage Go to language page Set theDVDmenulanguage TVType Audio Subtitles DVDMenu Parental ChangePSW Default Auto Eng Eng Eng PreferencePage TVType Audio Subtitles DVDMenu Parental ChangePSW Default Auto Eng Eng Eng Parental Example showing howto set parental control Press or thenpressENTER Press PreferencePage Go to language page Set parental control TVType Audio Subtitles DVDMenu Parental Cha...

Page 11: ...VDSignalSystem AUTO PAL NTSC 40Hz to 16KHz Frequency Response Optional Optional Preferencepage TVType Example showing howto set TV type Press or thenpressENTER Press PreferencePage Go to language page SelecttheTVsystem TVType Audio Subtitles DVDMenu Parental ChangePSW Default Auto Eng Eng Eng PreferencePage TVType Audio Subtitles DVDMenu Parental ChangePSW Default Auto Eng Eng Eng PAL NTSC Audio E...

Page 12: ...Black line with yellow head Reverse Signal In Brown line with yellow head Subwoofer Antenna USB Black Black Brown line with brown head Front RCA L R Dark Grey line with red white head Rear RCA L R Light Grey line with red white head Rear Zone Out 2 L Rear Zone Out 2 R Rear Monitor 2 Rear Zone Out 1 L Rear Zone Out 1 R Rear Monitor 1 Light Grey line with white head Light Grey line with yellow head ...

Page 13: ... on off LogoType Example showing howto set LogoType Press Press or thenpressENTER GeneralSetupPage TvDisplay AngleMark Osd Lang Wide On Eng GoToGeneralSetupPage GeneralSetupPage TvDisplay AngleMark Osd Lang ScreenSaver Wide On Eng On LogoType Default Captured LogoType Def LogoType Def Off Captions Off Press Press or thenpressENTER GeneralSetupPage TvDisplay AngleMark Osd Lang ScreenSaver Wide On E...

Page 14: ...TvDisplay GeneralSetupPage AngleMark Osd Lang ScreenSaver Wide On Eng On LogoType Def TvDisplay ScreenSaver Wide On Eng On Def LogoType Normal PS Normal LB Wide GeneralSetupPage GoToGeneralSetupPage SetTVDisplaymode Press Press or thenpressENTER Captions OSDLang GeneralSetupPage TVDisplay TvDisplay AngleMark Osd Lang ScreenSaver Wide On Eng On LogoType Def GeneralSetupPage AngleMark ScreenSaver Wi...

Page 15: ...ristics Press or SEL button on the main unit also performs the same function Reset the Unit You may need to reset the unit if operating for the first time or after replacing the car battery Note When ome errors occur on the also press RESET it will s display you can button to resume to normal and erase the clock settings and some of your stored functions This function can only be operated by the m...

Page 16: ...3 This function is operated by using the remote control Note PBC playing confirms to version 2 0 of VCD and SVCD disc only 3 Receptor on the main unit for the card remote control Infrared Sensor 4 Press button to mute the unit And appears on the LCD Press it again to return to previous volume level Mute Function Pressing MUT on the main unit also performs the same function 12 Note EQ Setting Repea...

Page 17: ...rdings The number in the mark on a DVD s package indicates the number of recorded languages audio systems 2 Note 6 Changing the subtitle language Multi subtitle With DVDs featuring multi language subtitle recordings you can press SUB T to switch between subtitle languages during playback Subtitles 1 Subtitles 2 Subtitles OFF Selection options switch as follows This function is operated by using re...

Page 18: ...l to set the TV standard to PAL or NTSC or AUTO system System Switch NTSC PAL AUTO The function can be operated by selecting the DVD MENU SETUP Note On Screen Display During DVD status pressing OSD button displays the following 8 Title elapsed Chapter elapsed Chapter remaining Title remaining Display off This function is only valid on remote control 3 Source Adjust In the main menu press SOURCE in...

Page 19: ...mong USB SD card and disc 14 Note Pressing in the monitor perform the same function Quickly Selecting Tracks 21 Note DuringDVD MP4playback press toplayprevioustrack press toplay nexttrack DuringVCDplayback firstpress toreturntothebeginningofthecurrent track press againwithin3seconds toplayprevioustrack press toplay nexttrack 21 21 21 21 1 2 3 4 5 6 7 8 9 0 X Press this region and the screen shows ...

Page 20: ...in radio mode Next Setup Press to display the following menu press to return the previous menu EXIT LOCAL AREA LOCAL GOTO FREQ EXIT EXIT LOCAL AREA LOCAL GOTO FREQ EXIT LOCAL AREA LOCAL GOTO FREQ EXIT EXIT LOCAL AREA LOCAL GOTO FREQ U S A EUROPE Adjust Screen Press ADJ SCREEN to display the above menu there is a square button in the top left corner Press the square button at place then the button ...

Reviews: