OM-NHFP
OM-NHFP
6
WARNING
ELECTRICALLY GROUND THE UNIT AT THE
TERMINAL PROVIDED. FAILURE TO
GROUND UNIT COULD RESULT IN
ELECTROCUTION AND DEATH.
6. Provide 115 Vac, 60 Hz, 5 Amp
electrical service. Local codes and/or
National codes should be observed in
accordance with ANSI/NFPA70 - latest
edition. AN ELECTRICAL GROUND IS
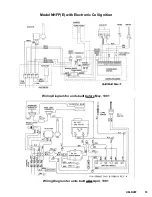
REQUIRED. The Electrical Schematic is
located on the inside of the Service
Panel.
In Canada, provide electrical service in
accordance with the Canadian Electrical
Code, CSA-C22.1 Part 1, and/or local
codes.
7. The installation must conform with the
American National Standard Z223.1 -
latest edition National Fuel Gas Code.
The unit should be installed in an
adequately ventilated room with an
adequate air supply. The best ventilation
will use a vent hood and exhaust fan.
DO NOT obstruct the flue or vent.
8. In Canada, the installation must conform
to CAN/CGA B149, Installation Codes
for Gas Appliances and Equipment,
and/or local codes.
9. The braising pan and its shutoff valve
must be disconnected from the gas
supply piping system during any testing
at pressures in excess of ½ psig (3.48
kPa). The appliance must be isolated
from the gas supply piping system by
closing its individual manual shutoff
valve during any pressure testing of the
gas supply piping system at test
pressures equal to or less than ½ psig
(3.48 kPa).
9. Space for servicing and operation is
required. DO NOT block any air intake
spacing to the combustion chamber or
obstruct air flow.
10. After the pan has been connected to the
gas supply, check each gas joint for
leaks. Use a thick soap solution or other
suitable leak detector. Do not use a
flame to check for leaks.
Initial Start-Up
Now that the Braising Pan has been installed,
you should test it to ensure that the unit is
operating correctly.
1. Remove all literature and packing
materials from the interior and exterior of
the unit.
2. Put enough water into the pan to cover
the bottom to a depth of 1/4 to 1/2 inch.
With the tilting mechanism run to the
horizontal position, note how the water
lies in the pan, to confirm that the pan
was leveled properly during installation.
3. Following "To Start Pan" instructions for
your pan model, begin heating the water
at a thermostat setting of 235
o
F. At this
setting, heating should continue until the
water boils.
4. To shut down the unit, turn the
thermostat dial to "OFF".
WARNING
WATER IS EXTREMELY HOT AND CAN
CAUSE SEVERE BURNS. AVOID WATER
WHEN EMPTYING UNIT.
5. Press the power tilt switch down to pour
out the water and to confirm that the pan
body can be tilted from horizontal to
vertical. Pull the switch up to lower the
pan.
If the unit functions as described above, it is
ready for use. If it does not, contact your local
Groen Authorized Service Agency.


