union plug after backwashing.
MODEL GEN 240
Loosen the waste port “Union Nut” and remove both the
union nut and socket fitting. Caution: Take care not to
lose the o-ring seated in the valve body. Slip union nut
onto 1-1/2" PVC (N.P.S.) drainage pipe (not supplied)
with female threads facing end of pipe. Then solvent
weld the union socket onto the pipe end, using ABS to
PVC Cement available at your pool store. Avoid
allowing solvent to run onto the end sealing surface.
Position onto the waste port, making sure o-ring is in
place and firmly hand tighten union nut.
ELECTRICAL OUTLET
Refer to your pump owners guide for detailed informa-
tion pertaining to the requirements and regulations for
safe electrical installation of the power supply, recep-
tacle outlet, switching and ground fault interrupter.
FINISH FILLING POOL
Finish filling your pool, referring to skimmer installation
and pool assembly instructions for proper water level.
VALVE OPERATIONS
Your filter has multiple positions of operation, which are
explained below. To change positions of the valve,
make sure the pump is OFF. Press down on the valve
handle enough to free the locking notch. Rotate the
handle so the tab LOCKS into the notch in the desired
position.
5
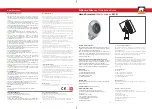
SKIMMER CONNECTION
HARD PLUMB
ADAPTOR
TO FRONT PUMP PORT
(SUCTION)
Insert the o-ring (63) into the union adaptor groove, then
secure the cemented pipe assembly onto the union
adaptor (62) with the union nut (65).
SOLVENT WELDING
Contact your pool dealer for ABS to PVC Solvent
Cement and PVC Primer and follow directions on labels.
TO WINTERIZE POOL
Drain pool down below the return fitting. Loosen union
nut (65) and pull back the union socket (64). Insert the
winterizing disc (66) between o-ring (63) and union
socket. Retighten union nut onto union adaptor firmly.
INSTALL SUCTION LINE
An 8 foot long hose is provided for filter Model GEN 180
and a hard plumb adaptor with clamps for filter Model
GEN 240 for adapting hard plumbing to the skimmer
outlet.
MODEL GEN 180 ONLY
The pump suction is provided with a hose barbed fitting
and a 1-1/2" pipe socket fitting. Install the hose barbed
fitting to the pump suction per the pump instructions and
discard the socket fitting. Slip a hose clamp over each
hose end and push one end onto skimmer outlet and the
other end onto the pump suction port. Tighten clamps
firmly using a flathead screwdriver or 5/16" nutdriver.
MODEL GEN 240
The pump suction is provided with a hose barbed fitting
and a 1-1/2" pipe socket fitting. Use the socket fitting
and discard the barbed fitting. Refer to HARD PLUMB
INSTALLATION and SOLVENT WELDING for assem-
bling piping between skimmer and pump suction. Slip
clamp onto small end of hard plumb adaptor and push
onto skimmer outlet. Slip clamp onto large end of
adaptor and insert pipe. Tighten clamps firmly.
WASTE LINE HOOKUP
The discharge waste water will contain pool water
treatment chemicals that may harm certain plants and
vegetation. Therefore, position the discharge end of the
waste line in a safe, out-of-sight area capable of accept-
ing 200 to 400 gallons of waste water.
MODEL GEN 180
Install a 1-1/2" inside diameter waste discharge hose
(not supplied) on the waste port located on the 6
position valve. Slip a 1-1/2" hose clamp (not supplied)
over one end of the hose. Then, push hose onto the
port fully and tighten clamp firmly.
IMPORTANT
The union plug (#340-2046) must be removed from the
waste port and replaced with the union hose adaptor
(#340-1969) prior to backwashing the filter. Replace the
FROM
PUMP
TO POOL
RETURN
TO WASTE
CLAMPS
SUCTION LINE INSTALLATION
(HARD PLUMB)