background image

Installation, Operation and Maintenance manual

17

WSO Flex

d.  Inlets

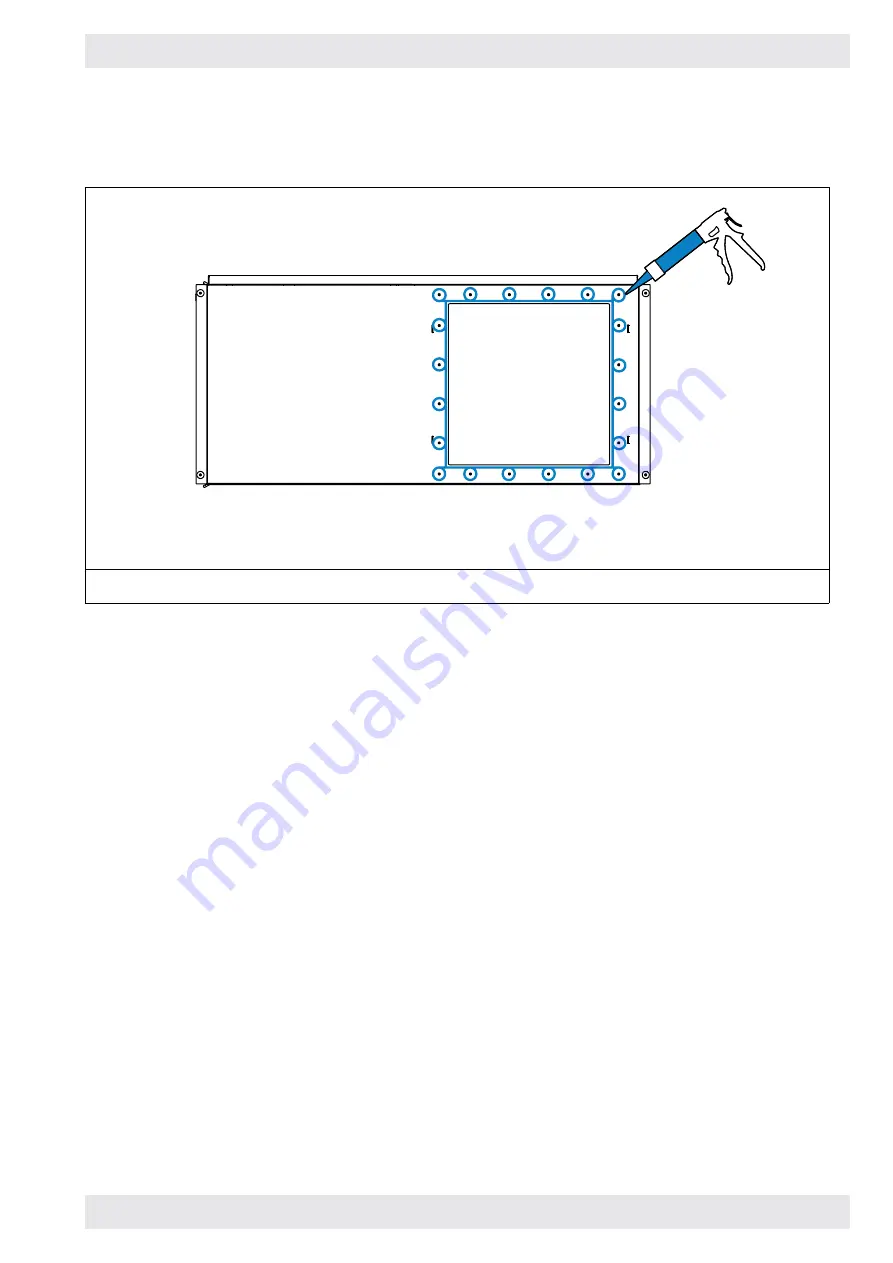
Before installing inlet option and to ensure correct sealing, apply MS polymer sealant 

around every hole and along inside of hole pattern, as shown in figure.

BOTTOM VIEW

Figure 9:  Sealing details

Summary of Contents for Torit DCE WSO Flex

Page 1: ...WSO Flex Mist Collectors INSTALLATION OPERATION AND MAINTENANCE MANUAL DOC AM04506 01 REV 03 0520 MASTER LANGUAGE ENGLISH...

Page 2: ...nstallation tips 9 Installation and assembly 11 CONTROLLER ELECTRICS AND PNEUMATICS 23 Controller terminal allocation plan 23 Controller mounted on the unit 24 Remote controller with wire 26 Retrofit...

Page 3: ...d 15 Figure 8 Vibration isolation 16 Figure 9 Sealing details 17 Figure 10 Teleduct 18 Figure 11 Inlet hopper with flex duct pack 19 Figure 12 Inlet hopper impact separator 20 Figure 13 Collection bot...

Page 4: ...SO Flex mist collectors can only be used for oils with an LEL 15g m f Oil mist is potentially flammable and WSO Flex mist collectors are only suitable for working in ambient temperature conditions and...

Page 5: ...n the nameplate of the unit and scope of delivery The user of the mist collector is responsible to dispose of any contaminant generated by the process according to local regulations Operation of theWS...

Page 6: ...your questions Function During operation contaminated air enters the WSO Flex mist collector through the dirty air inlet located on the bottom of the unit The air then passes through the first stage...

Page 7: ...aintenance manual 7 WSO Flex 6 7 5 1 3 4 2 1 Dirty air inlet 2 Fan set 3 Clean air chamber 4 Optional HEPA 5 Clean air outlet 6 Second stage filter element Dryflo or Synteq XP 7 First stage filter Fig...

Page 8: ...liary equipment live loads Required tools and equipment crane fork lift slings clevis pins and adequate lifting equipment standard tools e g screwdrivers wrenches etc drill pipe sealant level reciproc...

Page 9: ...der bar if necessary If a forklift is used fasten the unit securely to the forklift using straps that are tied around the unit and mast of the forklift Installation tips Enclosed machines do not place...

Page 10: ...O Flex 1 Collection hood 1 Figure 3 Wet surface grinder Examples of additional mounting options 1 Ceiling mounting 2 Teleduct mounting 3 Adjustable mounting stand with impact separator and collection...

Page 11: ...for hanging the unit Thread an M10 M12 DIN 934 nut onto the threads of each rod for at least 25 mm 3 Apply MS polymer sealant around the existing mounting holes on the top of the unit 4 Place an M10...

Page 12: ...manual 12 WSO Flex 6 1 3 5 2 4 1 M10 M12 threaded rod 2 M10 M12 nut 3 M10 M12 lock washer 4 M10 M12 washer 5 Existing mounting hole 6 300 mm minimum clearance between ceiling and top of collector Figu...

Page 13: ...ch eyebolt Position the cables or chains so that they form a 60 angle with the top of the mist collector and a 45 angle with the side surfaces Always use cable or chain that is rated for the appropria...

Page 14: ...or before it is assembled to the mist collector Level the mounting stand before securing anchor bolts 2 Adjust the mounting stand by loosening the four locking bolts on the upper part of the stand Sli...

Page 15: ...Installation Operation and Maintenance manual 15 WSO Flex 1 2 3 8 4 5 7 6 1 Washer 2 Nut 3 Stand extension 4 Nut 5 Washer 6 Washer 7 Locking bolt 8 Stand base Figure 7 Adjustable mounting stand...

Page 16: ...O Flex c Vibration isolation These are standard delivered for all units This option is a must for top mounted units that are installed on machines that are sensitive to vibration When installing make...

Page 17: ...ntenance manual 17 WSO Flex d Inlets Before installing inlet option and to ensure correct sealing apply MS polymer sealant around every hole and along inside of hole pattern as shown in figure BOTTOM...

Page 18: ...ct collar with the bottom flange of the hopper and fasten with bolts washers and nuts 3 Align the top flange of the hopper with the hole pattern on the bottom of the mist collector and fasten it with...

Page 19: ...et hopper with flex duct pack Inlet hopper impact separator This option is used on processes that generate a large number of particles It must be positioned on a stand or mounted from the ceiling Leve...

Page 20: ...d washers supplied 4 Fasten the flex duct to the side inlet of the impact separator using the clamp 5 Fasten the other end of the flex duct to either an angular nozzle inlet collar or fitting not incl...

Page 21: ...on This collection bottle can hold up to 3 7 litres of collected liquid The collection bottle is intended for applications in which relatively small amounts of oil is collected The collection bottle f...

Page 22: ...alve s position and thus the speed of the airflow unscrew the 2 knobs and lower or lift the slide according to the required airflow needed for your application The range of speed regulations is betwee...

Page 23: ...ct has to be opened 4 5 Connection to EBM Papst EC fan 4 PWM out 5 PWM GN 6 7 Alarm relay contact NO 8 Input motor alarm 9 10 11 Pot free contact motor operation 12 13 Connection motor contactor 14 PE...

Page 24: ...d DP coupling HEPA with DP2 The DP coupling HEPA has only one tube connected inside the unit 3 Wire the supply cable according the allocation plan shown in the controller manual There are 2 possible m...

Page 25: ...ation the supply cable is not connected to the electric net supply 3 Connect DP tubes from the DP couplings in the controller back plate to the 2 DP sensors on the controller panel DP1 is the sensor f...

Page 26: ...connection box controller box motor cable close off both DP couplings with blanking plug MAIN HEPA Figure 17 Remote controller 1 If a HEPA was delivered with the unit change the mounted bulkhead conne...

Page 27: ...x 3 Change p tubes inside the unit according below picture and connect to the mounted bulkhead connectors 4 Plug the 4 holes of the p couplings with delivered blanking plug to block the gap 5 Double c...

Page 28: ...mark them to connect as explained in the mounted version see point 1 controller mounted on the unit 10 Wire delivered electric cable through the open gland of the connection box and connect phases to...

Page 29: ...g the allocation plan reference step 2 for mounted controller 19 Now double check all connections are secure and safe Once evaluated close all boxes with their equivalent lid 20 Now the unit can be op...

Page 30: ...rminal diagram on page 11 of the WSOflex controller manual On this page the connections are described to be done See below terminal allocation plan The EC fan is rotating always in the correct directi...

Page 31: ...contact break for failure contact rating 250 VAC 2 A AC1 min 10 mA reinforced insulation on supply side and basic insulation on control interface side 2 8 0 10V yellow Analog input set value 0 10 V Ri...

Page 32: ...en or applied voltage 5 50 VDC disable bridge to GND or applied voltage 1 VDC reset function triggers software reset after a level change to 1 VDC SELV KL 3 8 Din2 Digital input 2 Switching parameter...

Page 33: ...fan motor or dramatically reduce the life of the filter elements 2 Be sure that the inlet ducting is properly installed and duct joints are sealed 3 Make certain the filter element is properly install...

Page 34: ...clean air chamber See trouble shooting guide 3 Exhaust Leakage at the exhaust Check third stage filter element and HEPA filter if applicable for positive gasket seals 4 Controller Controller is givin...

Page 35: ...collection bottle and faucet and re install see figure 12 Only remove the collection bottle when the mist collector is turned off Change of filter elements a First stage filter This is a permanent fil...

Page 36: ...P with the clean wrap the filter element will need to be replaced For easiest maintenance the wrap and second stage filter element can be changed at the same time Access the wrap through the access do...

Page 37: ...ccessed through the door 1 Pull the retention handle out and down to a horizontal position 2 Slide the filter element out of the unit 3 As the filter element is being removed a plastic garbage bag can...

Page 38: ...A filter at the same time as the second stage filter element is replaced 1 Remove the HEPA filter by unscrewing the outlet access panel at the side 2 Install the new HEPA filter in reverse order Make...

Page 39: ...n wheel has to be replaced Worn bearings The bearings have to be replaced Oil mist emission Filter element installed improperly Check that the gasket on the filter element is firmly pressed to the top...

Page 40: ...llection bottle and bottle faucet Controller MAIN dP alarm Plugged second stage filter element and or Dryflo wrap Replace second stage filter element and or Dryflo wrap Insufficient airflow and contro...

Reviews: