APPENDIX A : INSTALLATION
A--10
27080 Issue 1 Sept 98
Stroke Source
(1) With
External I/F
still selected, use the cursor keys to move the
highlight bar to
Stroke Source
.
(2) Use the increment keys to select
Internal
or
External
(if a shaft
encoder is to be used).
Note:
If the Stroke Source is Internal, the stroke rate is controlled by
Change Width in Print Setup (see below).
(3) If the Stroke Source is External, use the highlight bar to select
External Stroke Divider Ratio
and type in the value required.
(4) Use the scroll keys to search through the key options along the
bottom of the screen and select
OK
.
Print Delay
Note:
Each print format has a minimum print delay to which the printer
is set on delivery. This value should be recorded for future use.
Entering any value below this minimum will result in an error
message when printing. In the absence of a recorded minimum,
increase the print delay until an acceptable value is found. The
product detector or print head may require re--positioning.
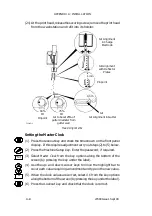
(1) Press the Print Setup key.
(2) Use the scroll keys to search through the key options along the
bottom of the screen and select
Print Delay
.
(3) Type in the number of strokes giving the change in position
required to print the message accurately on the product.
(4) Select
OK
from the key options along the bottom of the screen.
Character Height and Width
(1) With Print Setup still selected, select
Change Height
from the key
options along the bottom of the screen.
(2) Type in the height value required.
(3) Select
OK
from the key options along the bottom of the screen.
(4) Use the scroll keys to search through the key options along the
bottom of the screen and select
Change Width
.
(5) Type in the width value required.
(6) Select
OK
from the key options along the bottom of the screen.
OK
Delay
OK
Change
Height
OK
Change
Width
OK
Summary of Contents for A-SERIES
Page 1: ...DOMINO A SERIES INK JET PRINTER OPERATION AND MAINTENANCE MANUAL ...
Page 6: ... 6 27080 Issue 1 Sept 98 ...
Page 8: ... 8 27080 Issue 1 Sept 98 ...
Page 10: ... 10 27080 Issue 1 Sept 98 ...
Page 12: ...HEALTH AND SAFETY 1 2 27080 Issue 1 August 98 ...
Page 18: ...HEALTH AND SAFETY 1 8 27080 Issue 1 August 98 ...
Page 20: ......
Page 21: ......
Page 22: ......
Page 36: ...OPERATION 3 2 27080 Issue 1 August 98 ...
Page 55: ...DISPLAY MESSAGES AND FAULT FINDING 4 2 27080 Issue 1 August 98 ...
Page 76: ...REFERENCE 5 4 27080 Issue 1 August 98 ...
Page 136: ...PRINTER DESCRIPTION 6 20 27080 Issue 1 September 98 ...
Page 137: ...DESCRIPTION 27080 Issue 1 August 98 6 21 Wiring Diagram 37700W Iss 1 PELTI ER ...
Page 138: ...DESCRIPTION 6 22 27080 Issue 1 August 98 ...
Page 140: ...MAINTENANCE 7 2 27080 Issue 1 Sept 98 ...
Page 142: ...MAINTENANCE 7 4 27080 Issue 1 Sept 98 ...
Page 156: ...MAINTENANCE 7 18 27080 Issue 1 Sept 98 ...
Page 158: ...REPAIR 8 2 27080 Issue 1 Sept 98 ...
Page 192: ...REPAIR 8 36 27080 Issue 1 Sept 98 ...
Page 208: ...SPARES AND ACCESSORIES 9 16 27080 Issue 1 Sept 98 Electronics Inner Door 1 2 3 4 5 6 7 ...
Page 212: ...SPARES AND ACCESSORIES 9 20 27080 Issue 1 Sept 98 ...
Page 214: ...OPTIONS 10 2 27080 Issue 1 Sept 98 ...
Page 240: ...OPTIONS 10 28 27080 Issue 1 Sept 98 ...
Page 242: ...APPENDIX A INSTALLATION A 2 27080 Issue 1 Sept 98 ...
Page 261: ...APPENDIX B COMPRESSOR DRIVEN AIRDRYER B 2 20950 Issue 1 April 98 ...
Page 311: ...APPENDIX B A SERIES AIR DRIVEN AIRDRYER B 2 20951 Issue 1 Apr 98 ...
Page 313: ...APPENDIX B A SERIES AIR DRIVEN AIRDRYER B 4 20951 Issue 1 Apr 98 ...


