11
The second standby mode of operation will execute when a
failure of the temperature sensing device or associated
electronic circuitry occurs. If this should occur, the control
system will operate on the energy source selected via the
control panel. The cooling unit will run continuously on the
selected energy source. The refrigerator will continue to
operate in this mode indefinitely or until a new sensor is
installed and the system is reset.
H. TO SHUT OFF THE REFRIGERATOR
The refrigerator may be shut off while in any mode of
operation by pressing the main power ON/OFF button to the
UP (OFF) position. This shuts off all DC power to the
refrigerator.
5. HOW TO USE THE REFRIGERATOR
A. FOOD STORAGE COMPARTMENT
The food storage compartment is completely closed and
unventilated, which is necessary to maintain the required low
temperature for food storage. Consequently, foods having a
strong odor or those that absorb odors easily should be
covered. Vegetables, salads, etc. should be covered to
retain their crispness. The coldest positions in the refrigera-
tor are under the cooling fins and at the bottom of the
refrigerator. The warmer areas are on the upper door shelves.
This should be considered when placing different types of
food in the refrigerator.
B. FROZEN FOOD STORAGE
COMPARTMENT
Quick frozen soft fruits and ice cream should be placed in the
coldest part of the compartment which is on or just below the
freezer shelf. Frozen vegetables, may be stored in any part
of the compartment.
This compartment is not designed for deep or quick freezing
of food. Meat or fish, whether raw or prepared, can be stored
in the frozen food storage compartment provided they are
precooled first in the refrigerator. They can be stored about
three times longer in the frozen food compartment as
compared to the fresh food compartment. To prevent food
from drying out, keep it in covered dishes, containers, plastic
bags or wrapped in aluminum foil.
C.
ICE MAKING
Ice cubes can be made in the ice tray placed in the freezer
compartment. The tray should be filled with water to within
1/4" (5mm) from the top. For faster ice making, the tray
should be placed in direct contact with the freezer shelf.
To release the ice cubes, seize the tray with both hands and
twist the tray. Cubes not required should be replaced in the
tray. Refill the tray with water and replace the tray on the
freezer shelf.
Ice will be made more rapidly if the thermostat is set at its
highest position. It is a good idea to do this a few hours before
the anticipated need for ice, but be sure to move the
thermostat back to normal setting, usually about mid-setting
when the ice is formed. Food in the lower compartment may
be frozen if the setting is left on "COLDEST" position.
C.
DEFROSTING
Shut off the refrigerator by pressing the main power ON/OFF
button to the UP (OFF) position. Empty the refrigerator,
leaving the drip tray under the finned evaporator, and the
cabinet and freezer doors open. Defrosting time can be
reduced by filling the ice tray with hot water and placing it on
the freezer shelf.
CAUTION
DO NOT use a hot air blower. Permanent damage could
result from warping the metal or plastic parts. DO NOT use
a knife or an ice pick, or other sharp tools to remove frost
from the freezer shelf. They can create a leak in the ammonia
system.
When all frost is melted, dry the interior of the refrigerator with
a clean cloth. Replace all food and set thermostat to the
COLDEST temperature setting for a few hours. Then reset
the thermostat to the desired setting, usually at mid-setting.
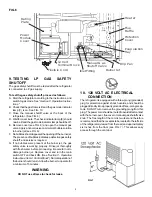
NOTE: On these models the drip tray/cup is on the rear side
of the refrigerator. (See FIG. 1)
Put the plastic drain tube in a watertight bucket or container
(access through louvered service panel on the outside of the
vehicle). As the frost melts, the water will flow into the
container. When all the frost has melted wipe up the excess
moisture and empty the accumulated water from the bucket.
Replace the drain tube to its original position.
E.
CLEANING
Cleaning the refrigerator is usually done after it is defrosted
or put into storage. To clean the interior liner of the refrigera-
tor, use lukewarm weak soda solution. Use only warm water
to clean the finned evaporator, ice trays and shelves.
NEVER use strong chemicals or abrasives to clean these
parts as the protective surfaces will be damaged. It is
important to always keep the refrigerator clean.
F. SHUT-OFF (STORAGE PROCEDURE)
Shut off the refrigerator by pressing the main power ON/OFF
button to the UP (OFF) position.

