31
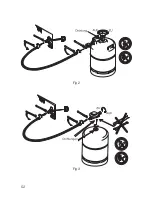
by screwing, connect the two ends of the tubing to the nipples and secure
them with the two hose clipse.
When fitting the connection to the gas inlet of the appliance, hold
counterpart to avoid straining and possibly damaging.
The gas bottle must only be used in an upright position and particular care
must be taken every time the appliance is connected to the gas bottle to
ensure that there are no leaks, that the gas pipe (rubber hose) is not under
tension or kinked, and that it is not in contact with hot surfaces.
The connection pipe and gas bottle should always be located in positions
where they will not be tripped over or otherwise inadvertently disturbed.
Before attempting to light the burner, every time after connection, turn on the
gas at the bottle and check the gas connections for leaks by applying a soap
and water solution over them and watching for bubbles, which would
indicate a leak.
After testing dry off traces of detergent.
For your safety
Do not check for leaks with a naked flame!
Do not smoke while checking for leaks!
10. Gas equipment system (Fig. 1)
This consists of a control knob (B) with built-in safety pilot, a burner with
igniter plug and a piezo-gas igniter (E).
The control knob has 3 positions:
MAX : high cooling capacity,
MIN :
low cooling capacity,
:
off-position = gas supply to burner is shut off.
If, for any reason the gas flame extinguishes the ignition control is working
automatically and shuts off gas supply.
11. Igniting the gas burner (Fig. 1)
1. Open gas cylinder or pressure regulating valve.
2. Turn knob (B) anti-clockwise to the MAX position, press and hold down.
GB
Summary of Contents for RC1600
Page 11: ...51 Fig 1...
Page 12: ...52 Fig 3 Fig 2...
Page 13: ...53 Fig 5 Fig 4 joint guarnizione afdichting junta joints guarnizione afdichtingen junta...
Page 14: ...54...
Page 15: ...55...

