4
7.
INSTALLING REFRIGERATOR IN
ENCLOSURE
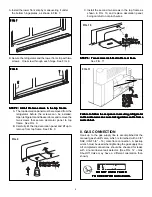
The transport support at the rear of the refrigerator can be
removed if necessary for the installation of the refrigerator
in the enclosure. (See FIG. 4)
INSTALLATION:
INSTALLATION:
INSTALLATION:
INSTALLATION:
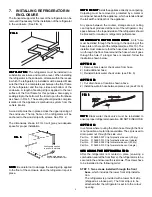
INSTALLATION: The refrigerator must be installed in a
substantial enclosure and must be level. When installing
the refrigerator in the enclosure, all areas within the recess
in which the refrigerator is installed must be sealed. Make
sure that there is a complete seal between the front frame
of the refrigerator and the top, sides and bottom of the
enclosure. A length of sealing strip is applied to the rear
surface of the front frame for this purpose. Also apply a
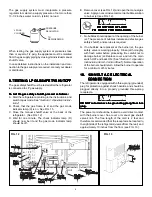
sealing strip to the bottom of the trim strip on the front base
as shown in FIG. 5. The sealing should provide complete
isolation of the appliance's combustion system from the
vehicle interior.
A wood strip must be in place across the upper opening of
the enclosure. The top frame of the refrigerator will be
anchored to the wood strip with screws. See FIG. 2.
The dimensions shown in FIG. 3 will give you adequate
space for proper installation.
NOTE
NOTE
NOTE
NOTE
NOTE: Be careful not to damage the sealing strip applied
to the floor of the enclosure when the refrigerator is put in
place.
Sealing strip applied
to bottom of trim strip
Sealing strip placed on
front of compartment floor
FIG. 5
FIG. 5
FIG. 5
FIG. 5
FIG. 5
NOTE: DO NOT
NOTE: DO NOT
NOTE: DO NOT
NOTE: DO NOT
NOTE: DO NOT install the appliance directly on carpeting.
Carpeting must be removed or protected by a metal or
wood panel beneath the appliance, which extends at least
the full width and depth of the appliance.
Any space between the counter, storage area or ceiling
can trap heat produced at the rear of the refrigerator. Any
space between the top and sides of the refrigerator should
be blocked for maximum refrigerator performance.
CONDENSATE WATER DRAIN HOSE
CONDENSATE WATER DRAIN HOSE
CONDENSATE WATER DRAIN HOSE
CONDENSATE WATER DRAIN HOSE
CONDENSATE WATER DRAIN HOSE
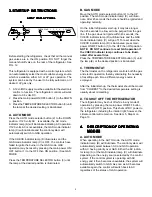
: A 3/4" hole
must be drilled through the flooring in the opening of the
base plate on the rear of the refrigerator (see FIG. 10). The
installer must make sure that the hose does not kink when
run through the floor. Seal around the hose where it goes
through the hole. If a longer hose is required, follow the
illustration shown below:
OPTION A:
OPTION A:
OPTION A:
OPTION A:
OPTION A:
1) Remove black water check valve from hose
2) Add additional hose
3) Reinstall black water check valve (see FIG. 6)
OPTION B:
OPTION B:
OPTION B:
OPTION B:
OPTION B:
1) Cut drain hose at location shown above
2) Install new drain hose between pieces cut. (see FIG. 6)
NOTE
NOTE
NOTE
NOTE
NOTE: Black water check valve must be reinstalled to
ensure proper refrigerator operation. DO NOT KINK HOSE.
OPTION C:
OPTION C:
OPTION C:
OPTION C:
OPTION C:
In vehicles where routing the drain hose through the floor
is not possible, a metal clip is available. The clip is used to
drain water out through the side vent.
Part No.
3106590.007 Clip for plastic side vent (50 qty.)
Part No.
3106590.015 Clip for plastic side vent (single)
Part No.
3106559.002 Clip for metal side vent (50 qty.)
Part No.
3106559.010 Clip for metal side vent (single)
SECURING THE REFRIGERATOR:
SECURING THE REFRIGERATOR:
SECURING THE REFRIGERATOR:
SECURING THE REFRIGERATOR:
SECURING THE REFRIGERATOR:
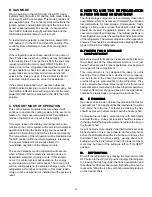
After the refrigerator is mounted in place (ensuring a
combustion seal at the front frame), the refrigerator is to be
secured in the enclosure with six screws. The screws have
to be installed in the following order:
STEP 1: Two screws installed through the front
base, which includes the lower front strip installa-
tion.
The refrigerator is provided with a lower front strip
(shipped as a loose part). The front strip is to be
attached after the refrigerator is set into the cutout
opening.
FIG. 6
FIG. 6
FIG. 6
FIG. 6
FIG. 6
FIG. 4
FIG. 4
FIG. 4
FIG. 4
FIG. 4

