


9
ON
OFF
AUTO
AC
GAS
1
2
CHECK COLD 1 2 3 4 5 COLDEST
3
D
C
B
E
F
3.
3.
3.
3.
3. ST
ST
ST
ST
STAR
AR
AR
AR
ART
T
T
T
T-UP INSTR
-UP INSTR
-UP INSTR
-UP INSTR
-UP INSTRUCTIONS
UCTIONS
UCTIONS
UCTIONS
UCTIONS
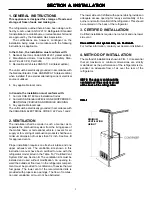
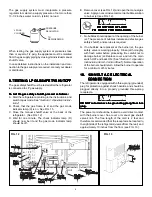
Before starting the refrigerator, check that all the manual
gas valves are in the ON position. DO NOT forget the
manual shutoff valve on the rear of the refrigerator. See
FIG. 12.
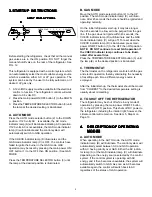
This refrigerator is equipped with a control system, which
can automatically select the most suitable energy source
which is available, either AC or LP gas operation. The
system can be set by the user to be fully automatic, or if
desired, LP gas only.
1. A 12 volt DC supply must be available for the electronic
control to function. The refrigerator controls will work
down to 9.6 volts DC.
2. Press the main power ON/OFF button (1) to the DOWN
position.
3. Press the TEMPERATURE SELECTOR button (3) until
the lamp at the desired setting is illuminated.
A
A
A
A
A
C
C
C
C
C
D
D
D
D
D
E
E
E
E
E
2-WAY DISPLAY PANEL
2-WAY DISPLAY PANEL
2-WAY DISPLAY PANEL
2-WAY DISPLAY PANEL
2-WAY DISPLAY PANEL
B
B
B
B
B
A. AUTO MODE
Press the AUTO mode selector button (2) to the DOWN
position. If 120 volts AC is available, the AC mode
indicator lamp (A) will illuminate indicating AC operation.
If 120 volts AC is not available, the GAS mode indicator
lamp (C) will illuminate and the control system will
automatically switch to GAS operation.
If the CHECK indicator lamp (D) illuminates and the
GAS mode indicator lamp (C) is OFF, the controls have
failed to ignite the burner in the GAS mode. GAS
operation may be reset by pressing the main power ON/
OFF button (1) to the OFF then ON position. (See GAS
MODE.
Press the TEMPERATURE SELECTOR button (3) until
the lamp at the desired position is illuminated.
B. GAS MODE
Move the AUTO mode selector button (2) to the UP
position. The GAS mode indicator lamp (C) will illumi-
nate. After 45 seconds the burner should be ignited and
operating normally.
On the initial refrigerator start-up, it may take longer
than 45 seconds to allow air to be purged from the gas
line. If the gas does not ignite within 45 seconds, the
CHECK indicator lamp (D) will illuminate and the GAS
mode indicator lamp (C) will go off. To reset when the
CHECK indicator lamp (D) is illuminated, press main
power ON/OFF button (1) to the OFF then ON position.
NOTE: DO NOT continue to reset GAS operation if
the CHECK indicator lamp continues to be illumi-
nated after several tries.
Press the TEMPERATURE SELECTOR button (3) until
the lamp (E) at the desired position is illuminated.
C. THERMOSTAT
The thermostat on the refrigerator controls both the gas
and electric operation, thereby eliminating the necessity
of resetting each time a different energy source is
employed.
After the initial start-up, the thermostat should be moved
from "COLDEST" to the desired temperature setting is
usually about mid-setting.
D. TO SHUT OFF THE REFRIGERATOR
The refrigerator may be shut off while in any mode of
operation by pressing the main power ON/OFF button
(1) to the UP (OFF) position. This shuts off DC power to
the refrigerator, including the interior light; however, the
climate control will remain on. See Item 5, Step G on
Page 10.
4.
4.
4.
4.
4.
DESCRIPTION OF OPERA
DESCRIPTION OF OPERA
DESCRIPTION OF OPERA
DESCRIPTION OF OPERA
DESCRIPTION OF OPERATING
TING
TING
TING
TING
MODES
MODES
MODES
MODES
MODES
A. AUTO MODE
When operating in the AUTO mode, the AUTO mode
indicator lamp (B) will illuminate. The control system will
automatically select between AC and GAS operation
with AC having priority over GAS. Either the AC indica-
tor lamp (A) or the GAS indicator lamp (C) will illuminate
depending on the energy source selected by the control
system. If the control system is operating with AC
energy and it then becomes unavailable, the system will
automatically switch to GAS. As soon as AC becomes
available again, the control will switch back to AC
regardless of the status of GAS operation.


