background image

A3-AG/N3-AG AGRICULTURE KIT 2.0 

User Manual

©

 2019 DJI All Rights Reserved. 


43

Semi-Automatic Descent:

 All stick commands except the throttle stick command are 

available during descent and landing. Motors will automatically stop after landing. 

  When operating in no-fly zones, the Flight Status Indicator will blink red slowly and 

continue for 5 seconds, then switch to indicate the current flying status and continue for 
12 seconds, at which point it will switch back to blinking red slowly. 

  For safety reasons, DO NOT fly near airports, highways, railway stations, railway lines, 

city centers, or other busy areas. Ensure the aircraft is visible at all times.

Pre-Flight Checklist

Mounting and Components Checklist

1. Ensure that all parts are mounted correctly and firmly.
2. Ensure that the ESCs and receiver are connected correctly and firmly.
3. Ensure that the spraying hoses are without any blockage.
4. Test if the nozzles work normally.

LED Status Checklist

1. Ensure that the mode switch corresponds to the flight status LED.
2. System status LEDs on the GNSS-Compass / GPS-Compass Pro are normal.
3. Ensure that all the sensor parameters are correct and the IMUs are calibrated correctly.

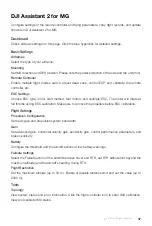
DJI Assistant 2 for MG Checklist

1. Ensure that the aircraft mounting parameters are correct.
2. Ensure that the flight controller parameters are correct.
3. Low voltage level protection and Failsafe protection are set correctly.

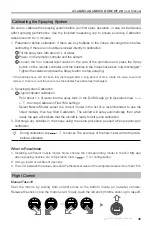
Compass Calibration

Ensure the compass is calibrated before every flight. Failure to calibrate may lead to poor flight 
performance or a crash.
1. DO NOT attempt to calibrate your compass where there is a chance of strong magnetic 

interference. This includes areas where there are massive metal objects, parking structures, steel 
reinforcements underground, or under bridges.

2. DO NOT carry ferromagnetic materials with you during calibration, such as keys or mobile 

phones.

3. The compass should always be calibrated when moving from indoor spaces to outdoor spaces.
4. After successful calibration, the compass may become abnormal when you place the aircraft on 

the ground. This may be because of underground magnetic interference. Move the aircraft to 
another location and try again.

Summary of Contents for A3-AG

Page 1: ...2019 04 v1 2 User Manual A3 AG N3 AG Agriculture Kit 2 0 ...

Page 2: ...30 System Data Protection 32 Empty Tank 32 Return to Home RTH 32 Attitude Control When One Motor Output Fails 35 Propulsion System Protection 35 Radar Module Altitude Stabilization Prediction 35 Obstacle Avoidance Radar Optional 36 DJI MG App 37 Main Screen 37 Operation View 38 Flight 41 Operation Environment 41 Flight Limits and No Fly Zones 41 Pre Flight Checklist 43 Compass Calibration 43 Calib...

Page 3: ...8 3 1 2 12 11 13 14 15 A3 AG Parts Flight Controller Feature Highlights 1 Built in inertial sensors for the measurement of aircraft attitude and built in pressure sensor for the detection of aircraft altitude 2 Support for multiple receiver types If used with the DJI Datalink 3 the A3 AG has direct access to features in the DJI MG app such as intelligent planning and operation 3 M1 to M8 are used ...

Page 4: ...ESC PWM port for each motor 8 LED Port Communicates with the LED module 9 IMU2 Port Reserved port 10 PMU Port Derives power from the PMU 11 CAN2 Reserved port 12 API Port Reserved port 13 F5 F8 Pins Reserved ports 14 F1 F4 Pins Reserved ports 15 S Bus Port Reserved port GPS Compass Pro Module The GPS Compass Pro module has a built in GPS GLONASS receiver and compass The compass is used for geomagn...

Page 5: ... whole Flight Control System and low voltage protection function LED Module The LED Module has an integrated LED Indicator and Micro USB port A The LED is mainly for flight control system status indication during flight e g Flight Mode B In addition there is a Micro USB port for firmware upgrades via DJI Assistant 2 for MG 1 Flight Status Indicator Indicates the status of the flight control system...

Page 6: ...Flight Controller Feature Highlights 1 Built in inertial sensors for the measurement of aircraft attitude and built in pressure sensor for the detection of aircraft altitude 2 Support for multiple receiver types If used with the DJI Datalink 3 the N3 AG has direct access to features in the DJI MG app such as intelligent planning and operation 3 M1 to M8 are used to connect the ESCs of the aircraft...

Page 7: ...port 9 F1 F4 Pins Reserved ports 10 F5 F8 Pins Reserved ports 11 API Port Reserved port 12 EXP Port Reserved port 13 Orientation Arrow The flight controller orientation arrow GNSS Compass Module The GNSS Compass module has a built in GPS GLONASS and compass The compass is used for geomagnetic field measurements Compass calibration is required before use DO NOT use or store the compass in environme...

Page 8: ...e LiPo batteries with built in PMU providing power for the whole Flight Control System and low voltage protection function 1 Flight Status Indicator Indicates the status of the flight control system 2 Micro USB Port Used to configure and upgrade the N3 via DJI Assistant 2 for MG LED Module The LED Module has an integrated LED Indicator and Micro USB port A The LED is mainly for flight control syst...

Page 9: ...n adapter cable 2 Working Status Indicator It will glow solid green when the device is working normally 3 CAN Ports Both of the two CAN Bus ports can be connected to the CAN1 port on the flight controller 4 Power Port XT60 port Connected to an external power supply 12S Li Po battery 5 RTK Port Reserved port 6 Pump I Port Connected to DJI Pump I 7 Pump II Port Connected to DJI Pump II 8 Radar Port ...

Page 10: ... 9 10 11 18 19 20 21 22 17 16 12 13 14 15 1 Antennas Relays aircraft control signals 2 Display Device Android based to run the DJI MG app 3 Speaker Audio output 4 Control Sticks Controls aircraft movement Can be set to Mode 1 Mode 2 or a custom mode 5 Lanyard Attachment Used to attach the remote controller lanyard 6 Power Button Used to turn the remote controller on and off 7 Status LED Indicates ...

Page 11: ...perations by default Use the app to customize the button 22 Settings Dial Turn to adjust operation efficiency in Route A B Route or Manual Plus operation mode 23 Button C1 When you are planning a field it starts or ends obstacle measurement When planning a field the function cannot be customized When you are not planning a field the default function is Operations to switch between A B M and M Use ...

Page 12: ...ith the A3 AG 2 0 or N3 AG 2 0 flight controller no extra power supply is needed When using with other flight controllers it is essential to provide an additional power supply 8 to 30 V 3 LINK Port Reserved Port 4 Status LED Status LED Description Solid Red Indicates successful power supply to the Air System but linking has failed between the Air System and Ground System Alternating Red and Green ...

Page 13: ...irframe and connect them properly 3 Launch the DJI Assistant 2 for MG and configure the parameters 4 Ensure the motor and Failsafe settings are correct 5 Ensure the devices connected to the flight controller are working normally and correctly set in DJI Assistant 2 for MG Preparation Equipment Ensure you have a suitable airframe remote controller system ESCs and battery to use with the flight cont...

Page 14: ...systems are recommended The iESC port can connect to the DJI Smart ESC Communication Cable if using the DJI Intelligent ESC Propeller and Motor It is required to use with Propeller and Motor of more than 2400rpm D Battery If using a LiPo battery 3S 12S only the voltage information and low voltage protection are available Preparing DJI Assistant 2 for MG Download DJI Assistant 2 for MG Visit the of...

Page 15: ...or using Launchpad DJI Assistant 2 for MG works exactly the same way on Mac OS X and Windows The DJI Assistant 2 for MG screenshots that appear in this manual are taken from the Windows version For safety reasons do not use the power battery for power supply or remove the propellers from the motors before connecting to the Assistant Software he Windows version Start the Installation Important Stri...

Page 16: ...ced adhesive tape regularly to ensure the IMU is fixed firmly in place Mounting the GNSS Compass Module Follow the procedures below to mount the GNSS Compass bracket and the GNSS Compass module The GNSS Compass module included in the Upgrade Kits is the same as the one in the N3 package For the A3 AG it is GPS Compass Pro module 3 Ensure the GNSS Compass arrow is pointing to the aircraft nose and ...

Page 17: ...odule may become damaged and lead the aircraft to work abnormally or even lose control 4 Select a bracket of appropriate length for you aircraft to avoid interference with the compass The length is based on the airframe type and the mounting position and so on Ensure that there will not any compass warning when the aircraft is flying with maximum load and can normally fly Mounting the LED Module M...

Page 18: ... Failure to do so may lead to unexpected flight behavior or serious accidents Connecting to a Receiver 1 Connect the DBUS port on the Air System to the RF port on the flight controller using the included RF cable 2 Insert the Air System antennas into the ports on the side of the Air System and snap them into place 3 Mount the Air System onto a suitable flat surface Make sure that there is a gap be...

Page 19: ...ess necessary When removing the antennas use pliers to grip the metal connector DO NOT apply excessive force to the wire Connecting to the ESCs S900 Connection Diagram 1 Connect the M1 M6 ports on the bottom board of the S900 to the M1 M6 ports on the Flight Controller in order 2 The iESC port can connect to the DJI Smart ESC Communication Cable if using the DJI Intelligent ESC P01603 01 G B A Oth...

Page 20: ... on the AMU II to the power supply of the aircraft via an appropriate cable Connecting to Expansion Devices Delivery Pump DJI delivery pump used with the AMU II Mount the DJI delivery pump to the desired position Pay attention to the orientation of the outlets and inlets Then connect the two cables of the pumps to the Pump I port and Pump II port on the AMU II respectively Other pumps Connect the ...

Page 21: ...t and rear directions and altitude stabilization in the downward direction Connect the three radar modules in order and connect to the radar port on the AMU II 3 When connecting the cable to the radar module attach the rubber pad included in the package to the radar cable plug and connect the cable to the 4 pin port on the radar module Tighten the two M2 6 screws Make sure that the surface of the ...

Page 22: ...orresponding color DJI Liquid Indicator Mount the liquid indicator to the bottom of the spray tank Connect the cable to the 5 pin port on the downward radar module DJI Obstacle Avoidance Radar Optional 1 Mount the obstacle avoidance radar to a proper position according to its detection range DO NOT block the radar Otherwise the performance of the radar may be adversely affected 10 10 50 50 OR OR 2...

Page 23: ...to register for first time use 4 Follow the prompts to upgrade the firmware to the latest version 5 Select the airframe type 6 Configure the Flight Controller IMU and GNSS Compass GPS Compass Promounting parameters 7 Select the receiver type and configure the channel mapping 8 Make sure the motors are rotating in correct direction If not change the rotating direction 9 Configure the function chann...

Page 24: ...s surroundings which may result in horizontal shifting Use the remote controller to position the aircraft Maneuvering the aircraft in A mode can be difficult Before switching the aircraft into A mode make sure you are comfortable flying in this mode DO NOT fly the aircraft too far away as you might lose control and cause a potential hazard Avoid flying in areas where GNSS signal is weak or in conf...

Page 25: ...C2 onscreen or press the C2 button to add waypoints Tap End Obstacle C1 onscreen or press the C1 button when finished 6 Continue measuring the field by flying the aircraft alongside the boundary and adding waypoints at each corner of the field Tap End Measurement when the field has been measured and all obstacles have been marked The DJI MG app will produce a flight route according to the field s ...

Page 26: ... an Operation 1 Power on the remote controller Place the aircraft at one of the previously set calibration points and then power it on 2 Go to the main screen in the DJI MG app and then tap Execute Operation to enter the Operation View 3 Tap to select a field in Fields tag and then tap Invoke 4 Tap Rectify Offset and then Rectify Aircraft Position or adjust the route position via the Fine Tuning b...

Page 27: ...ption data protection and the altitude stabilization and obstacle avoidance functions of the radar module are available in this mode Use the app to adjust operation efficiency affecting the flying speed and spray rate A B Route operation mode is recommended for large rectangular spray areas Operation Route The aircraft travels along a pre designated square zig zag route after recording turning poi...

Page 28: ...ia the Settings dial on the remote controller The DJI MG app will display an icon of line spacing after Point A and B are recorded Tap to adjust the value The line spacing cannot be adjusted during operation 2 Select the Route After Point A and B are recorded the app produces Route R by default Tap Direction on the lower right corner of the screen to switch to Route L 3 Configuring Aircraft Altitu...

Page 29: ... aircraft spray liquid via the remote controller s Spray button and adjust the spray rate via the dial Manual operation mode is ideal when the operating area is small Manual Plus Operation Mode Tap the operation mode switch button in the app and select M to enter Manual Plus operation mode The aircraft s maximum flying speed is 7 m s customizable in the DJI MG app the heading is locked and all oth...

Page 30: ...its distance limit or altitude limit 8 Empty tank 9 If the GNSS signal is weak the aircraft enters Attitude mode and exits the Route or A B Route operation The last position where there was a strong GNSS signal is recorded as a breakpoint Ensure that GNSS signal is strong when using the Operation Resumption function Otherwise the aircraft cannot record and return to the breakpoint The breakpoint i...

Page 31: ...e corresponding flight behavior and hover When pushing the control sticks to exit the operation the aircraft will need a braking distance Ensure that there is a safe distance between the aircraft and any obstacles 2 Avoid an Obstacle After switching to Manual operation mode users can control the aircraft to avoid the obstacle from Point C to D 3 Resume Operation Tap Resume in the DJI MG app If the...

Page 32: ...ke off in Manual operation mode and fly the aircraft to where the operation was interrupted Enter the desired mode to continue the operation Return to Home RTH Home Point The default Home Point is the first location where your aircraft received strong GNSS signals that are required for positioning The Flight Status Indicator will blink several times after the Home Point has been recorded RTH The R...

Page 33: ...vate to 15m Height over HP 15m Low Battery RTH The low battery RTH or critical low battery landing is triggered when the LiPo battery voltage is low The Low Battery RTH is disabled by default The Flight Status Indicator will blink red slowly when battery voltage is low RTH or landing can be set in the DJI Assistant 2 for MG or the DJI MG app Control the aircraft through the remote controller durin...

Page 34: ...the aircraft s current coordinates as the Home Point 3 Tap select in Home Point settings to set the remote controller s current coordinates as the Home Point 4 The Flight Status Indicator will blink green to indicate that the new Home Point has successfully been set RTH Safety Notices The aircraft cannot avoid obstacles during RTH Users can only control the speed and altitude of the aircraft If th...

Page 35: ...and downward positions of the aircraft the forward and rear radar modules can predict the distance between the aircraft and the vegetation or other surface to achieve terrain follow function The radar functions can be enable or disabled in the app When enabled the aircraft will fly above the vegetation at a constant spraying distance In Manual operation mode the radar module can also measure the s...

Page 36: ...ude changes cause no interference to the detection of angles Additionally front and rear obstacle detection can be switched when flying forward or backward Usage Configuration in the App Make sure that the radar is correctly mounted Then power on the remote controller and aircraft Go to Operation View in the app to enable the obstacle avoidance function Aircraft Actions 1 If obstacles are detected...

Page 37: ...n a field Execute Operation Tap to enter Operation View to view the aircraft status configure settings and switch between different operation modes 2 Aircraft Connection Status Shows whether the aircraft is connected to the remote controller 3 Menu Tap to manage tasks view user information aircraft information and configure general settings Task Management View planned fields and operation progres...

Page 38: ...rameters Shows parameters of current spraying operation The display will vary according to operation mode Field Area Shows the total plan area value when planning fields for Route operations via the intelligent operation planning system 1 Plan Area Shows the value of the actual area of the produced flight route after planning fields There is the following formula Plan Area Field Area Obstacle Area...

Page 39: ...ion spraying system data display Radar Settings Includes altitude stabilization prediction should be disabled if an altitude prediction radar module is not in use terrain mode and obstacle avoidance should be disabled if an obstacle avoidance radar is not in use RC Settings Includes RC calibration stick mode RC custom key and linking Aircraft Battery Includes Low Battery Warning battery informatio...

Page 40: ...tch between Manual M Manual Plus M and A B Route AB operation modes 17 Operation List Point A B Operation List Icon displayed in M operation mode Tap to view the planned fields and operations in progress and use operations B A Point A B Icon displayed in AB operation mode Tap to record Point A or B The color of the icon will change from grey to purple to indicate successful recording Tap to clear ...

Page 41: ... Unmanned aerial vehicle UAV operators should abide by the regulations from self regulatory organizations such as the International Civil Aviation Organization the Federal Aviation Administration and their local aviation authorities For safety reasons flight limits are enabled by default to help users operate this aircraft safely and legally When operating in P or F mode the height and distance li...

Page 42: ... No fly zones are divided into airports and restricted areas Airports include major airports and flying fields where manned aircraft operate at low altitudes Restricted areas include borders between countries or sensitive sites The details of the no fly zones are explained below GNSS required R mi around the restricted area depending on the regulation is a no fly zone inside which takeoff and flig...

Page 43: ...onds to the flight status LED 2 System status LEDs on the GNSS Compass GPS Compass Pro are normal 3 Ensure that all the sensor parameters are correct and the IMUs are calibrated correctly DJI Assistant 2 for MG Checklist 1 Ensure that the aircraft mounting parameters are correct 2 Ensure that the flight controller parameters are correct 3 Low voltage level protection and Failsafe protection are se...

Page 44: ...p in the app 3 Hold the aircraft vertically with its nose pointing upward and rotate it 360 degrees around a vertical axis 4 The Flight Status Indicator shows the current flight mode and the calibration page disappears in the app when calibration is complete If the Flight Status Indicator blinks red or a calibration failure is displayed in the app repeat the steps above to calibrate the compass Wh...

Page 45: ... fully discharged 2 Spraying System Calibration 1 Liquid indicator calibration Pour about 1 L of water into the spray tank In the DJI MG app go to Operation View then tap Calibrate in Flow IMU settings Select Nozzle Model select the correct model in the list it is recommended to use the listed models then tap Start Calibration The aircraft will spray automatically then when ready the app will indi...

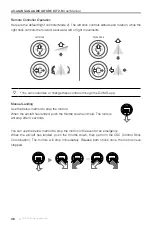
Page 46: ...e stopped OR Manual Landing Use the below method to stop the motors When the aircraft has landed push the throttle down and hold The motors will stop after 3 seconds You can customize or change these controls through the DJI MG app Remote Controller Operation Here are the default flight controls Mode 2 The left stick controls altitude and rotation while the right stick controls the forward backwar...

Page 47: ...e ESC The motor will rotate at full throttle during ESC calibration Make sure to remove the propellers before ESC calibration Flight Settings Propulsion Configuration Set basic gain and propulsion system bandwidth Gain Set advanced gain horizontal velocity gain sensitivity gain control performance parameters and brake sensitivity Battery Configure the threshold and the aircraft actions of low batt...

Page 48: ... Flight controller parameters backup and recovery Only parameters in products of the same type and firmware can be supported for backup and recovery Firmware Update A DJI account is required for firmware updates Login with your DJI account or register for one Radar Shows radar module information such as software version hardware ID loader ...

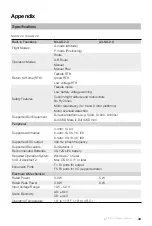
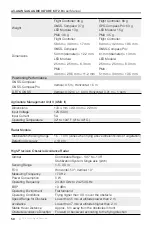
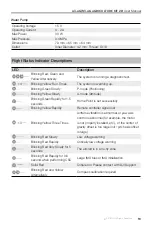
Page 49: ...ipment DJI aerial platforms e g S900 S1000 S1000 DJI iOSD Mark II DJI iOSD mini Peripheral Supported Airframes 4 rotor I4 X4 6 rotor I6 V6 Y6 IY6 8 rotor X8 I8 V8 IX8 Supported ESC output 400 Hz refresh frequency Supported Receivers DJI Datalink 3 Recommended Batteries 3S 12S LiPo battery Required Operation System for DJI Assistant 2 Windows 7 or later Mac OS X 10 11 or later Expansion Ports F1 F4...

Page 50: ... 4 mm 99 4 mm 22 mm Input Voltage 12S 50 V Input Current 5 A Operating Temperature 32 to 104 F 0 to 40 C Radar Module Stabilization Working Range 1 5 10 m varies when flying above different kinds of vegetation Detection Accuracy 10 cm High Precision Obstacle Avoidance Radar Gimbal Controllable Range 135 to 135 Stabilization System Single axis pitch Sensing Range 1 5 30 m FOV Horizontal 50 Vertical...

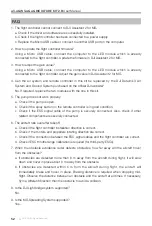
Page 51: ...on is abnormal or yaw axis control is abnormal for example the motor is not properly installed etc or the center of gravity offset is too large roll pitch axis offset is large Blinking Red Slowly Low voltage warning Blinking Red Rapidly Critically low voltage warning Blinking Red Very Slowly for 5 seconds The aircraft is in a no fly zone Blinking Red Rapidly for 0 6 second when performing CSC Larg...

Page 52: ...is open b Check if the spray button on the remote controller is in good condition c Check if the ESC signal cable of the pump is securely connected Also check if other related components are securely connected 6 The aircraft rolls over after takeoff a Check if the flight controller installation direction is correct b Check if the motors and propellers rotating direction are correct c Check if the ...

Page 53: ...Manual 2019 DJI All Rights Reserved 53 10 Is a third party liquid indicator supported It is supported if the level of the liquid level meter is 3 3 V To ensure stability however it is not recommended to use a third party liquid level meter ...

Page 54: ...ontent is subject to change Download the latest version from http www dji com agriculture solution v2 If you have any questions about this document please contact DJI by sending a message to DocSupport dji com DJI Support http www dji com support ...

Reviews: