background image

14

English


Address

Monitoring Port

Search Port

Audio 

Port

: Enter the device name used to register the 

device to FEN. If FEN feature is not enabled on 
the device, deselect 

FEN

 checkbox and enter the 

device's IP address. For port number, using the 
default value is recommended. 


User ID

Password

: Enter the User ID and Password 

used to login to the device. (Default value of User 
ID: 

admin

, No default value of password)

iOS device

Open the 

App Store

 on your device.

Enter 

IDIS Mobile

 in the search filed of the 

App Store

.

Install

 IDIS Mobile 

program and open it.

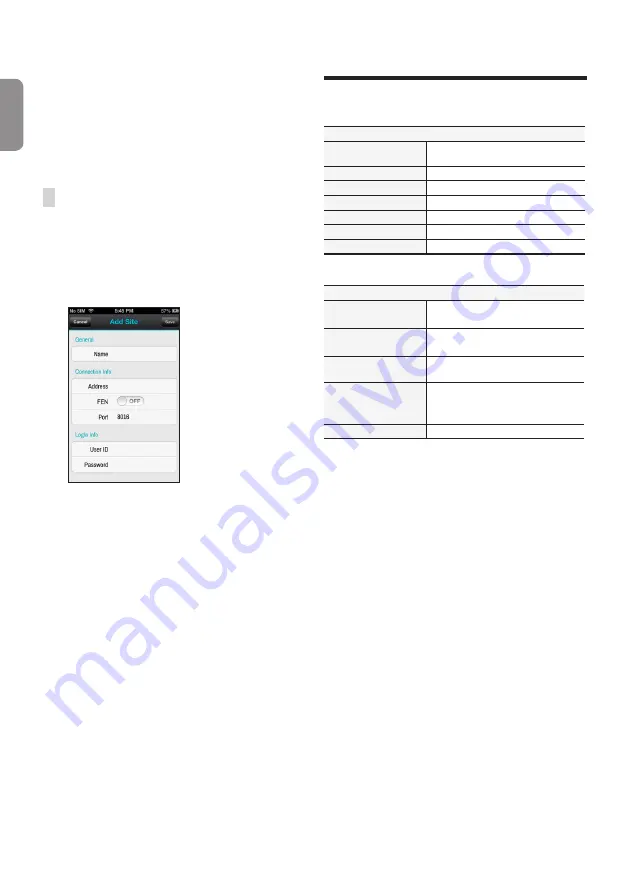
Register the device by pr button and entering 
the device information.


General

: Enter a name of the device to be used in 

IDIS Mobile 

app.


Connection Info

: Turn 

FEN


ON

 and enter the 

device name used to register the device to the FEN. 
If FEN feature is not enabled on the device, turn 

FEN


OFF

 and enter the device's IP address. For port 

number, using the default value is recommended. 


Login Info

: Enter the User ID and Password used 

to login to the device. (Default value of User ID: 

admin

, No default value of password).

Specifications

These product specifications may change without prior 
notice.

General

Exterior Dimensions 

(W x H x D)

430mm x 88mm x 411mm

Weight (Main Unit)

6.0kg (with 1HDD)

Working Temperature

0°C – 40°C

Operating Humidity

0% – 90%

Power

100-240V

Power Consumption

Max. 200W (with 4HDDs)

Certifications

FCC, UL, CE, CB, PSE

* When two HDDs(3TB) are installed, the value above was measured.

Video

Video In

4/8/16 Network Camera
(Video In Port : 5/9/17)

Monitor Out 

HDMI: 1 HDMI
VGA: 1 DB15

Video Resolution

1920 x 1200, 1920 x 1080, 1680 x 1050, 
1600 x 1200

Recording Speed (IPS)

Up to 480ips @ Full HD (DR-3116PS)
Up to 240ips @ Full HD (DR-3108P)
Up to 120ips @ Full HD (DR-3104P)

Playback Speed (IPS)

120ips @ Full HD

Summary of Contents for Idis DR-3104P

Page 1: ...DR 3104P DR 3108P DR 3116PS Network Video Recorder Quick Guide Powered by...

Page 2: ...refer servicing to qualified service personnel under the following conditions A When the power supply cord or the plug has been damaged B If liquid is spilled or objects have fallen into the equipment...

Page 3: ...oduct Applicable in the European Union and other European countries with separate collection systems Thismarkingshownontheproductoritsliterature indicatesthatitshouldnotbedisposedwithotherhouseholdwas...

Page 4: ...s that can be connected and the number of cameras that can be displayed For simplicity the illustrations and descriptions in this document refer to the 16 channel model Rear Panel AUDIO IN AUDIO OUT C...

Page 5: ...d e r D i r e c t I P S w i t c h DirectIP Gigabit PoE Switch Alarm Speaker Microphone HDMI Monitor VGA Monitor Sensor POS Network Camera Network Camera Analog Camera IDIS Center Remote Monitoring Key...

Page 6: ...tings will only be applied after clicking Next Record Method Setup Remote Control b a c d e f 3 1 2 4 5 6 7 8 9 0 1 ID Button 2 Panic Button 3 Camera Buttons 4 Status Button 5 Layout Button 6 PTZ Cont...

Page 7: ...Display Area 5 Apply Cancel Buttons Camera Scan Button Use this button to scan for and register cameras Pressing the Scan button displays the following submenu Rescan Scan for DirectIP cameras that w...

Page 8: ...try Add Remove Camera Adds or removes the selected camera The Add Camera option is inactive if the camera has already been added to the screen Authentication Enter the necessary camera login info This...

Page 9: ...s complete the system will enter Live Mode Press the MENU button while in Live mode to bring up the Live menu on the top of the screen Press MENU once more to hide the menu Use the Arrow buttons on th...

Page 10: ...p or above Internet Explorer Ver 7 0 or above 32 Bit IDIS Web only works with Microsoft Internet Explorer and will NOT work with other browsers IDIS Web does not work in Microsoft Windows 8 metro UI S...

Page 11: ...Windows Vista or User Account Control window may pop up Click Allow and follow the instructions in the installation window to proceed with the installation 3 When the installation window appears click...

Page 12: ...he bottom of the Site List panel on the right A Device Scan window will appear on the screen 3 After selecting a scan mode click on Start Scan button and the scan results will be displayed on the list...

Page 13: ...tabs click on the Play tab In the Site list select a site you wish to connect to Then drag drop the selected site on the playback screen using your mouse The recorded video of the selected site will b...

Page 14: ...he device to the FEN If FEN feature is not enabled on the device turn FEN OFF and enter the device s IP address For port number using the default value is recommended Login Info Enter the User ID and...

Page 15: ...Power Out Ethernet 4 8 16 ports Monitor Out HDMI 1 HDMI VGA 1 DB15 Audio In 1 RCA connector Audio Out 1 RCA connector Alarm Terminal block Ethernet Port 1 RJ 45 eSATA Port 1 eSATA RS 232 Serial Port T...

Page 16: ...IDIS Co Ltd For more information please visit at www idisglobal com...

Reviews: