background image

22

Part 3 - Configuration

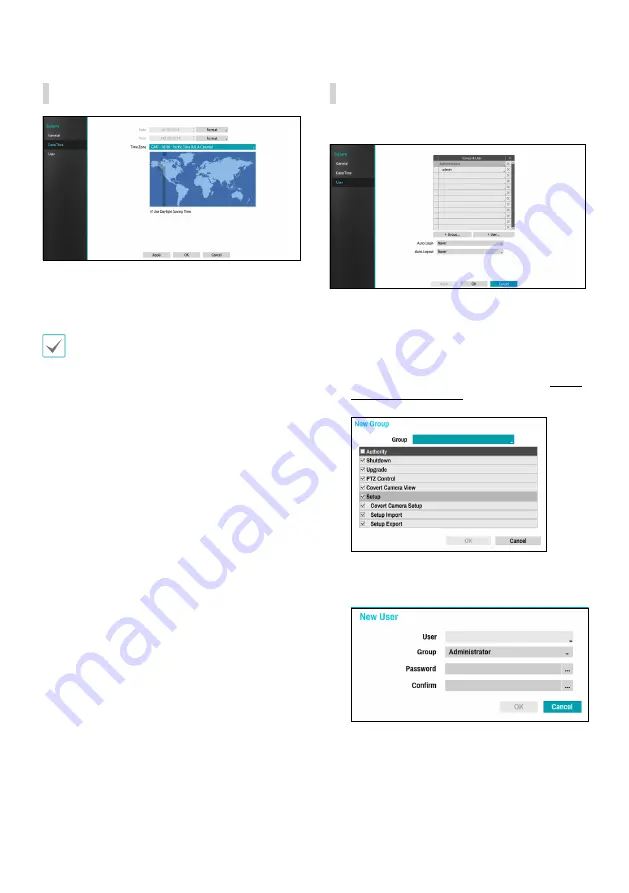
Date/Time


Date Format

/

Time Format

: Used to change the system’s 

date and time formats.


Time Zone

: Used to designate the system’s time zone.

Refer to the map displayed on the screen and change the 
time zone using the mouse or the arrow buttons.


Use Daylight Saving Time

: Enables DST correction.

User

U

se this option to register users and assign permissions.

Select 

+ Group

 and enter a group name. A group name 

can be up to 15 characters in length.

Specify the group’s permission settings. For more 
information on permission settings, refer to the 

Group 

Permissions on page 24.

Select

 + User

 and then enter a user name.

Summary of Contents for Idis DD-1216

Page 1: ...DD 1216 Video Decoder Operation Manual Powered by...

Page 2: ...iar with its use seek technical assistance from their retailer regarding product installation and use If you need to disassemble the product for functionality expansion or repair purposes you must con...

Page 3: ...t and refer servicing to qualified service personnel under the following conditions A When the power supply cord or the plug has been damaged B If liquid is spilled or objects have fallen into the equ...

Page 4: ...E AT THEIR OWN EXPENSE WARNING CHANGES OR MODIFICATIONS NOT EXPRESSLY APPROVED BY THE PARTY RESPONSIBLE FOR COMPLIANCE COULD VOID THE USER S AUTHORITY TO OPERATE THE EQUIPMENT THIS CLASS OF DIGITAL AP...

Page 5: ...eir respective owners The information in this manual is believed to be accurate as of the date of publication even though explanations of some functions may not be included We are not responsible for...

Page 6: ...12 Part 2 Getting Started 14 Login 14 Live Mode 15 Live Menu 15 Event Monitoring 18 Covert Camera 19 Context Menu Access 19 Edit Group 19 Part 3 Configuration 20 Menu Use 20 Text Input via Virtual Ke...

Page 7: ...7 TableofContents Part 4 Appendix 29 System Log Types 29 Error Code Types 30 Specifications 32 4...

Page 8: ...ollowing features 16 composite video output connectors HDMI VGA CVBS Real time network surveillance H 264 and H 265 compression algorithm DirectIPTM and IDIS protocol supported Convenient firmware upg...

Page 9: ...eSATA NETWORK CLIENT VIDEO IN PoE NC C NO ARI G RS 485 A 1A 2 A 3A 4 G Tx Rx RS 232 CAUTION TOREDUCETHERISKOFELECTRICSHOCK DONOTREMOVECOVER ORBACK NOUSER SERVICEABLEPARTSINSIDE REFERSERVICINGTOQUALIF...

Page 10: ...Indications LED Status Description Power LED Off No power connection Blinking System booting or upgrading lights System operating Network LED Blinking Normal network connection 3 Factory Reset Switch...

Page 11: ...sources 4 USB 2 Ports Connect the two USB ports Thenetworkconnectorisnotdesignedtobeconnecteddirectlywithcableorwireintendedforoutdooruse Press down on the button and insert the cable into the opening...

Page 12: ...the connector 12V of adapter to the video decoder and then connect the AC power cable of adapter to the power outlet Factory Reset Located next to the Power LED port on the front of the video decoder...

Page 13: ...13 Part1 Introduction Connections on the Rear Panel D i r e c t I P S w i t c h VGA Monitor Camera 12V Power DirectIP Gigabit PoE Switch CVBS Monitor D i r e c t I P N V R DirectIP NVR HDMI Monitor...

Page 14: ...ickon Login usingthe mouse 2 Selectauser enterthepassword andthenselectOK Clickonthe buttonnexttothepassword fieldusingthemouse Thiswillbringupavirtual keyboardyoucanusetoassignapassword For moreinfor...

Page 15: ...layout to single screen corridor format 1X2 2x2 3x3 or 4x4 In order to use the corridor format feature Corridor Format Display Monitor Use Corridor Format must first be enabled 3 Previous Next Group L...

Page 16: ...stbeenabled e g Cameo Sequence in 2x2 split screen mode IfusingtheFull Sequence setting pagenumbers appearonthesystemstatusareaontheupperrightpart ofthescreen nexttotheSequenceicon Pagesareskippedunde...

Page 17: ...camera sOSD window UsetheArrow buttonstopanandtiltthecameraup down left andright Youcanalsochangethedirectionbydraggingonthemouse Also it spossibletousethemousewheeltozoomin out Logginginwithanaccount...

Page 18: ...tozoomin out PTZCameraPanandTilt ZoomIn Out FocusNear Far IRISOpen Close OnePush Set MovetoPreset AdvancedPTZ Whileinonepush themessage Focusing willprompt onthescreen DraganddroptorepositionthePTZToo...

Page 19: ...cess WhileinLivemode right clickonthemousetoaccessthe Contextmenu PTZ AccessPTZcontrols Information Selectanetworkchanneltodisplay informationabouttheselectedchannel sdevice Edit Group Rearrangethespl...

Page 20: ...ivemenu Setupusingthe mouse 1 2 3 1 SystemSetup 2 CameraSetup 3 DisplaySetup 2 Left clickonthemousetoselectanoption 3 ChangethesettingandthenselectApply orOK tosave thechange Toapplydefaultsettings se...

Page 21: ...d to the system s USB port SelectingSetup Import doesnotchangethesettings below Time relatedsettings Date Time TimeZone andUse DaylightSavingTime Export Exportsthecurrentsystemsettingstoastorage devic...

Page 22: ...neusingthemouseorthearrowbuttons Use Daylight Saving Time EnablesDSTcorrection User Use this option to register users and assign permissions 1 Select Group and enter a group name A group name can be u...

Page 23: ...istered user or group select the icon on the right of the corresponding user group Group Administrator and User admin cannot be deleted Select the icon next to Group User on the top of the screen to d...

Page 24: ...Mayupgradethesystemfromthesystemmenu SystemSetup PTZ Control MaycontrolPTZcameras Covert Camera View MayaccesscovertcamerasinLivemode Setup Covert Camera Setup Mayconfigureconvertcamerasettings Setup...

Page 25: ...its images but does display OSD information about the camera Setting a camera as Covert 2 hides its images as well as ODS information about the camera as if it has been deactivated completely NVR Scan...

Page 26: ...the device scan screen Click Status entry of registered NVR to change the authentication information Camera Scan If Scan setting is set to Camera you can scan for the IDIS protocol camera to connect...

Page 27: ...ing the camera directly refer to the table below to set the camera stream Layout Stream Maximum Supported Resolutions ips 1x1 1x2 Stream 1 Unrestricted 2x2 Corridor Stream 1 3MP 30ips 3x3 Stream 2 2MP...

Page 28: ...vent occurs is shown on the screen Select between 5 secs and 15 mins For more information on Event Monitoring refer to the Event Monitoring on page 18 Manual Configuration Set the resolution manually...

Page 29: ...BootUp Login SystemShutdown Logout Restart SetupBegin UpgradeSuccess SetupEnd UpgradeError SetupImport PowerFailure SetupImportFailure TimeChanged SetupExport TimeZoneChange SetupExportFailure TimeSyn...

Page 30: ...mpressionFailure 103 LILOExecutionFailure 104 RebootFailure 105 ImproperFile Network Error Codes No Type No Type 0 CauseofFailureUnknown 20 ConnectionCancelledbyUser 1 NormalLogout 21 NoResponsefromNe...

Page 31: ...n Themainunitwon tturnon Checkthepowercableconnectionstatus Checkthepoweroutlet UnabletodisplayLivevideo Checkthecamera svideocableconnectionstatus Checkthemonitor svideocableconnectionstatus Checkthe...

Page 32: ...100M 1Gbps DC12V Input Terminal Blocks LED Power Status Network Button Switch Reset Environmental Conditions Operating Temperature 32 F to 104 F 0 C 40 C Operating Humidity 0 90 General Dimensions W x...

Page 33: ......

Page 34: ......

Page 35: ...DD 1216 Powered by...

Page 36: ...2 Direct IP IDIS Direct IP...

Page 37: ...3 1 2 3 4 5 6 SMPS 7 8 UPS UPS 9 10 11 12 13 14 A B C D E F 15 16 17 18 19 Tmra 20 21 22 23 24...

Page 38: ...4 15...

Page 39: ...5 IDIS Ltd 2021 IDIS Ltd IDIS Ltd IDIS IDIS Co Ltd patentlist accessadvance com...

Page 40: ...6 1 8 8 10 10 10 11 12 2 14 14 15 15 18 19 19 19 3 20 20 20 21 21 21 22 22 25 25 27 OSD 27 28 1 2 3...

Page 41: ...7 4 29 29 30 32 4...

Page 42: ...8 1 Ethernet 16 HDMI VGA CVBS H 264 H 265 DirectIPTM IDIS USB...

Page 43: ...TOPEN A C E G B D F H 100 240V AUDIO IN AUDIO OUT VGA OUT HDMI eSATA NETWORK CLIENT VIDEO IN PoE NC C NO ARI G RS 485 A 1A 2 A 3A 4 G Tx Rx RS 232 CAUTION TOREDUCETHERISKOFELECTRICSHOCK DONOTREMOVECOV...

Page 44: ...10 1 1 2 3 1 2 3 1 2 3...

Page 45: ...11 1 1 2 3 4 1 12 2 PoE 3 4 USB 2 1 12 12 GND 2 PoE Cat5e RJ 45 Ethernet NVR PoE 3 CVBS VGA HDMI 4 USB 2 USB 12 USB USB...

Page 46: ...12 1 VGA HDMI 2 3 4 PoE NVR RJ 45 CAT5 CAT5e Cat6 PoE 16 NVR 12 1 2 3 2 4...

Page 47: ...13 1 D i r e c t I P S w i t c h VGA Monitor Camera 12V Power DirectIP Gigabit PoE Switch CVBS Monitor D i r e c t I P N V R DirectIP NVR HDMI Monitor...

Page 48: ...14 2 Login 1 2 K 3...

Page 49: ...15 2 1 2 3 4 5 6 7 8 1 2 1X2 2x2 3x3 4x4 3 4 OSD On Screen Display OSD 5 1 2 3 4 5 6 7 8...

Page 50: ...16 2 e 2x2 2x2 6 7 8 1 4...

Page 51: ...17 2 PTZ PTZ PTZ PTZ PTZ PTZ OSD PTZ PTZ PTZ PTZ PTZ PTZ PTZ PTZ...

Page 52: ...18 2 PTZ PTZ PTZ PTZ PTZ PTZ PTZ PTZ PTZ IRIS PTZ PTZ PTZ...

Page 53: ...19 2 1 2 1 2 1 2 PTZ PTZ 1 2 3...

Page 54: ...20 3 3 1 1 2 3 1 2 3 2 3 OK...

Page 55: ...21 3 USB USB on page 30 USB USB USB FAT32 5000 system_log txt NVR NVR NVR IDIS IDIS NVR...

Page 56: ...22 3 1 15 2 3...

Page 57: ...23 3 4 16 5 OK 6 7 OK admin admin admin...

Page 58: ...24 3 PTZ PTZ...

Page 59: ...25 3 1 2 1 2 1 2 NVR NVR NVR NVR NVR 4 NVR...

Page 60: ...26 3 OK OK NVR 16 NVR IDIS OK IDIS...

Page 61: ...27 3 OK 1x1 1x2 1 2x2 1 3 3x3 2 2 4x4 2 2 OSD OSD PTZ PTZ PTZ x2 x3...

Page 62: ...28 3 3 2 5 15 3840 2160 2560 1440 1920 1200 1920 1080 1680 1050 1600 1200 3840 x 2160 HDMI 2 0 VGA 1920 1080 NTSC PAL...

Page 63: ...29 4 4...

Page 64: ...30 4 No No 0 400 USB 1 401 USB 2 402 USB 3 403 USB 4 404 USB 100 405 101 102 103 LILO 104 105 No No 0 20 1 21 2 22 3 23 4 24 OEM 5 25 6 26 7 27 SSL 8 28...

Page 65: ...31 4 9 29 11 30 RTP TCP 12 31 13 100 CODEC 14 101 jpeg 15 103 MPEG4 16 400 17 1...

Page 66: ...1600x1200 VBR HDMI VGA CVBS Ethernet 10M 100M 1Gbps 12 32 F 104 F 0 C 40 C 0 90 7 9 x 1 7 x 5 7 200 x 44 x 145 0 78 DC12V PoE IEEE802 3af 3 12V 1 03A 12 7W PoE IEEE 802 3af Class 3 FCC CE KC V1 0 IDI...

Page 67: ......

Page 68: ...IDIS Co Ltd For more information please visit at www idisglobal com...

Reviews: