background image

The settings for the peripheral devices on your Digital PVR product, refer to the methods below.

1. Press the Menu button.

2. Select Others using

 ◀/▶/▲/▼

 button and press the OK button.

3. Select Peripheral Devices using the 

▲/▼

 button and press the OK button.

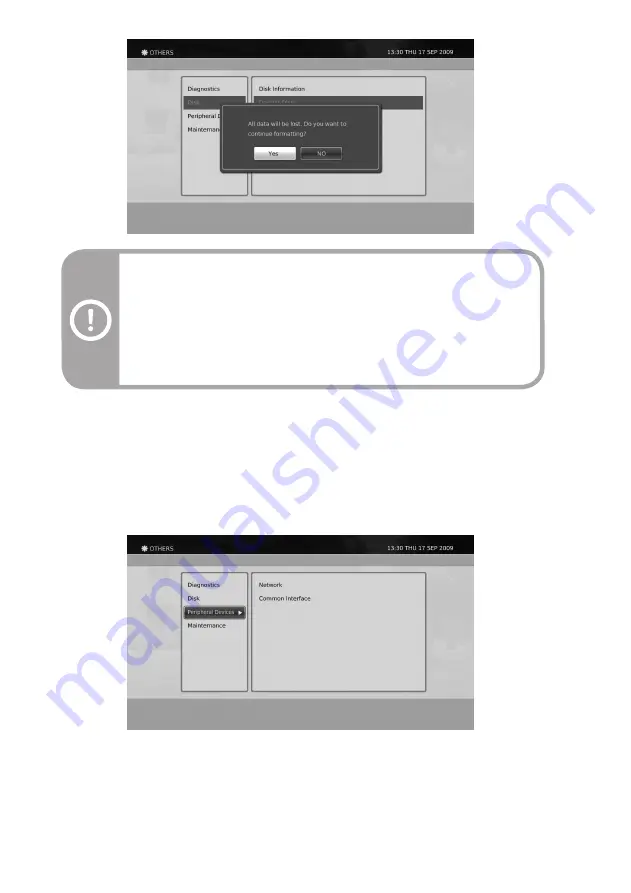
Peripheral Devices

Note: 

Please be aware that this process will take a few minutes.

DO NOT TURN THE POWER OFF DURING FORMATTING PROCESS!

The service list and configured settings for your product will not be erased using 

this function. 

WARNING : ALL OF THE RECORDED MEDIA WILL BE DELETED AFTER THIS 

PROCESS!

52

You can repair your external memory device using this menu for consistency. When using this menu, you will be 

asked for the PIN number.  The default PIN is 0000.  Also you will be asked again for confirmation after entering 

the PIN number. 

Repair Disk

Summary of Contents for DHR8202U

Page 1: ...Twin HD Tuner Digital Terrestrial Recorder User s Guide DHR8202U DHR8203U DHR8205U...

Page 2: ...V 1 0...

Page 3: ...mmes on one screen and you can record two different services while watching another simultaneously Furthermore you can even playback a existing recorded media while recording two different services si...

Page 4: ...all not be exposed to dripping or splashing and that no objects filled with liquids such as vases shall be placed on the product The ventilation should not be impeded by covering the ventilation openi...

Page 5: ...does not operate normally The warranty will not be guaranteed if the warranty void tape is removed Contact the retailer supplier who sold you the product Call the helpline center on the last page of...

Page 6: ...ser s risk In relation to the software the end user is prohibited from copying transferring to a 3rd party modifying or otherwise attempting to derive the source code of any part or whole of the propr...

Page 7: ...Smartcard 7 7 8 8 9 10 10 11 11 11 11 12 12 13 13 13 14 14 15 15 16 17 18 18 18 19 20 20 21 21 21 21 22 22 23 23 24 24 24 24 25 25 25 25 26 27 27 27 28 Setup Connecting the Aerial Connecting the TV U...

Page 8: ...ges System Information Signal Information Disk Peripheral Devices Maintenance Preferences AV Setup Language Time Parental Control Playback Settings Power Management Installation Scan Services Full Res...

Page 9: ...page of this manual Warning The company shall not be liable for problems caused by changing hard disk driver by user When you open the packaging make sure you have the following User s Guide Quick St...

Page 10: ...e product 7 USB Used to connect USB memory device such as memory stick or HDD 8 CI Module Slot Used to connect CI Module 1 RF IN Used to connect your aerial 2 RF OUT Used to connect RF ANT input jack...

Page 11: ...o Slowly play media A B repeat Press for Book Marking function Press for Repeat function Press to Rewind media Press to Pause media Press to exit to the live screen Press to view OSD Menu Colour butto...

Page 12: ...t The Conditional Access component is a CI module with a removable Smartcard A CI Module looks like a PCMCIA for laptops There are various kinds of CI Modules suitable for various encryption systems I...

Page 13: ...act your local product distributor Connecting the Aerial Using HDMI Lead Connecting the TV Connect your aerial to the RF IN Use the RF lead to connect the TV and your product to watch digital or analo...

Page 14: ...sed audio through the HDMI interface In this case change the settings in the Menu Preferences AV Setup Dolby Digital WARNING When using HDMI DVI converter lead for your connection to a monitor you may...

Page 15: ...thods described as below TV and VCR connections using the SCART leads are as below Using SCART Lead 1 On the RF OUT of the product and the aerial input of the VCR use the RF lead connector for connect...

Page 16: ...Connecting the Audio System When connecting the Audio System choose the most appropriate procedure for your product as below Powering On 1 Plug in the power of the product to a wall outlet 2 Switch O...

Page 17: ...Power saving stand by used in this product 1 Normal stand by mode The normal stand by mode supports current time display on the VFD while on stand by mode And the power supply for the main core is en...

Page 18: ...ays that the product is under reservation mode 7 Displays that the product is under recording mode 8 Displays that the product is under time shifting mode 9 Displays on playback mode 10 Displays on pa...

Page 19: ...arning If you exit the Installation Wizard without fully completing the service searching procedure you may not have all of the services available In this case you can use the Menu Installation Scan S...

Page 20: ...rences Power Management chapter Service List All of the searched Services on the product can be listed by the Service List The list comprises TV Radio and others such as Favourite groups Each service...

Page 21: ...r Number WHITE FUNC Press the FUNC button while navigating the Service List to directly access the Home HD SD Edit List and Sort menu By pressing the WHITE button again the dialogue access menu will d...

Page 22: ...witch services using one of the following methods 1 Press the P P button on the remote control 2 Enter the service number using the NUMERICAL 0 9 buttons and press the OK button on the remote control...

Page 23: ...ct the desired audio language as below 1 Press the AUDIO button to view the Audio Language selection dialogue menu 2 Select the desired audio language using the button and press the OK button If the c...

Page 24: ...main screen will be outputted To exit the PIP mode press the PIP button again Note The teletext MHEG is only available for the main screen The PIP screen is also available while recording a programme...

Page 25: ...d recorded the time gap between the live broadcasting point and watching point various play modes status and bookmarks 1 2 3 4 5 6 7 8 9 1 Start Time Programme start time 2 End Time Programme end time...

Page 26: ...rom the postion you entered Note The product does not support Time Shifted Recording and recording the same service simultaneously When the Record button is pressed during a Time Shifted Recording ope...

Page 27: ...g to adjust the recording end time You can adjust the recording end time by using the button or the P P button Then press the OK button to change the recording end time Repeat Mode You can repeat play...

Page 28: ...rammes you may watch another programme in the PIP screen but there are some restrictions Press the OK button to display the Service List and press the button to select the PIP Service List available N...

Page 29: ...uring Fast Forward Rewind the operation stops immediately and will be paused Pause If you press the PAUSE button on the remote control the current programme will be paused If you press the PAUSE butto...

Page 30: ...while navigating the Bookmark List will add a bookmark BLUE No function WHITE FUNC Press the FUNC button while navigating the Service List to directly access the colour button functions By pressing t...

Page 31: ...programme List TV SCART TV Type Display Format Video Format Dolby Digital Audio Description Lip Sync Adjustment The Main Menu lets you choose and change a wide range of your Digital PVR product Main M...

Page 32: ...ime Zone Setting Time Zone Guidance Protection Change PIN Power Saving Mode in Standby Automatic Standby Instant Replay Quick Skip Slide Show Time Time Shift Duration Time Shift Auto Start 30 Diagnost...

Page 33: ...Media screen select a media and press the OK button on the remote to play the media You can also use the P P buttons on the remote control to move the page up down The Media screen is displayed as fol...

Page 34: ...EN button to Select Unselect media C YELLOW Media Type Press the YELLOW button to select the type of media MP3 JPEG Recorded TV programme Recorded Radio Programme D BLUE Sort Press the BLUE button to...

Page 35: ...ton You can select multiple media 2 To unselect the selected media press the GREEN button again Deleting Recorded Media 1 Select a media you want to delete from the list and press the FUNC button 2 Se...

Page 36: ...ance programme Displayed on recommended programme Displayed on split programme Displayed on series programme Guide The programme guide displays a full list of available services and programmes based o...

Page 37: ...rvation The reservation icon will be added on the programme 2 Select the reserved scheduled programme and press the OK button to cancel reservation 3 If you press the OK button a pop up dialogue windo...

Page 38: ...e navigating the Programme Search is as follows RED Delete Pressing the RED button while navigating the Programme Search will delete a character which you wrote in the search keyword input field GREEN...

Page 39: ...tton to sort the list by the title s alphabetical order WHITE FUNC Press the FUNC button to use all of the colour button functions just by navigating the pop up dialogue window Page Up Down Press to m...

Page 40: ...the main Menu or pressing the BLUE button on the remote control when on the Guide Menu When Cancelling reservations please ensure that only the reservations that you wish to cancel are selected Unsel...

Page 41: ...your TVs maximum format it will automatically be set to your TVs maximum resolution The default setting of the Video Format is set to Auto Video Format The Preferences menu lets you change the setting...

Page 42: ...Gaelic This function is only valid if the source supports subtitle service 1 Press the MENU button 2 Select Preferences using the button and press the OK button 3 Select Language using the button and...

Page 43: ...ress the OK button 3 Select Parental Control using the button and press the OK button Settings for parental control can be configured by using this menu Parental Control 1 Press the Menu button 2 Sele...

Page 44: ...live point Quick Skip Selection 15 Sec 30 Sec 60 Sec This is the setting value for the instant replay function used in the Time Shifted Recording and the recorded title playback Instant Replay You ca...

Page 45: ...Management You can change the settings for the Power Management functions for the product You can adjust the settings whether the product switches to the power saving mode on standby And also adjust...

Page 46: ...ghted press the OK button to start scanning 3 After the scan operation is finished it will automatically highlight the Save button Press OK button to save the searched services 1 Press the Menu button...

Page 47: ...lar frequency and press the OK button 2 To start scanning move the cursor to the Scan button and press the OK button to start scanning 3 The scanned services can be saved by moving the cursor to the S...

Page 48: ...ected service 4 Press the YELLOW button to select all services Press the YELLOW button again to unselect all selected services The functions for the Colour Buttons on the remote control while navigati...

Page 49: ...have selected the services you wish to Delete press the RED button Note Press the button to move to the TV or radio service list directly The default PIN is 0000 RED Remove Pressing the RED button whi...

Page 50: ...the selected service to or from the list GREEN Select Unselect Pressing the GREEN button while navigating the Edit Favourite List will select or unselect the service YELOW Select All Unselect All Pre...

Page 51: ...button 3 Select Diagnostics using the button and press the OK button Diagnostics Others The System Messages for the product can be viewed following the below methods 1 Press the Menu button 2 Select...

Page 52: ...Current tuned channel information Modulation information Service provider information Signal strength and quality information System Information The system information enables the user to view the inf...

Page 53: ...ng your disk 1 Press the Menu button 2 Select Others using button and press the OK button 3 Select Diagnostics using the button and press the OK button 51 You can format your internal Hard Disk Drive...

Page 54: ...cess will take a few minutes DO NOT TURN THE POWER OFF DURING FORMATTING PROCESS The service list and configured settings for your product will not be erased using this function WARNING ALL OF THE REC...

Page 55: ...ion using this menu The information on the Common Interface of the product can be viewed following the below methods 1 Press the Menu button 2 Select Others using button and press the OK button 3 Sele...

Page 56: ...turned off after completing the update You can restore your product to the default settings by using Restore Default When restoring to the default settings you will be asked for the PIN The default P...

Page 57: ...er Consumption Gross weight Boxed Size Operating Temperature MPEG1 Layer2 3 MPEG2 AAC HE AAC Dolby Digital Plus MPEG2 MPEG4 H 264 AVC VC 1 576p 720p 1080i 1080p 576i CVBS RGB 4 3 16 9 Letter Box 3xUSB...

Page 58: ...Make sure the batteries in the remote control are operable 6 The default PIN is 0000 7 Service search does not work properly Check whether the antenna is connected correctly 8 Cannot view any scrambl...

Page 59: ...l It must be used solely for domestic purposes For further information regarding your warranty please see the section at the rear of your user manual The warranty will be rendered invalid if the produ...

Page 60: ......

Page 61: ...MEMO...

Page 62: ...MEMO...

Page 63: ......

Page 64: ......

Reviews: