


Making Connections
7
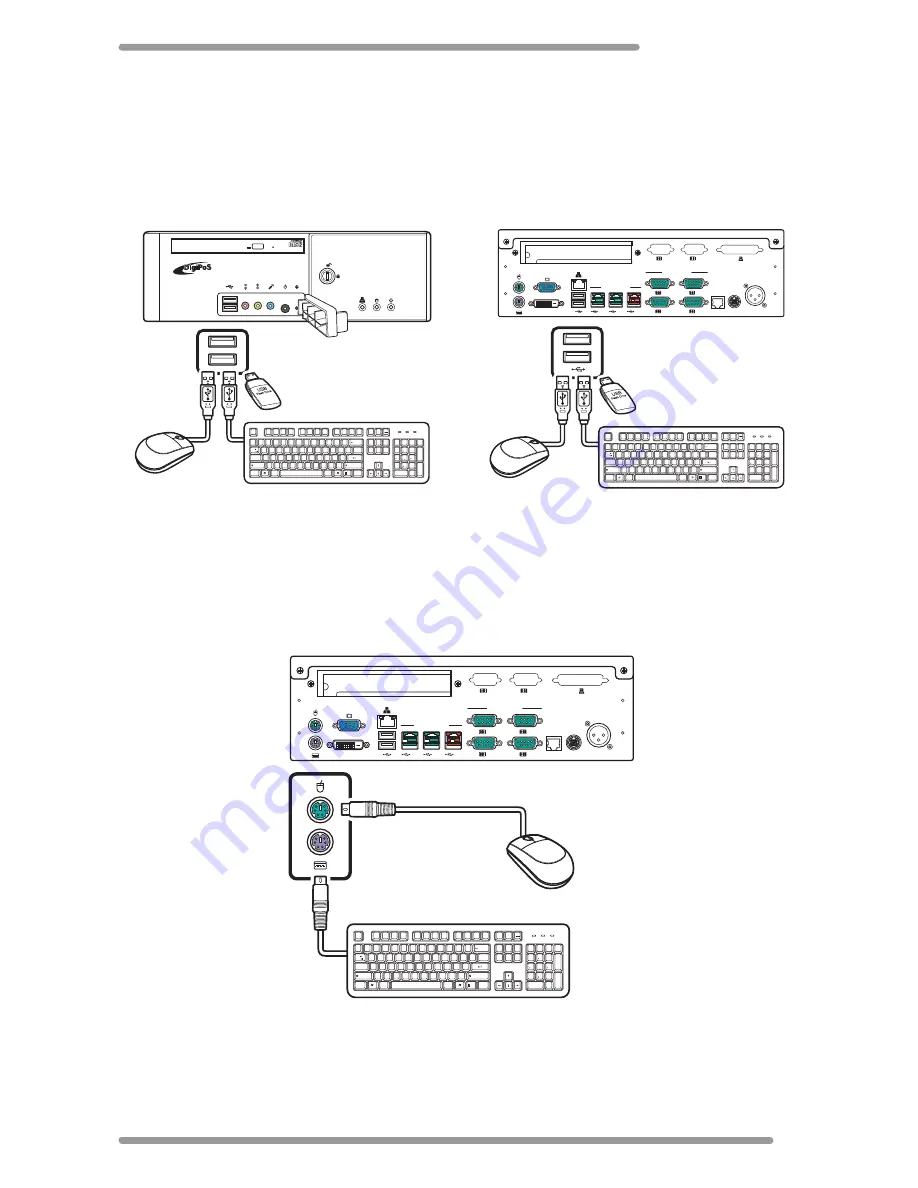
Connecting USB Devices
There are two USB ports on both the front and the rear side of the DigiPoS Retail Active
8000 available for USB peripheral devices. You can connect USB devices, such as a USB
keyboard, a USB mouse, and data storage devices (i.e. USB flash drives).
Connecting a PS/2 Keyboard and Mouse
You can connect a PS/2 keyboard and mouse using the PS/2 keyboard and mouse ports on
the rear side of the DigiPoS Retail Active 8000.
RETAIL ACTIVE
MOLEX
MOLEX
Esc
F1
F2
F3
F4
F5
F6
F7
F8
F9
F10
F11
F12
Screen
Insert
Backspace
Enter
Enter
Alt
Ctrl
Caps Lock
Tab
Alt
Ctrl
Page
Up
Page
Down
+
=
_
-
)
(
*
*
&
^
%
$
#
@
1
~
`
_
/
+
Delete
Scroll
Lock
Num
Lock
Home
Home
7
9
8
!
1
End
0
2
3
4
5
6
7
8
9
Q
P
{
[
{
[
-
\
/
W
E
R
T
Y
U
I
O
A
:
;
"
'
S
D
F
G
H
J
K
L
Z
X
C
V
B
N
M
<
,
.
>
?
Ins
0
Del
.
4
PgUp
3
PgDn
End
6
5
2
Shift
Shift
Pause
Break
Num
Lock
Caps
Lock
Scroll
Lock
3
1
4
2
6
5
12V
12V
24V
CASH DRAWER
POWERED RS232
PCI
DVI
EXTERNAL
POWERED INPUT
24VDC
OUTPUT
POWERED USB
MOLEX
MOLEX
Esc
F1
F2
F3
F4
F5
F6
F7
F8
F9
F10
F11
F12
Screen
Insert
Backspace
Enter
Enter
Alt
Ctrl
Caps Lock
Tab
Alt
Ctrl
Page
Up
Page
Down
+
=
_
-
)
(
*
*
&
^
%
$
#
@
1
~
`
_
/
+
Delete
Scroll
Lock
Num
Lock
Home
Home
7
9
8
!
1
End
0
2
3
4
5
6
7
8
9
Q
P
{
[
{
[
-
\
/
W
E
R
T
Y
U
I
O
A
:
;
"
'
S
D
F
G
H
J
K
L
Z
X
C
V
B
N
M
<
,
.
>
?
Ins
0
Del
.
4
PgUp
3
PgDn
End
6
5
2
Shift
Shift
Pause
Break
Num
Lock
Caps
Lock
Scroll
Lock
Front side port
Rear side port
3
1
4
2
6
5
12V
12V
24V
CASH DRAWER
POWERED RS232
PCI
DVI
EXTERNAL
POWERED INPUT
24VDC
OUTPUT
POWERED USB
Esc
F1
F2
F3
F4
F5
F6
F7
F8
F9
F10
F11
F12
Screen
Insert
Backspace
Enter
Enter
Alt
Ctrl
Caps Lock
Tab
Alt
Ctrl
Page
Up
Page
Down
+
=
_
-
)
(
*
*
&
^
%
$
#
@
1
~
`
_
/
+
Delete
Scroll
Lock
Num
Lock
Home
Home
7
9
8
!
1
End
0
2
3
4
5
6
7
8
9
Q
P
{
[
{
[
-
\
/
W
E
R
T
Y
U
I
O
A
:
;
"
'
S
D
F
G
H
J
K
L
Z
X
C
V
B
N
M
<
,
.
>
?
Ins
0
Del
.
4
PgUp
3
PgDn
End
6
5
2
Shift
Shift
Pause
Break
Num
Lock
Caps
Lock
Scroll
Lock


