background image

Appendix 

67 


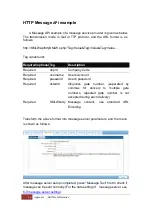
Press the icon on left side of the blank to see message format for reference. 

@@DEVICENAME@@

 : The device name to show as sending a message. 

@@ACCOUNT@@

 : The account to send the message. 

@@PASSWORD@@

 : The password to send the message. 

@@GSMLWNUM@@

 : The number to send the message. 

@@MSG@@

 : Message content to show as sending a message. 

@@IP@@

 : Device IP to show as sending a message. 


Summary of Contents for SMLW 12 Series

Page 1: ...1...

Page 2: ...g A triangle with flash sign and an arrow inside is to alert users the presence of uninsulated dangerous voltage within the product s enclosure that may be of sufficient magnitude to constitute a risk...

Page 3: ...e rated current indicated on the device 5 Replacement with wrong types of battery may result in explosion and used batteries should be disposed as per relevant regulations 6 The test results of this d...

Page 4: ...cturer will not guarantee express implicitly or explicitly or declare legally the content or particularly deny the marketability and applicability of this product used for a specific purpose These rul...

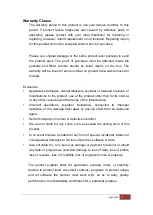
Page 5: ...nty altered misused modified or damaged because of natural disasters or improper operation This warranty will not apply to any defects or discomformity in product component due to negligence in instal...

Page 6: ...ardware Description 11 1 6 Product packaging 12 Chapter 2 Hardware installation 13 2 1 Horizontal rack installation 13 2 2 Vertical rack installation 14 2 3 Product installation 15 Chapter 3 Panel ope...

Page 7: ...6 IDCView 42 6 7 Peripheral Parameters 44 6 8 Other 45 Chapter 7 Firewall menu 46 7 1 IP Filter 46 7 2 MAC filter 47 Chapter 8 Account Management 48 8 1 New User 48 8 2 Outlet Authority 49 8 3 Email...

Page 8: ...n 13 2 Java 63 Appendix 65 Set back to factory default values 65 HTTP Message API example 66 Message format Explanation 68 Product Specification Sheet 69 Product Information 72 Magnetic 72 circuit bre...

Page 9: ...ifying the issue of device network IP management 1 2 Application scope Power monitoring and management of Computer room and rack Power monitoring in the computer centers of various organs and units Po...

Page 10: ...r relevance info IP and MAC filtering to restrict the operation computer of devices SYSLOG support SNMP V1 V2 V3 and SNMP Trap support Support Web API Support online firmware upgrade to renew equipmen...

Page 11: ...perature and network information 4 Power Outlet Power supply 5 Main Lead Device power lead 6 Circuit breaker protection Prevent power overload and damage to devices when circuit breaker protection tri...

Page 12: ...roduct packaging Remote Power Monitor 1pc Electronic User Manual CD 1pc Power Cord 1pc Rack fixer 2pcs Screw 4pcs If any of the above accessories missed or failed to function normally please contact t...

Page 13: ...the installation please do obey the Important Safety Instructions 2 1 Horizontal rack installation SMLW 8 series provide standard 9 Inch rack for the installation of devices Please use the rack insta...

Page 14: ...ical rack installation SMLW 12 16 24 series provide 0U to be installed on the side of rack For installation of the device on the rack please use the installation accessories attached with the product...

Page 15: ...lation For correct operation of this product make sure to install this device according to the following table and chart 1 Network port 2 LAN or Internet cables 3 Computer for operation of this device...

Page 16: ...twork info 2 Five sides button Upper and lower switching Switch down to display current info max current alarm and inner temp and Network info Left and right switching Switching the secondary items of...

Page 17: ...zzer Buzzer will have bee sounds when alarm happens In web page management through timeout parameter setting of cycle key pressing in panel operation area of 6 7 peripheral Parameters it is also possi...

Page 18: ...es button down to show in a regular turn of current info max current inner temp and Network info as below Press left of the five sides button it would show the opposite detection Press five sides butt...

Page 19: ...p to enter alarm current setting For modification of alarm current press to increase the alarm current by 0 5A in each press After increasing to the maximal alarm current the value will return back to...

Page 20: ...e device IP will be preset as192 168 1 10 if there is no DHCP server the acquired IP can be displayed by LCD panel Relevant operation referred to 3 2 Total current and IP operation or device IP can be...

Page 21: ...ction Currently available in English Traditional Chinese Simplified Chines press Next to continue Account Setting This menu is for setting the admin account and password of the device all the fields s...

Page 22: ...22 Chapter 4 First Operation BellWin Information Host setting The product is assigned dynamically DHCP To specify a fixed IP address please fill in IP Address Subnet Mask and Gateway...

Page 23: ...rver provided by ISP providers then you can set up two DNS servers If you do not know your DNS server address please check it from Windows O S by these steps Go to START ALLPROGRAMS ACCESSORIES COMMAN...

Page 24: ...ual way HTTP the other is a security measure HTTPS Comment setting rolling down for Http or Https as concern transmissions If you want a security measure instead of HTTP The default is 80 or HTTPS The...

Page 25: ...ith Time Server Sync with time server When this option enabled device time will synchronize with time server Time Server Please fill in time server IP address or click to select time server option lis...

Page 26: ...e zone where the device is The system is based on Greenwich Mean Time thus an accuracy setting to time zone may affect the time record of events and chart Time Format Select the time format to show in...

Page 27: ...cally reboot to update configurations 4 3 Sign in It will show a fixed IP Address after rebooting User can see IP address through LCD panel as enabled DHCP See 3 2 Total cruuent and IP operation First...

Page 28: ...ter successful login the web page will display the following operation menu each part of which is illustrated as below 1 User login information 2 Automatically logout Timeout 3 System Logout 4 Select...

Page 29: ...ripheral state Display total current voltage power factor device temp and watts setup overload current high alarm and low alarm of total current branch1 and branch 2 1 Voltage Display the voltage of t...

Page 30: ...nsumption of the device only applicable to 30 32 A 9 Wart hour Display the consumption wart hour of the device since the last zeroing only applicable built in Wart hour module Overload current Input t...

Page 31: ...ing This menu is mainly for setting the basic data of network Enabled DHCP Use checkbox to enable DHCP It will assign IP address Host Assign the Network IP address for the power switch Subnet Mask Set...

Page 32: ...er to connect with smart monitor by HTTP Enabled Https Allow browser to connect with smart monitor by HTTP SSL Http Port Provide browser to communicate by HTTP with smart monitor Https Port Provide br...

Page 33: ...st Test The ping results will be displayed in the Result panel Please press Confirm to store setup after finished 6 2 E mail server When there is a triggered warning from the setup of this power switc...

Page 34: ...identify the user please enable the checkbox and setup the account and password Username The account to log in mail server Password The password to log in mail server Email Test After set up the above...

Page 35: ...er of ISP supplier or preset SMS server Host Host IP address of SMS Server Transmission Mode Follow ISP suppliers rules to send out short message via GET or POST protocol to sender s server Device Nam...

Page 36: ...e account to send the message PASSWORD The password to send the message GSMNUM The number to send the message MSG Message content to show as sending a message IP Device IP to show as sending a message...

Page 37: ...make sure this function is normal Click Test the window will pop up as below Phone Number Enter your cell phone number for testing Content Enter the message for testing Test Test result will be displ...

Page 38: ...Set the destination port Default is 161 Read Community Key in passwords for the Community Name fields Default is public SNMP Writing Select the checkbox to enable SNMP Write in Write Community Key in...

Page 39: ...DES type Select DES type to key in password SNMP Device info sysName The name displayed on SNMPAgent sysContact The contact displayed on SNMPAgent sysLocation The location displayed on SNMPAgent SnmpT...

Page 40: ...ow will pop up as below Host Enter the Host IP address of SNMP Trap Server for testing Port Enter SNMP Server connect port Default is 162 Authority String The authentication string to access SNMP Trap...

Page 41: ...Port Enter Connect Port for Syslog Server Default is 514 Press Add button to build new data User can press Delete button to remove exist data Please click Save to store setup data Syslog Test After se...

Page 42: ...st result will be displayed at the black area after pressed test button Please press Confirm to store setup after finished 6 6 IDCView This menu mainly displays the server data of IDCView events IDCVi...

Page 43: ...this function is normal Click IDCview Test the window will pop up as below Host Enter the Host IP address of IDCView server for testing Port Enter Connect Port for IDCView Server Test Test result wil...

Page 44: ...by system when power current is lower than threshold current Temp RH Probe Temp Scale You can choose either Celsius or Fahrenheit Released Temp Range You may set up threshold temp to avoid floating po...

Page 45: ...t as no operation is processing Timeout In alarm setting status LCD panel will show the initial picture of first phase automatically as no operation is processing 6 8 Other This menu is mainly for set...

Page 46: ...ave after finishing setting Chapter 7 Firewall menu In this tab you may set up permitted IP or Mac address to access this remote power manager 7 1 IP Filter User can set up permitted IP section in thi...

Page 47: ...s was built System will reject people who try to access this remote power manager from other Mac addresses Unmark the square and press Save button if you expect to cancel this function Allowed MAC Add...

Page 48: ...Modify and Delete the User account 8 1 New User When you click Add browser will pop up a window for you to set Account Password and User Type Basic Info To setup Account Password and User Type Account...

Page 49: ...setting is permitted and controllable switch can be changed Administrator Administrator can manage the whole network 8 2 Outlet Authority Outlet Authority tab is mainly to open up outlet authority to...

Page 50: ...fill the right mail address Parameter Use the checkbox to enable the setting The system will follow the warning method you choose Infeed Use the checkbox to enable the setting When abnormal condition...

Page 51: ...right cellphone number Parameter Use the checkbox to enable the setting The system will follow the warning method you choose Infeed Use the checkbox to enable the setting When abnormal condition of in...

Page 52: ...odify Account Click this icon to modify the previous setting Operation of Alarm please see 8 1 Add New Account 8 6 Delete Account Click Delete icon browser will pop up a Confirmation of delete window...

Page 53: ...ling down to select Sync with computer or Manual Setting Time Server Setting Synchronization with Time Server Select this time method if you want the system time of this power switch to be the same as...

Page 54: ...r List You may have numerous options to select time server as this device provides then click Save to finish it Time Zone The time here is following Greenwich Mean Time as most NTP servers do User mus...

Page 55: ...l Temperature and humidity charts and statistic data Category It provides infeed device temperature external temperature and humidity This window will show different screen based on variant version Cl...

Page 56: ...and reasons of such logs Click on icon to list all events by order The meaning of three icons is as Refresh Download and Delete Refresh Click Refresh button to refresh the screen Download Click Downlo...

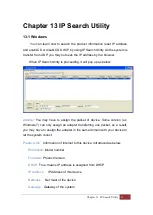
Page 57: ...firmware and the configuration files You can download the latest firmware from the suppliers web page to upgrade the firmware of SM series products 12 1 Firmware Upgrade The upgrade steps are as foll...

Page 58: ...ge will upload firmware upgrade files and after upload finished enter firmware update and then firmware upgrade will be finished after countdown Upgrade will finish after 100 seconds When the file you...

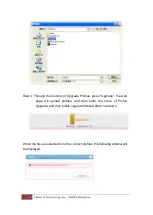
Page 59: ...steps for saving profiles are as follows Step 1 Press Save Step 2 Save the files to the directory specified by you The steps for upgrading profiles are as follows Step 1 Press Browse Step 2 Select th...

Page 60: ...he function of Upgrade Profiles press Upgrade the web page will upload profiles and then enter the menu of Profile Upgrade and then profile upgrade finished after countdown When the file you selected...

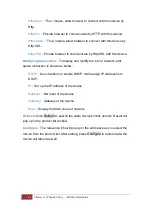
Page 61: ...l pop up as below Adapter You may have to assign the packet of device Some version ex Windows 7 can only assign an adapter transferring one packet as a result you may have to assign the adapter in the...

Page 62: ...display and modify the info of network edit space instruction is shown as below DHCP Use checkbox to enable DHCP It will assign IP address from DHCP IP Set up the IP address of the device Netmask Net...

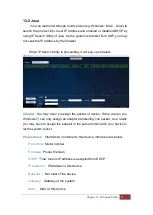
Page 63: ...up as below Adapter You may have to assign the packet of device Some version ex Windows 7 can only assign an adapter transferring one packet as a result you may have to assign the adapter in the same...

Page 64: ...modify the info of network edit space instruction is shown as below DHCP Use checkbox to enable DHCP It will assign IP address from DHCP IP Set up the IP address of the device Netmask Net mast of the...

Page 65: ...ctory default values 2 Select Reset Account IP admin account and password will be set as admin add a new account if no admin account while the function of IDCView only is cancel Device IP will be auto...

Page 66: ...quired username User s Account Required password User s password Required dstaddr Objective gate number separated by commas for delivery to multiple gate numbers repeated gate number is not accepted d...

Page 67: ...reference DEVICENAME The device name to show as sending a message ACCOUNT The account to send the message PASSWORD The password to send the message GSMLWNUM The number to send the message MSG Message...

Page 68: ...lly bring in the followings info Message format Note Company code depid xxxxxx Required User s Account account ACCOUNT Required User s password password PASSWORD Required Cellphone number dstaddr GSML...

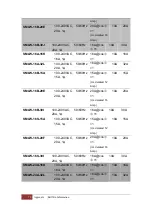
Page 69: ...ed 12 Amp 10A 15A SMLW 8B 20E 100 240VAC 20A 1 50 60Hz 20A cos 1 UL derated 16 Amp 10A 20A SMLW 12A 16K 100 240VAC 16A 1 50 60Hz 16A cos 1 10A 16A SMLW 12A 32L 100 240VAC 20A 1 50 60Hz 16A cos 1 10A 3...

Page 70: ...AC 15A 1 50 60Hz 15A cos 1 UL derated 12 Amp 10A 15A SMLW 16B 20E 100 240VAC 20A 1 50 60Hz 20A cos 1 UL derated 16 Amp 10A 20A SMLW 16B 30I 100 240VAC 20A 1 50 60Hz 16A cos 1 10A 30A SMLW 16S 15A 100...

Page 71: ...os 1 UL derated 16 Amp 10A 20A SMLW 24B 30I 100 240VAC 20A 1 50 60Hz 16A cos 1 10A 30A SMLW 24P 16K 100 240VAC 16A 1 50 60Hz 16A cos 1 10A 16A SMLW 24P 20F 100 240VAC 20A 1 50 60Hz 20A cos 1 UL derate...

Page 72: ...wer Input Voltage 100 240 VAC 200 240 VAC 50 60 Hz 100 240 VAC 200 240 VAC 50 60 Hz 100 240 VAC 200 240 VAC 50 60 Hz 100 240 VAC 200 240 VAC 50 60 Hz Operating Temp 0 35 C 0 35 C 0 35 C 0 35 C Operati...

Page 73: ...her than for its normal or any other cause beyond the range of the intended use Incorrect operations improper installation connected to improper appliance or the damage that repair by anyone other tha...

Page 74: ...s the rights of the modification and upgrade on software and documents and is not liable to inform any party about any modified or updated contents If you want to know more about information of extend...

Reviews: