


9
Camera Installation
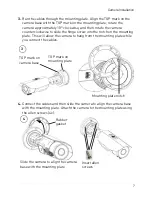
6.
Loosen the three allen screws on the camera stand to adjust the camera
viewing angle as necessary. Tighten the allen screws when finished.
A B
C
6
• Screw
A
allows you to rotate the camera 360°, independent from the
camera stand.
• Screw
B
allows you to tilt the camera and camera stand 90°.
• Screw
C
allows you to rotate the camera and camera stand 360°.
7.
Use a Philip’s head screwdriver to adjust the camera zoom and focus as
needed.
Focus
Zoom
7
8.
Close the service compartment and firmly tighten the service
compartment screw.


