background image

English

   - 11 -

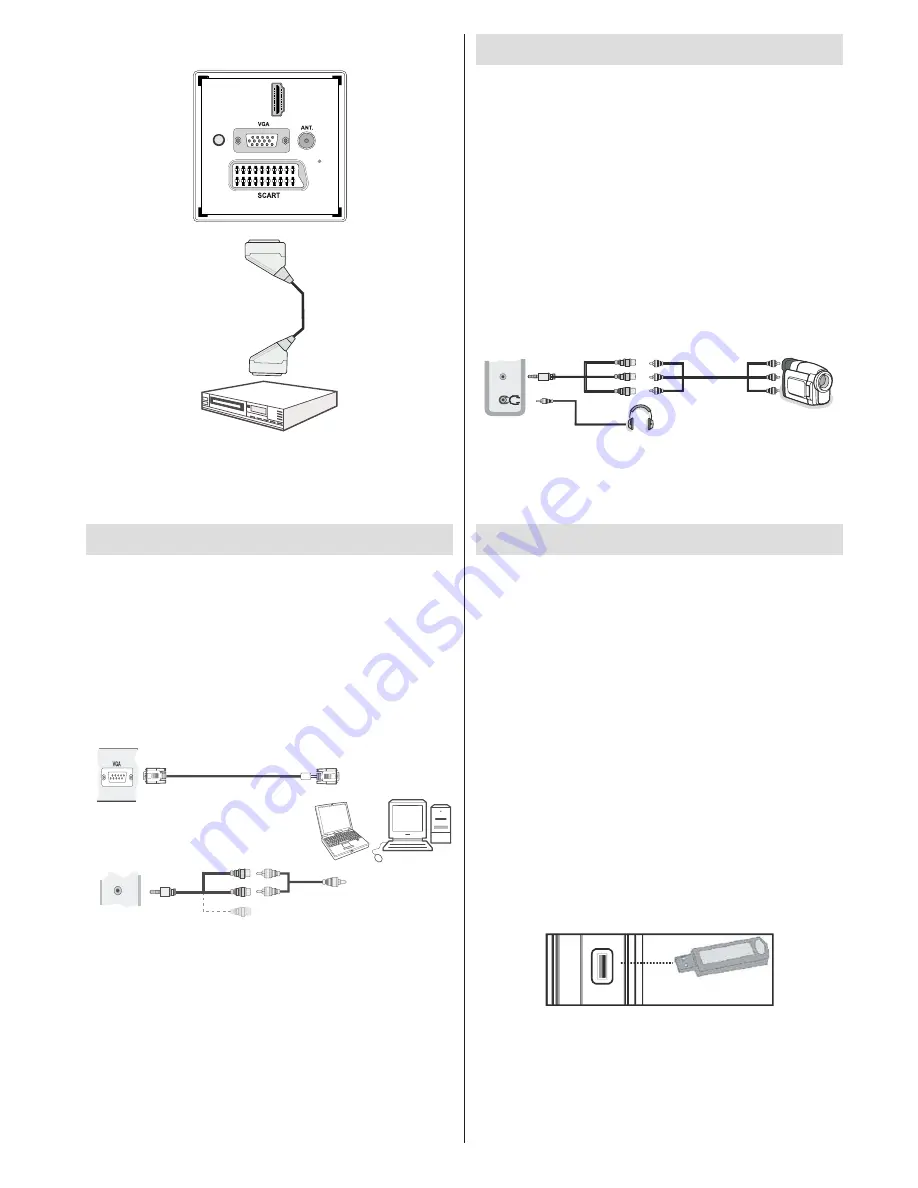
You may also connect through the 

• 

SCART

 input.  

H

DMI

 1

SPDIF

Coax.OUT

Scart

 Cable

(not


supplied)

External device

Note

• 

: These three methods of connection perform the 

same function but in different levels of quality. It is not 

necessary to connect by all three methods.

Connecting the LED TV to a PC

For displaying your computer’s screen image on your 

LED TV, you can connect your computer to the TV set. 

Power off both computer and display before making 

any connections. Use 15-pin D-sub display cable to 

connect a PC to the LED TV. When the connection 

is made, switch to PC source. See “Input selection” 

section.  Set  the  resolution  that  suits  your  viewing 

requirements. Resolution information can be found 

in the appendix parts

.

PC  Input

(back)

Side  AV  Input

PC  VGA  Cable

(not  supplied)

PC  Audio  Cable

(not  supplied)

Side  Audio/Video 

Connection  Cable

(supplied)

or

SI

D

AV

Using Side AV Connectors

You can connect a range of optional equipment to your 

LED TV using side connectors of the TV.

For connecting a camcorder or camera , you should 

• 

use 

AV

 socket (side). To do this, you must use the 

supplied 

video/audio connection cable

. First, plug 

single jack of the cable to the TV’s

 AV IN

 socket 

(side). Afterwards, insert your camera cable’s (

not 

supplied

) connectors into the plural part of the 

video/

audio connection cable

. Colours of the connected 

jacks should match. See illustration below. 
Afterwards, you should switch to 

• 

Side AV

 source. See 

the section 

Input selection

 in the following sections 

for more information.

Camera

AV Connection

Cable (supplied)

AV Cable

(not supplied)

Headphone

SIDE 

AV

To  listen  the  TV  sound  from  headphones,  you 

• 

should connect headphones to your TV by using the 

HEADPHONE 

jack as illustrated above.

USB Memory Connection

You can connect USB devices to your TV by using 

• 

the USB input of the TV. This feature allows you to 

display/play JPG, MP3 and video files stored on a 

USB stick.
It is possible that certain types of USB devices (e.g. 

• 

MP3 Players) may not be compatible with this TV. 
You  may  back  up  your  files  before  making  any 

• 

connections  to  the TV  set  in  order  to  avoid  any 

possible data loss. Note that manufacturer will not 

be responsible for any file damage or data loss.
 Do not pull out USB module while playing a file.

• 

CAUTION: Quickly plugging and unplugging USB 

devices, is a very hazardous operation. Do not 

repeatedly quickly plug and unplug the drive. This 

may cause physical damage to the USB player 

and the USB device itself.

SIDE VIEW        USB MEMORY

5Vdc

Max:500mA

USB

USB Memory Connection

IMPORTANT: The TV should be switched off while 

plugging or unplugging a  USB device.

 Plug your 

USB devices to the USB input of the TV.

Note: It is possible certain types of hard disk drives 

are not supported.

Summary of Contents for LED22914FHDVD

Page 1: ...LED22914FHDDVD OPERATING INSTRUCTIONS COLOUR TELEVISION WITH REMOTE CONTROL ...

Page 2: ...hannel 15 Deleting a Channel 15 Renaming a Channel 15 Locking a Channel 15 Managing Stations Favourites 15 Button Functions 15 Managing Stations Sorting Channel List 15 On Screen Information 16 Media Playback Using Media Browser 16 Viewing Videos via USB 16 Viewing Photos via USB 17 Playing Music via USB 17 Media Browser Settings 17 Changing Image Size Picture Formats 18 Configuring Picture Settin...

Page 3: ...L Frequency Search PC input Plug Play for Windows 98 ME 2000 XP Vista Windows 7 Game Mode Introduction Thank you for choosing this product This manual will guide you for the proper operation of your TV Before operating the TV please read this manual thoroughly Please do keep this manual in a safe place for future references This device is intended to receive and display TV programs The different c...

Page 4: ...nse heat such as an electric heater Ensure that no open flame sources such as lighted candles are placed on top of the TV Batteries should not be exposed to excessive heat such as sunshine fire or the like Lightning In case of storm and lightning or when going on holiday disconnect the power cord from the wall outlet Replacement Parts When replacement parts are required make sure that the service ...

Page 5: ...isolator see EN 60728 11 Licence Notification Optional Manufactured under license from Dolby Laboratories TRADEMARK ACKNOWLEDGMENT Dolby and the double D symbol are trademarks of Dolby Laboratories The Standby On Off button does not completely switch off this device it will still consume power In order to fully switch off this device the power should be switched off at the mains socket Because of ...

Page 6: ...Feature menu If you set Power Save Mode as On the TV will switch to energy saving mode and luminance level of TV set will be decreased to optimum level Note that some picture settings will be unavailable to be changed when the TV is in Power Save Mode When the TV is not in use please switch off or disconnect the TV from the mains plug This will also reduce energy consumption Disconnect power when ...

Page 7: ...se in Media Browser mode 17 Play in Media Browser mode 18 Red button 19 Green button List Schedule in EPG Tag 20 Untag All in favourite list Play Slideshow in Media Browser Loop Shuffle in Media Browser Picture mode selecion Changes picture mode 21 in Media Browser video mode No function 22 Teletext Mix in TXT mode 23 Subtitle on off in DVB channels 24 Previous programme 25 AV Source selection 26 ...

Page 8: ...VD Player These devices must be connected via the HDMI sockets or Component Socket These sockets can accept either 720p or 1080p signals No sound connection is needed for an HDMI to HDMI connection RF Input 2 connects to an aerial antenna system Note that if you use a decoder or a media recorder you should connect the aerial cable through the device to the television with an appropriate antenna ca...

Page 9: ...rds insert your video cable s not supplied connector into the YELLOW input located on the plural side of the supplied AV connection cable Colours of the connected jacks should match To enable audio connection you must use RED and WHITE inputs of the side AV connection cable Afterwards insert your device s audio cable s connectors into the RED and WHITE jack of the supplied side AV connection cable...

Page 10: ...ress the button on the remote control or press the switch on the TV the TV will switch to standby mode To power down the TV completely unplug the power cord from the mains socket Note When the TV is switched to standby mode standby LED can blink to indicate that features such as Standby Search Over Air Download or Timer is active First Time Installation IMPORTANT Ensure that the aerial is connecte...

Page 11: ...PC input with YPbPr to PC cable YPbPr cable is not supplied When the connection is made switch to YPbPr source See Input selection section To enable audio connection use the VGA Component Audio cable First plug single jack of the cable to the TV Afterwards insert your DVD player s audio cable s connectors into the plural part of the VGA Component audio connection cable see illustration below Colou...

Page 12: ...the plural part of the video audio connection cable Colours of the connected jacks should match See illustration below Afterwards you should switch to SideAV source See the section Input selection in the following sections for more information Camera AV Connection Cable supplied AV Cable not supplied Headphone SIDE AV To listen the TV sound from headphones you should connect headphones to your TV ...

Page 13: ...ected The functions will be described in accordance with the menu system of your TV Functions of the menu system are described in the following sections Volume Setting Press V button to increase the volume Press V button to decrease the volume A volume level scale slider will be displayed on the screen Programme Selection Previous or Next Programme Press CH button to select the previous programme ...

Page 14: ...urrent programme EPG Screen Two Up Down Left Right Navigate Red button Prev Time Frame Displays the programmes of previous time frame Green button Next Time Frame Displays the programmes of the next time frame Yellow button Prev Day Displays the programmes of previous day Blue button Next day Displays the programmes of the next day Numeric buttons Jump Jumps to the preferred channel directly via n...

Page 15: ... the numeric buttons and press OK button to search Analogue Manual Search After selecting search type as analogue you can use button to highlight an item and then press or button to set an option Enter the channel number or frequency using the numeric buttons You can then press OK button to search When the channel is located any new channels that are not on the list will be stored Analogue Fine Tu...

Page 16: ...ton to save Press MENU to cancel Locking a Channel You can press GREEN button to tag untag all channels YELLOW button to tag untag a single channel Select the channel that you want to lock and select Lock option Press OK button to continue You will be asked to enter parental control PIN Default PIN is set as 0000 Enter the PIN number Press OK button when the desired channel is highlighted to lock ...

Page 17: ... the media browser screen will be displayed automatically You can play music picture and video files from the connected USB memory stick Use or button to select Videos Photos Music or Settings Viewing Videos via USB When you select Videos from the main options the available video files will be filtered and listed on this screen You can use or button to select a video file and press OK button to pl...

Page 18: ... main options available audio files will be filtered and listed on this screen Up Down Navigate Play button Plays all media files starting with the selected one 0 9 Numeric buttons The TV will jump to the file starting with the letter you input via the numeric buttons on your remote control Play This OK button Plays the selected file Stop button Stops playback Pause button Pauses the selected play...

Page 19: ...le in HDMI YPbPr and DTV sources 16 9 This uniformly stretches the left and right sides of a normal picture 4 3 aspect ratio to fill the wide TV screen For 16 9 aspect ratio pictures that have been squeezed into a normal picture 4 3 aspect ratio use the 16 9 mode to restore the picture to its original shape Subtitle This zooms up the wide picture 16 9 aspect ratio with subtitles to the full screen...

Page 20: ...r Off Game Mode When Game Mode is set to On specific game mode settings which are optimized for better video quality will be loaded Note When Game Mode is on some items in the Picture Settings menu will be unavailable Picture Zoom Sets the picture size to Auto 16 9 Subtitle 14 9 14 9 Zoom 4 3 Panoramic or Cinema Reset Resets the picture settings to factory default settings While in VGA PC mode som...

Page 21: ... the TV will mute and the volume of the headphones can be adjusted via sound settings headphones AVL Automatic Volume Limiting AVL function sets the sound to obtain fixed output level between programmes For instance volume level of advertisements tend to be louder than programmes Dynamic Bass Dynamic Bass is used to increase bass effect of the TV set Digital Out Sets digital out audio type Configu...

Page 22: ...ge depending on the service provider Press MENU button and select the icon by using or button Press OK button to view Settings menu Use or button to highlight Conditional Access and press OK to view menu items Configuring Language Preferences You can operate the TV s language settings using this menu Press MENU button and select the Settings icon by using or button Press OK button to view Settings...

Page 23: ...r is 0000 After coding the correct PIN number the parental settings menu will be displayed Parental Settings Menu Operation Select an item by using or button Use or button to set an item Press the OK button to view more options Menu Lock Menu lock setting enables or disables the menu access You can disable access to the installation menu or the whole menu system Maturity Lock optional When set thi...

Page 24: ...D button to cancel Change Delete Controls parental settings on timers Editing a Timer Select the timer you want to edit by pressing or button Press GREEN button Edit Timer menu screen will be displayed When finished with editing press GREEN button to save You can press MENU button to cancel Deleting a Timer Select the timer you want to delete by pressing or button Press RED button Select YES by us...

Page 25: ...t your TV always has the most update information you can use this setting You can enable or disable automatic upgrade by setting Automatic Scanning option You can manually search for new software by selecting Scan for upgrade In order for any software upgrade to take place please ensure that the TV is set to standby mode Hard of Hearing If the broadcaster enables any special signal concerning the ...

Page 26: ... Subcode Pages Selects subcode pages if available when the teletext is activated P P and numbers 0 9 Press to select a page Note Most TV stations use code 100 for their index pages Coloured Buttons RED GREEN YELLOW BLUE Your TV supports both FASTEXT and TOP text systems When these systems are available the pages are divided into groups or topics When FASTEXT system is available sections in a telet...

Page 27: ...heck if you have entered the correct frequency Please retune the channels The picture quality may degrade when two peripherals are connected to the TV at the same time In such a case disconnect one of the peripherals No Picture Is the aerial connected properly Are the plugs connected tightly to the aerial socket Is the aerial cable damaged Are suitable plugs used to connect the aerial If you are i...

Page 28: ...12 1360x768 60 Hz Appendix B AV and HDMI Signal Compatibility Input Signal Types Source Supported Signals Available EXT SCART PAL 50 60 O NTSC 60 O RGB 50 O RGB 60 O Side AV PAL 50 60 O NTSC 60 O YPbPr 480I 60Hz O 480P 60Hz O 576I 50Hz O 576P 50Hz O 720P 50Hz O 720P 60Hz O 1080I 50Hz O 1080I 60Hz O 1080P 50Hz O 1080P 60Hz O HDMI 480I 60Hz O 480P 60Hz O 576I 50Hz O 576P 50Hz O 720P 50Hz O 720P 60Hz...

Page 29: ...lution Bit rate etc Movie mpg mpeg MPEG1 2 MPEG Layer 1 2 3 MAX 1920x1080 30P 20Mbit sec dat MPEG1 2 MPEG2 vob MPEG2 mkv H 264 MPEG1 2 4 EAC3 AC3 mp4 MPEG4 Xvid 1 00 Xvid 1 01 Xvid 1 02 Xvid 1 03 Xvid 1 10 beta1 2 H 264 PCM MP3 avi MPEG2 MPEG4 PCM MP3 MAX 1920x1080 30P 20Mbit sec Xvid 1 00 Xvid 1 01 Xvid 1 02 Xvid 1 03 Xvid 1 10 beta1 2 H 264 PCM Music mp3 MPEG 1 Layer 1 2 MP3 32Kbps 320Kbps Bit r...

Page 30: ...loaded successfully upon the next power up the TV opens with latest software version Note on reboot operation Reboot is the last step in software upgrade operation if download of new software is finished successfully During reboot the TV makes final initializations In the reboot sequence the panel power is closed and front led indicates the activity with blinking Around 5 minutes later the TV rest...

Page 31: ...5 W max PANEL 16 9 display 22 Screen Size DIMENSIONS mm DxLxH With foot 134 x 532 x 375 Weight Kg 5 05 DxLxH Without foot 53 x 532 x 347 Weight Kg 4 80 Digital Reception MHEG 5 ENGINE compliant with ISO IEC 13522 5 UK engine Profile 1 for UK Object carousel support compliant with ISO IEC 135818 6 and UK DTT profile Frequency range 474 850 MHz for UK models 170 862 MHz for EU models Transmission st...

Page 32: ...d green or green and yellow The wire which is coloured blue or black must be connected to the terminal which is marked with the letter N or coloured Black The wire which is coloured brown or red must be connected to the terminal which is marked with the letter L or coloured Red For continued protection against risk of fire replace only with same type and rating of fuse ASTA approved 5A 250VAC fuse...

Page 33: ...C PAL playback according to disc content LPCM audio via coaxial digital audio output optional Multi Audio up to 8 support According to disc content Multi Subtitle up to 32 support According to disc content Multi Angle up to 9 support According to disc content 8 level parental control Fast forward and rewind in 5 different speeds 2x 4x 8x 16x 32x Slow motion playback in 4 different speeds 1 2x 1 4x...

Page 34: ...e the disc to direct sunlight or heat sources such as hot air ducts or leave it in a car parked in direct sunlight as the temperature can rise quickly and damage the disc After playing store the disc in its case On cleaning Before playing clean the disc with a cleaning cloth Wipe the disc from the center out Do not use solvents such as benzine thinner commercially available cleaners or anti static...

Page 35: ...ess STOP button three times to eject Overview of the Remote Control Standby 1 Language selection Set language 2 Numeric buttons 3 Navigation buttons Up Down Left Right 4 Clear 5 Display time DVD menu 6 Mute 7 Pause 8 Rapid reverse 9 Play 10 Zoom 11 Repeat 12 Subtitle 13 AV Source selection 14 Menu 15 OK 16 Return 17 Search Mode 18 Info 19 Volume Up Down 20 Skip Previous 21 Skip Next 22 Rapid advan...

Page 36: ... Time counter mode selection during playback Press repeatedly to switch between modes LANG Audio language X X MENU Displays TV menu OK SELECT Enter View Play REPEAT Displays repeat options RETURN Returns back to the previous menu if available ROOT Goes back to the root folder if available SEARCH MODE Direct selection of scenes or time Selects the desired file Selects the desired file SUBTITLE Subt...

Page 37: ...ck to the initial settings If a language is selected not supported by the 7 disc the subtitle language will automatically be set to the disc s priority language Usually a circulation will happen while switching 8 to another language that is you can cancel the subtitle by pressing this button a number of times until Subtitle Off appears on the screen When the power is turned on or the disc is 9 rem...

Page 38: ...echnical service SPDIF OUTPUT You can set Spdif Output as PCM or RAW If you select PCM from SPDIF Output in DVD menu and play DVD with Dolby audio you can get audio output with two channels via the speakers and the SPDIF Out If you select RAW from SPDIF Output in DVD menu and play DVD with Dolby audio speakers will be muted and you can get 5 1 Dolby audio via the SPDIF Out Troubleshooting The pict...

Page 39: ...ound have been recorded by means of digital signals Incorporating a new video compression technology MPEG II and high density recording technology DVD enables aesthetically pleasing full motion video to be recorded over long periods of time for instance a whole movie can be recorded DVD has a structure consisting of two 0 6 mm thin discs which are adhered to each other Since the thinner the disc t...

Page 40: ...o Dolby Digital and MPEG 2 System Various screen and audio functions can be easily selected through the on screen menu CD is recorded as a Digital Signal with better audio quality less distortion and less deterioration of audio quality over time 12 cm 12 cm Specifications Types of Discs Supported DVD SS SL 4 7 DVD 5 SS DL 4 7 DVD 9 DS SL 4 7 DVD 10 DS DL 4 7 DVD 18 CD DA CD R CD RW MP 3 JPEG Video...

Page 41: ...50195213 ...

Reviews: