background image

7

The puppy divider allows you to control the amount of space your 
puppy has access to so he doesn’t have more Crate than he needs. 
Just remember: a good rule of thumb is your dog - at every age - 
should always have enough room to stand up, turn around and lie 
down comfortably.

Puppy Divider

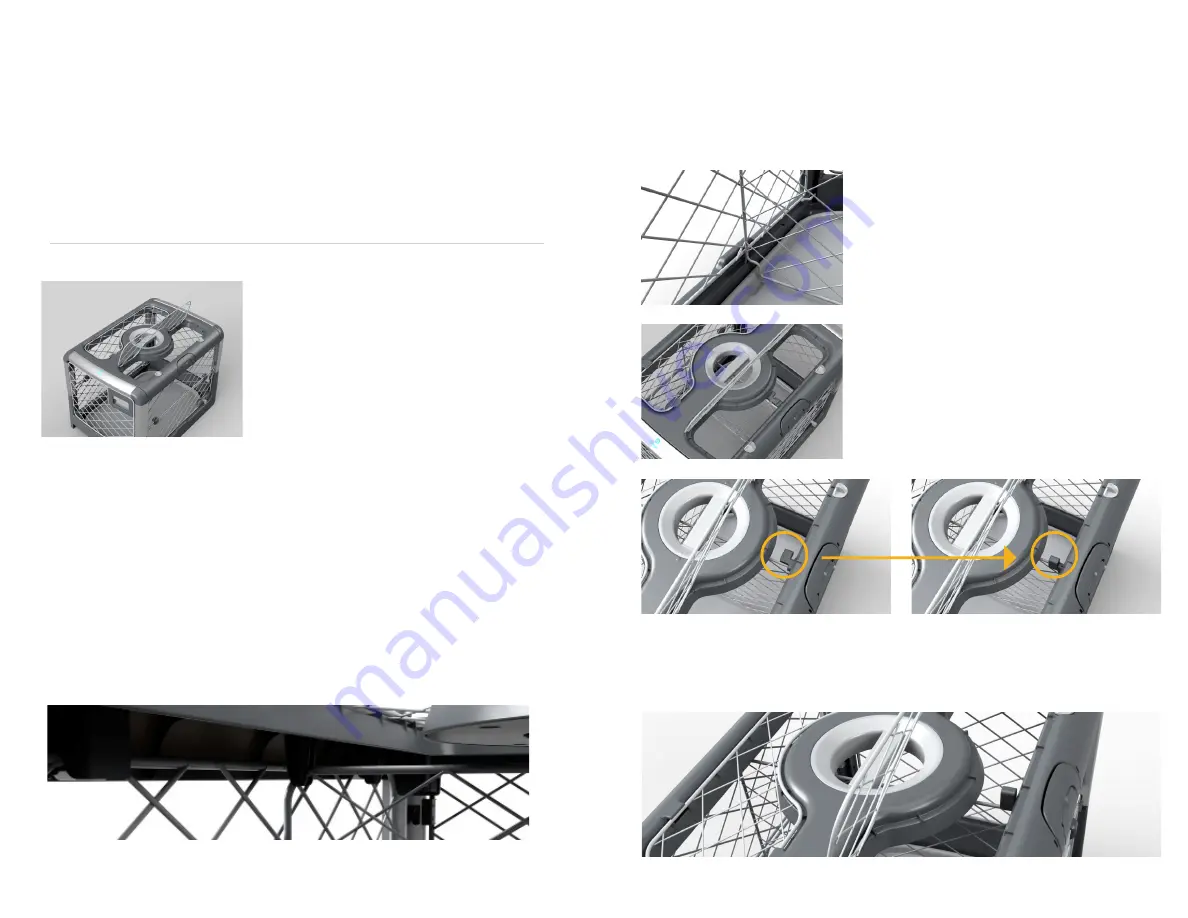
To Insert Puppy Divider:


»

Open the front door or ceiling hatch.  
Any opening, except the side door,  
can be used when the puppy divider  
is in place (under the ceiling and two in  
the base of the Crate)


»

Place the puppy divider in the Crate, 
making sure to insert it so that both 
divider locks are close to the  
ceiling of the Crate


»

Rotate the divider if needed until it becomes parallel with the front  
door and perpendicular to the side door


»

Locate the various sets of puppy divider holes in the base; each set has 
two holes, one on the left side of the Crate and one on the right. For each 
location on the base, there are corresponding tabs on the ceiling


»

Select the puppy divider location appropriate for your dog


»

Starting with the ceiling tabs, gently fit the top of the puppy divider into the 
space between tabs. You may need to slide the divider locks towards the 
center of the divider a bit, to keep them out of the way during this step

8

Puppy Divider 

(continued)

Slide the bottom of the puppy divider into the holes on the base. At this step, 
the puppy divider should be able to freely stand on its own in the Crate.


»

Slide the bottom of the puppy divider into 
the holes on the base. At this step, the 
puppy divider should be able to freely 
stand on its own in the Crate


»

Starting with either the left or right side of 
the puppy divider, rotate the divider lock 
so that it’s on its side


»

Push the divider lock towards the outside of the Crate until you feel 
resistance, then rotate the lock so that it is upright. then push all the way in. 
When fully in place, you won’t be able to push the lock in any further.

Summary of Contents for Revol

Page 1: ......

Page 2: ...ONS WARRANTY REGISTRATION 4 5 7 10 10 11 12 13 About Diggs We design beautiful thoughtfully engineered and safe products for pets inspired by baby industry standards We pour energy creativity and not...

Page 3: ...and outs of using your Crate and keeping your pup safe and comfortable OTHERWISE LET S START AT THE BEGINNING WELCOME TO YOUR CRATE 4 rolling hand grip wheels not visible carrying handle ceiling hatch...

Page 4: ...ossible Doors 1 1 2 2 6 Raise door up until the spring loaded pins lock into place in the holes at the top of the Crate Push the door until it connects with the magnets under the ceiling and the folde...

Page 5: ...one on the right For each location on the base there are corresponding tabs on the ceiling Select the puppy divider location appropriate for your dog Starting with the ceiling tabs gently fit the top...

Page 6: ...y enough room for your puppy to stand turn around and lie down comfortably Install it using the process outlined in the Installation section Or remove the divider entirely if your pup is all grown up...

Page 7: ...e with dogs that are improperly Crate trained or not Crate trained is not recommended Use of the Crate is known to cause anxiety in dogs that are improperly Crate trained or not Crate trained Such anx...

Page 8: ...to correct problems covered by this warranty This warranty gives you specific legal rights and you may also have other rights that vary from jurisdiction to jurisdiction REGISTRATION If through some u...

Page 9: ...r ativit et notre amour pour vous procurer ces produits de haute qualit facile d usage 14 Comment Fonctionne Votre Nouveau Caisson Votre nouveau Revol est maintenant mont et pr t accueillir votre chio...

Page 10: ...n haut du caisson Pousser la porte jusqu au contact avec les aimants au plafond du caisson et la porte pli e sera alors parall le au plafond LA PORTE DE DEVANT Pour l ouvrir Pincer la poign e le loque...

Page 11: ...r chiot vous permet de contr ler l espace auquel votre chiot aura acc s si le caisson est trop grand pour lui Ne jamais oublier que votre chien tout ge doit toujours avoir assez d espace pour se lever...

Page 12: ...teur tirer le verrou du s parateur vers le centre du caisson jusqu ce qu il soit d tach du haut Reprendre le m me processus pour l autre cot du s parateur afin de lib rer les deux verrous du haut Ceux...

Page 13: ...ter dessus se mettre debout sur le Caisson ou le rouler quand le chien est dedans N y pensez m me pas NE JAMAIS rouler le Caisson en haut ou en bas des escaliers M ME SI le chien n est pas l int rieur...

Page 14: ...ment tout d faut ou dommage caus par des accessoires des pi ces de remplacements des modifications ou des services de r paration non autoris s par Diggs Inc Cette garantie ne couvre pas tout dommage...

Page 15: ...25 www diggs pet...

Reviews: