background image

OPERATOR’S MANUAL

PM300E and PM332E Planter Monitors

11001-1423-200710

30 / OPERATE MODE

Figure 20
Upper Parameters Screen

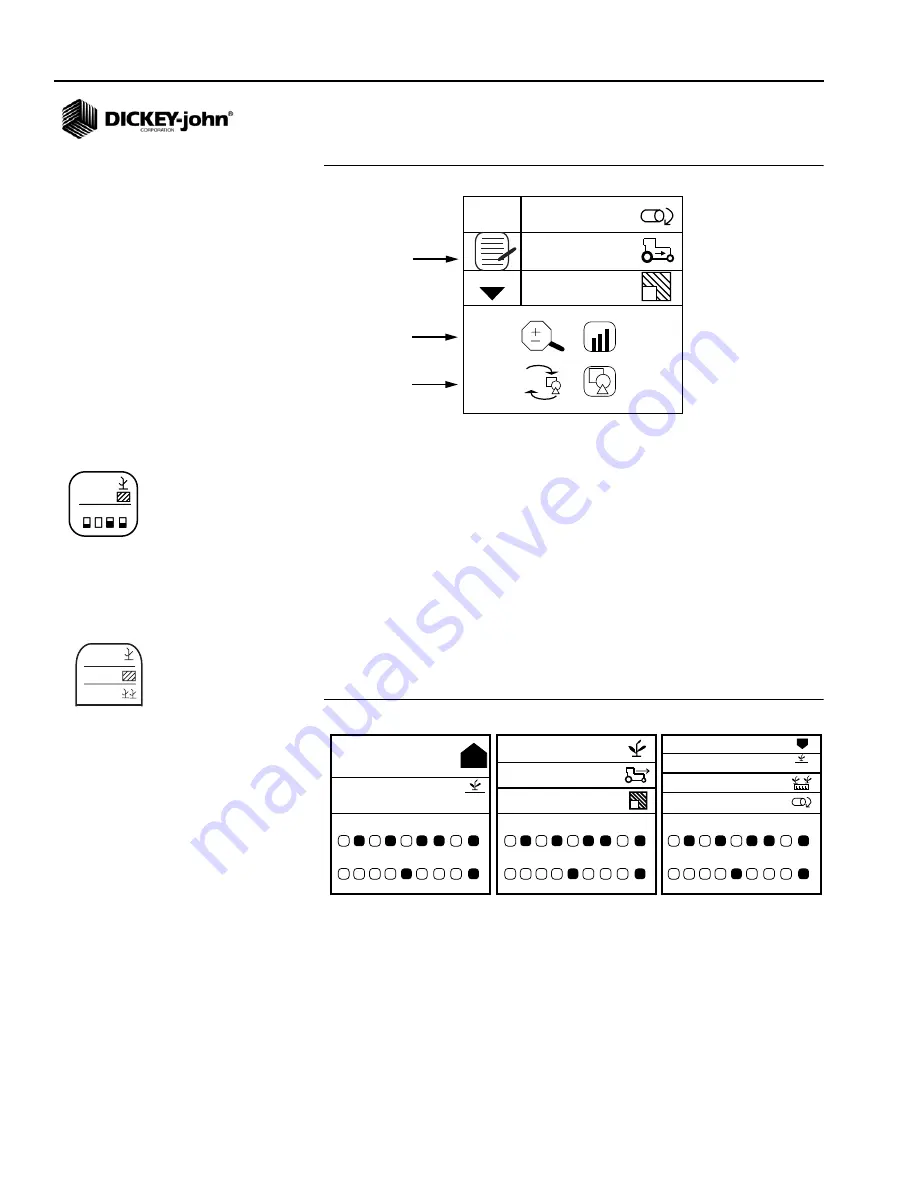
Changing Number of Parameters 

The parameter lines display can be configured to show 2, 3, or 4 
parameters at one time by changing the size of the parameters.  The Up 
and Down
 Arrow keys are used at the Main Operate screen to scroll down 
to see all parameters being monitored.

To Change the Number of Parameter Lines:

1. From the Main Menu screen, highlight the Display & Service icon.
2. Highlight the Upper Parameter icon and press Enter.
3. Press the Down Arrow key to highlight the magnifying glass.
4. Press the Enter key to select the icon. Use the Up or Down Arrow 

key to toggle through the options for 2, 3 or 4 display lines.

5. Press Enter to confirm the selection.

Figure 21
Parameter Line Options

NOTE:

Italicized text indicates 
functionality that is locked. 
Authorized users can unlock 
screens by highlighting the icon 
and pressing the Enter key to 
display the Password screen. 
Refer to the Advanced Setup 
section for additional 
information.

CHANGING GRAPHIC OR TEXT ICONS

The planting parameters display can be configured for text or graphic icons 
in the upper window.

To Change the Graphic/Text Settings:

1. At the Main Menu screen, highlight the Display & Service icon and 

press Enter.

1

2

1

3

aA

Graphics/Text Mode

Increases/Decreases
Parameter Lines

Parameter 
Lines

Planting Parameter
Edit Icon

123.4

43.8

1 2 3 4

123.4

43.8

1 2 3 4

123.4

43.8

123.4

567.8

912.3

16,8

   33,1

5,4

   33,1

 8

33,5

25

37,2

1   2   3   4   5   6   7   8   9

10 11 12  13 14 15 16 17 18

4,5

1

12,5
16,8

...

 13

9

1   2   3   4   5   6   7   8   9

10 11 12  13 14 15 16 17 18

1   2   3   4   5   6   7   8   9

10 11 12  13 14 15 16 17 18

   2 Parameter Functions 3 Parameter Functions 4 Parameter Functions


Display & Service icon

Upper Parameter icon 

Summary of Contents for PM300E

Page 1: ...Arrow Keys 13 Left and Right Arrow Keys 14 Editing Screen Fields 14 Main Menu Screen 15 Monitor Setup 15 Planter Configuration 16 Number of Rows 16 Row Spacing 16 Row SetUp Auto Assigned 17 Ground Spe...

Page 2: ...Row Scan 32 Seeds per Distance 32 Minimum Average Maximum Seeds per Distance 32 Seeds per Distance Row Scan 32 Field Area 1 32 Field Area 2 32 Total Area 32 Speed 33 Area per Hour 33 Fan 33 Shaft 33...

Page 3: ...age that follows Be alert to the possibility of personal injury or death Use of the word WARNING indicates a potentially hazardous situation which if not avoided could result in death or serious injur...

Page 4: ...OPERATOR S MANUAL PM300E and PM332E Planter Monitors 11001 1423 200710 2 SAFETY NOTICES...

Page 5: ...pper level and gear sensors The units store all configuration data in nonvolatile memory retaining information even when disconnected from power Figure 1 provides an illustration of a generic console...

Page 6: ...2 3 4 5 6 7 8 9 3 2 2 9 5 0 6 in 6 1 2 3 4 5 6 7 8 9 3 3 4 10 9 1 2 5 3 3 4 0 0 10 11 12 13 14 15 16 17 18 1 2 3 4 5 6 10 33 5 7 8 9 10 11 12 10 37 2 2 4 6 8 1 2 3 4 5 6 12 5 7 8 9 10 11 12 2 33 3 Gr...

Page 7: ...ttery power cable and signal cable that extends to the drawbar Wire Harnesses The PM300E and PM332E include integrated harnesses to supply the unit s power fused ground speed input and sensor inputs t...

Page 8: ...OPERATOR S MANUAL PM300E and PM332E Planter Monitors 11001 1423 200710 6 INTRODUCTION...

Page 9: ...erage Row Population Minimum Maximum Average Row Spacing Minimum Maximum Average Spacing per Distance Field Area 1 Field Area 2 Field Area 3 Total Area Ground Speed Fan Shaft or Flow Frequency User de...

Page 10: ...OPERATOR S MANUAL PM300E and PM332E Planter Monitors 11001 1423 200710 8 MAJOR FEATURES...

Page 11: ...TING BRACKET NOTE When mounted to a vertical surface a tie wrap can be used to secure the cables to the bottom of the bracket Install the mounting bracket at the desired location using locally acquire...

Page 12: ...implement harness to the location of choice typically near the drawbar The harnesses must not obstruct movement of the operator or of the moving parts of the tractor or implement Take care when routi...

Page 13: ...stall sensors onto seed tubes using tie wraps 2 Route implement harness to the appropriate locations provide slack near moving parts to allow for movement Attach harness to the implement using tie wra...

Page 14: ...OPERATOR S MANUAL PM300E and PM332E Planter Monitors 11001 1423 200710 12 INSTALLATION...

Page 15: ...modified by selecting and holding the Alarm Cancel key ENTER KEY The Enter key selects a highlighted item for data modification After changing the parameter values Enter accepts the modified data ESC...

Page 16: ...ayed On other screens the arrows are used to navigate between options EDITING SCREEN FIELDS The term highlight used throughout the manual refers to pressing a key to activate and move the cursor until...

Page 17: ...locked Authorized users can unlock screens by highlighting the icon and pressing Enter to display the Password screen Refer to the Advanced Setup section for additional information Figure 7 Main Menu...

Page 18: ...WS To change number of rows 1 Use the Left and Right Arrow keys to highlight the number of rows field 2 Press Enter to modify the number of rows Use the Right and Left Arrow keys to select the digit t...

Page 19: ...or is malfunctioning and the operator wants to disable monitoring on that row When FLOW is selected funnel the row will not be included for population calculations but will be monitored for flow The f...

Page 20: ...rking the start and finish points 2 Using the Arrow keys highlight the Start symbol on the screen X 3 Begin moving the tractor forward 4 With the tractor moving between 3 0 and 8 Km h press the Start...

Page 21: ...t the manual ground speed value 3 Press the Enter key to modify the constant 4 Use the Arrow keys to select digits increment and decrement values 5 Select the Enter key to accept the new number 6 Once...

Page 22: ...r to select digits Use ENTER to accept data or OPERATE to accept data and return to the OPERATE screen 123 4 43 8 1 2 3 4 1 2 1 3 Functions top half aA Service M 0 3 0 5 0 2 2 1 0 9 B 0 2 0 5 0 3 0 7...

Page 23: ...creen is informational only and cannot be changed To Display the Service Screen 1 From the Main Operate screen press the Enter key to display the Main Menu screen 2 Highlight the Display Service icon...

Page 24: ...ord should be kept confidential and given only to authorized users If a new password is created it is recommended that this new number be written down as it will be required to gain access to any lock...

Page 25: ...1000s of seeds per acre or hectare dependent on the unit of measurement selected If no value is entered the monitor uses average population to calculate alarms or row population indicators To Change T...

Page 26: ...firm the selection 6 Press the Escape key to return to the Main Operate screen NOTE Italicized text indicates functionality that is locked Authorized users can unlock screens by highlighting the icon...

Page 27: ...If the calibration factor is unknown the monitor can determine the calibration factor by using the built in calibration mode Ensure equipment is configured to operate safely Shaft fan calibration req...

Page 28: ...or decrease alarm volume To Change Units Backlight and Alarm Volume 1 From the Main Menu screen highlight the Display Service icon and press Enter 2 Press the Down Arrow key to highlight either the U...

Page 29: ...Main Menu screen 2 Highlight the Speed Area Mode icon and press Enter to access the Speed Area Mode screen Figure 17 Speed Area Mode Screen SEED COUNT MODE NOTE Italicized text indicates functionalit...

Page 30: ...OPERATOR S MANUAL PM300E and PM332E Planter Monitors 11001 1423 200710 28 AUXILIARY MODES...

Page 31: ...5 second intervals bar graph with 32 row machine The operator can use the Right and Left Arrow keys to manually select the desired rows Automatic scrolling will restart 10 seconds after a manual selec...

Page 32: ...1 Parameter Line Options NOTE Italicized text indicates functionality that is locked Authorized users can unlock screens by highlighting the icon and pressing the Enter key to display the Password scr...

Page 33: ...N Average Population displays the average of the planter s rows that are configured for population in thousands of seeds per hectare s ha or thousands of seeds per acre s ac The population response ra...

Page 34: ...alternates the display of the minimum row planter average and maximum row every two seconds When a minimum or maximum row is being displayed the corresponding symbol is shown with the row number SEEDS...

Page 35: ...ding on the text graphic setting AREA PER HOUR Area Per Hour displays the current rate of area per hour in hectares per hour ha hr or acres per hour ac hr depending on the Metric English setting FAN F...

Page 36: ...hlighting the icon and pressing the Enter key to display the Password screen Refer to the Advanced Setup section for additional information Row indicator size determines the number of rows displayed o...

Page 37: ...by pressing the Alarm Cancel key Figure 24 Hopper 1 And 2 Alarms ROW FAILURE A row failure alarm occurs when the console detects less than 2 seeds per second through the seed tube This may result fro...

Page 38: ...r 8 chirps that differentiates from all other alarms and triggers when no seed flow is detected from any row unit when ground speed is detected Typical scenarios to activate an All Row Failure alarm 1...

Page 39: ...screen will display the row unit over or under population symbol until corrected All Rows Failure occurs or sensor mechanical problems are fixed Figure 27 Population Limit Warning Display FAN SPEED L...

Page 40: ...rm Cancel key but will re activate if problem is not resolved Figure 29 Shaft Speed Limit Warning Display Optional FLOW LOW HI LIMIT WARNING An alarm will sound when flow inputs exceed or fall below t...

Page 41: ...is acknowledged by pressing the Alarm Cancel key but will re activate until the problem is corrected Figure 31 Ground Speed Sensor Failure Display BATTERY HI LOW The battery hi low alarm triggers whe...

Page 42: ...display on the Main Operate screen The alarm can be acknowledged by pressing the Alarm Cancel key but will re activate until problem is resolved Figure 33 Self Test Failure HI GROUND SPEED EXCEEDED O...

Page 43: ...OPERATOR S MANUAL PM300E and PM332E Planter Monitors 11001 1423 200710 TROUBLESHOOTING 41 TROUBLESHOOTING...

Page 44: ...connection with adjacent sensor to determine if sensor is damaged 3 Console is damaged Contact dealer or DICKEY john Europe 33 141 192 180 Hopper alarm does not sound when hopper is empty 1 Hopper sen...

Page 45: ...ds 1 Ground speed alarm set too low 2 Incorrect ground speed constant 1 Set ground speed alarm limit higher or to zero to disable 2 Ground speed sensor has not been calibrated radar sensor angle has c...

Page 46: ...OPERATOR S MANUAL PM300E and PM332E Planter Monitors 11001 1423 200710 44 TROUBLESHOOTING...

Page 47: ...ge red Ground Speed Pin Description 1 Ground black 2 Signal green 3 Power red 4 Sense white PM332E Implement Pin Description 1 Row 1 green 2 Row 2 brown 3 Row 3 blue 4 Row 4 orange 5 Row 5 yellow 6 Ro...

Page 48: ...OPERATOR S MANUAL PM300E and PM332E Planter Monitors 11001 1423 200710 46 CONNECTOR PINOUTS...

Page 49: ...Y john s written consent damage to any associated equipment or lost profits or special damages Said part will not be considered defective if it substantially fulfills the performance expectations THE...

Reviews: