DiamondDigital DiamondDigital DV322 User Manual Download Page 22


21

ENGLISH 

OPERATING INSTRUCTIONS (continued) 


Image Settings 


 Image Settings 

Scheme 

Brightness 

Contrast 

Saturation 

Back Light 

Color Temp.

Advanced 

: select          ENTER : action          Return : back / quit 

Personal 


High 

Normal 


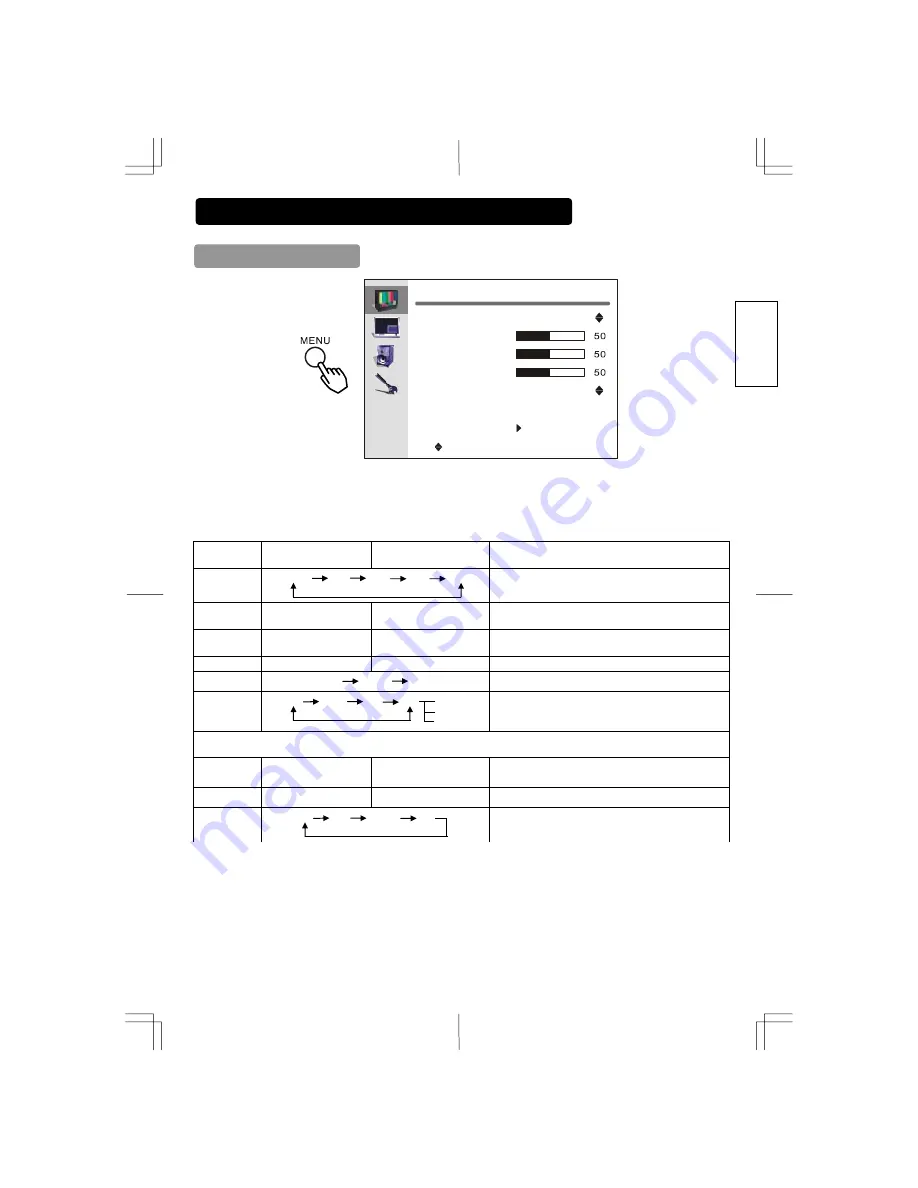
1.  Press the “MENU” button to display the Main Menu screen. 
2.  Press the ENTER button to confirm then use the   and   SELECT buttons to select the item to be adjusted and then use the   and   ADJUST 

buttons to adjust the selected items. 


Selected  

characters


Setup hint


SCHEME 

Personal       Vivid      Movie      Game      Sport 


Adjust as desired. 

Brightness


Black is subdued for increased 
overall darkness.


Black is set to off for increased 
overall brightness.


Adjust as desired.


Contrast


Narrows the gap between light 
and dark.


Broadens the gap between light 
and dark.


Adjust for maximum visibility to suit the ambient brightness. 


Saturation


Decrease saturation level.


Increase saturation level.


Adjust as desired.


Back Light 

High       Medium      Low


Adjust as desired. 

Color Temp


Warm              Normal            Cool            User             Red 

Green
Blue


Normally set to Normal.


Advanced 

Tint


Enhances red and weakens 
green.


Enhances green and weakens 
red.


This cannot be adjusted when receiving the PAL/SECAM signal. and 
will be greyed out.  
Adjust as desired for photo realistic skin color.


SHARPNESS 

Decrease sharpness level 

Increase sharpness level 

Normally set to the center position; shift to the minus (-) side for a 
softer picture and plus (+) for a sharper picture. 

FLESHTONE


Off       High      Moderate      Low   


Set except Off for richer skin color.


Summary of Contents for DiamondDigital DV322

Page 1: ...DV322 Wide Screen LCD Flat Panel Display 32 81 3 cm LCD Panel Size User Manual...

Page 2: ...will find it useful in the future Notes on lnstallation This product is marketed with the assumption that it is to be installed by qualified personnel with relevant skills and competence It is recomm...

Page 3: ...appliance WARNING TO AVOID FIRE OR ELECTROCUTION DO NOT EXPOSE THIS MONITOR TO RAIN OR MOISTURE THE MONITOR SHOULD NOT BE EXPOSED TO DRIPPING OR SPLASHING AND OBJECTS SUCH AS VASES FILLED WITH LIQUID...

Page 4: ...rode 12 Use only with the cart stand tripod bracket or table specified by the manufacturer or sold with the apparatus When a cart is used use caution when moving the cart appliance combination to avoi...

Page 5: ...Do not use harsh or abrasive cleaners CAUTION Use a soft cloth to clean the cabinet and the control panel of the TV When excessively soiled dilute a neutral detergent in water wet and wring out the s...

Page 6: ...hannel Setting 27 ASPECT 31 Teletext Menu 32 TROUBLESHOOTING 33 Symptoms 33 Abnormal Displays Corrections VGA Only 36 PRODUCT SPECIFICATIONS 37 Component Connection 38 Component Connection 38 Recommen...

Page 7: ...t Do not insert foreign objects or pour liquids inside the TV Penetration of liquids or foreign objects could result in a fire or electrical shock Use special caution in households where children are...

Page 8: ...eavy objects on the concealed power cord or cables Do not pull the power cord and cables When connecting and disconnecting the power cord or cables do it with your hand holding the plug or connector D...

Page 9: ...o not place the TV on a carpet or blanket or near a curtain or anywhere else where there is a possibility of obstructing the ventilation slots of the TV Do not place the TV in the following places Hot...

Page 10: ...ote control Avoid strong rays Any strong rays such as direct sun rays or room lighting onto the remote control sensors could invalidate the remote control Avoid radio interference Any interfering radi...

Page 11: ...t and ceiling mounting unit by yourself as it can be dangerous Ask your dealer to provide the name of a qualified technician In order to prevent overheating maintain a space of 10cm 4 inches For a des...

Page 12: ...to the rear of the TV 2 Connect the power cord plug to the power outlet 3 Turn ON the main power switch is located on the side The type of plug is different from this drawing for some countries CAUTI...

Page 13: ...audio connectors Connect devices such as a video game system or a DVD player and turn on or turn off the Main power switch the power of your appliance 9 Power connector Connect your power cord Precau...

Page 14: ...NTENNA Better Connection U K ONLY S CABLE Side I O AV2 An example of connecting video components If the OUTPUT RCA terminal is connected to a 2nd monitor it is possible to view the same image as on th...

Page 15: ...input terminal of this device and the output terminal of the personal computer Depending on the type of personal computer being connected the use of an optional conversion adapter or the adapter prov...

Page 16: ...y as shown Rear Cabinet Front Frame Pane Indicator lamp These buttons are located on the top Control Panel The main power switch is located at the back on the lower surface CHANNEL buttons Adjust the...

Page 17: ...roduct If inserted in the wrong direction the batteries could explode or leak resulting in fires physical injury or stains ATTENTION Do not drop the remote control To avoid possible failures do not sp...

Page 18: ...h to input source HDMI SLEEP Teletext color Keys Select timer to turn power off The default timer is 30 60 90 and 120 minutes Only enable in TV function Turn ON OFF conceal information 0 9 Number Keys...

Page 19: ...annel up down button is ON AMBER Off Power Save When the main power switch is ON and the PC is in power save mode When the indicator lamp lights Amber or the message No cable connected or Going to sle...

Page 20: ...the volume adjustment status guide will be displayed The volume will increase when the VOL or button is pressed while the guide is being displayed The volume will decrease when the VOL or button is p...

Page 21: ...and PROGRAM ADJUST buttons and press the ENTER button Image Settings Scheme Brightness Contrast Saturation Back Light Color Temp Advanced select ENTER action MENU back quit Personal High Normal 3 Use...

Page 22: ...tness Adjust as desired Contrast Narrows the gap between light and dark Broadens the gap between light and dark Adjust for maximum visibility to suit the ambient brightness Saturation Decrease saturat...

Page 23: ...d PIP Mode Off Small PIP Large PIP Side by Side tall Side by Side Adjust as desired PIP Position Bottom Right Bottom Left Top Left Top Right Adjust as desired Selecting PIP Source While a black box ap...

Page 24: ...2 Select the PIP with SELECT button 3 Press ENTER button 4 Press MENU button 2 times to return to Side by Side Main Menu 5 Press MENU to exit Select PIP Source While a black box appears on the screen...

Page 25: ...uit Full Screen Off Bottom Right Display Settings Aspect Ratio PIP Mode PIP Position select ENTER action MENU back quit Full Screen Small PIP Bottom Right Display Settings Aspect Ratio PIP Mode PIP Po...

Page 26: ...clock Phase Advances the dot clock Phase CLOCK Reduces the dot clock Increases the dot clock Adjust for maximum character clarity Audio Settings Audio Settings Bass Treble Balance Effect select ENTER...

Page 27: ...ff 30 Min 60 Min 90 Min 120 Min Set the TV off time for each mode Reset Default YES NO Resets all settings to FACTORY defaults Depending on the type of signal displayed displays may not be optimized t...

Page 28: ...I D K M ENTER action MENU back quit Channel Scan Auto VHF Low OMHz 0 0 ENTER break and save MENU break and cancel 2 Channel Edit Setup Auto Scan Channel Edit select ENTER action MENU back quit Channel...

Page 29: ...V System select RED GREEN YELLOW BULE MENU exit 1 XYZ 55 25MHz NTSC M 2 61 25MHz NTSC M 3 001 67 25MHz NTSC M 4 77 25MHz NTSC M 5 83 25MHz NTSC M 6 91 25MHz NTSC M 7 97 25MHz NTSC M 8 97 25MHz Channel...

Page 30: ...5 25MHz PAL B G 5 215 25MHz PAL 1 6 639 25MHz PAL 1 7 77 25MHz PAL D K 8 55 25MHz NTSC M 9 55 25MHz B G 10 55 25MHz Channel Edit CH Name Frequency TV System select RED GREEN YELLOW BULE MENU exit 1 26...

Page 31: ...NICAM_STERRO NICAM_MONO or FM MONO appears on the screen NICAM_MONO signal received Each time the button is pressed NICAM_MONO or FM MONO appears on the screen FM_STEREO sound received Each time the M...

Page 32: ...aspect function is disable Each time when SELECT is 16 9 the ZOOM button of the remote control is pressed the screen display zoom size will extend linearly Zoom 0 5 in sequence Resolution Full displa...

Page 33: ...in Press 0 9 or and This is used to select a page when TEXT function enable enter the number of the page required using the 0 to 9 to select a desired page example page 120 enter 1 2 0 CH and CH can s...

Page 34: ...signal is received abnormally Ensure that the input signal matches the monitor specifications Check to see that the signal cable is properly connected 14 37 13 The power indicating lamp is lit normal...

Page 35: ...ter is below 75Hz try a higher frequency to a maximum limit of 75Hz There may be a slight attenuation of the current image The top surface of the monitor heats up When used for long periods of time th...

Page 36: ...ransmitter problems 4 AV Input is not set correctly 5 Corroded or poor antenna cable connections 1 Re align the antenna 2 None 3 Check with the local Operator 4 Check the external equipment connected...

Page 37: ...en 10 Perform adjustment for symptom 2 below when the characters are blurred on the entire screen The display image may be momentarily disturbed during clock adjustment but this is not a failure Sympt...

Page 38: ...te TTL level Video input Input terminals AV1 IN Composite video S VIDEO input terminal for CVBS RCA S VIDEO 4 pin mini din AV1 IN L R audio input terminal for CVBS or S Video RCA AV2 IN Composite vide...

Page 39: ...GND 11 No connection Sync signal type Priority H V separate sync 1 H V composite sync 2 sync on Green 3 12 SDA 13 H sync or H V composite sync 14 V sync V CLK 15 SCL Even in the case of the recommende...

Page 40: ...x 720P 37 5 50 7 1920 x 1080i 33 75 60 8 1920 x 1080i 28 125 50 Note Vertical frequency standard 1Hz Vertical lines standare 14 lines Analog RGB Video Timing Chart No Resolution H freq kHz V freq Hz...

Page 41: ...73 2 480p 480 59 94 31 47 3 576i 576 50 00 15 63 4 576p 576 50 00 31 26 5 720p 50 720 50 00 37 50 6 720p 60 720 60 00 45 00 7 1080i 50 1080 50 00 28 13 8 1080i 60 1080 60 00 33 75 z The TV differentia...

Page 42: ...Consumer Information Centers...

Reviews: