background image


Thermal Jet

Appendix D: File Backup and Restore

5780-320 Operations Manual Rev C 

Page 34

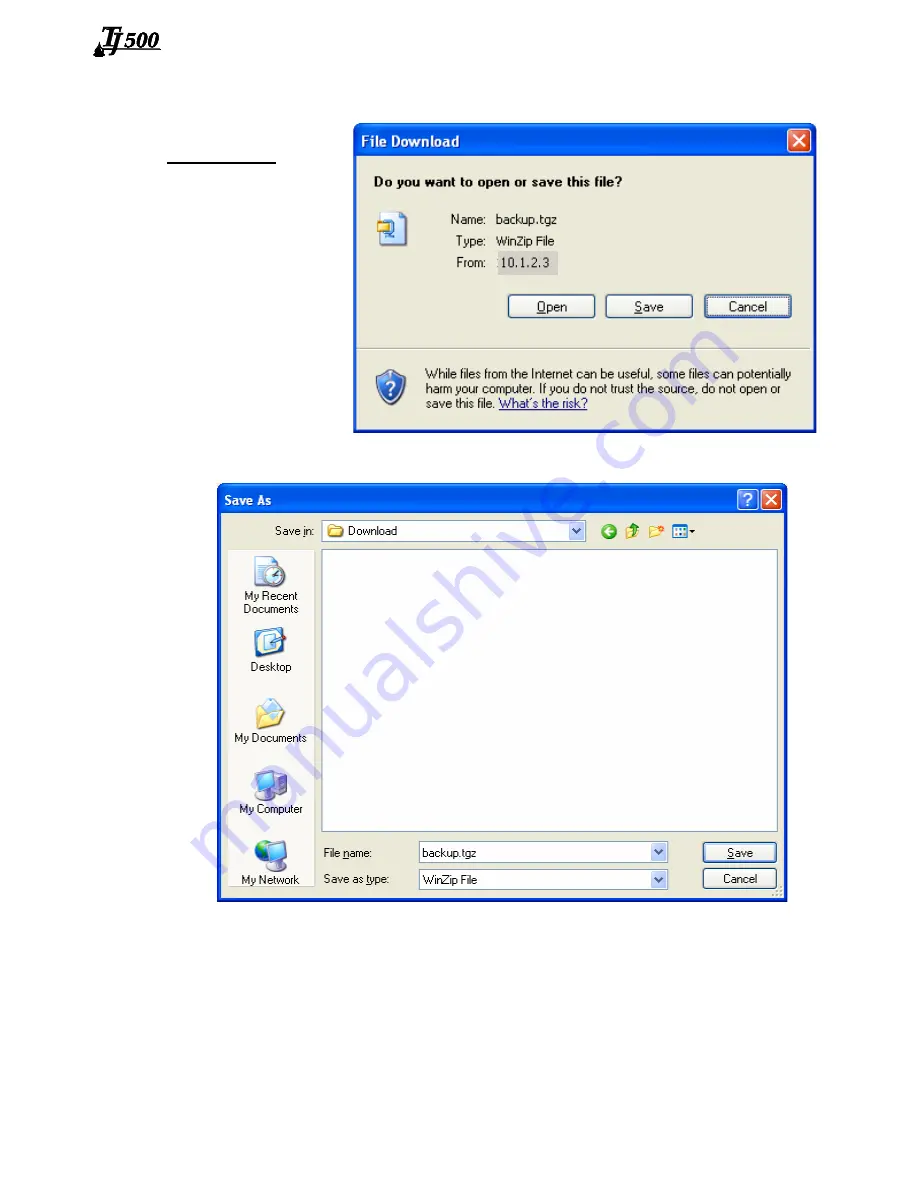
File Backup

To backup the sys-
tem files, click the

Backup files

 link.

The dialog box
shown at right (or a
similar dialog box)
will appear.

Click the 

Save

 button. A 

Save As

 dialog appears.

The IJ3000-ES files backed up are compressed and put into a single file, and are given the
default name and file extension 

backup.tgz

. Following normal Windows® conventions, the

backup file may be renamed and given any extension, and saved in any folder desired. To
save the backup file with an extension other than .tgz, open the 

Save as type

 combo box

and select 

All Files

.

Summary of Contents for TJ500

Page 1: ...Operations Manual 1 Missouri Research Park Drive St Charles MO 63304 Service Line 1 800 526 2531 Illinois Tool Works Inc 2009 Thermal Jet Ink Jet System 5780 320 Revision C...

Page 2: ...technical specifications at any time and without notice 2009 Illinois Tool Works Inc All rights reserved Printed in the United States of America Ink Cartridge The TJ500 has been engineered and design...

Page 3: ...specified carries a limited warranty The inks and conditioners used with the TJ500 Thermal Jet system carry a limited warranty For all warranty terms and conditions contact Diagraph an ITW Company for...

Page 4: ...d 13 Home Screen 14 Main Menu 16 Section 4 Maintenance Shutdowns 21 Daily Maintenance Ink Cartridge 21 Weekly to Monthly Maintenance Print Head 21 Shutdowns Less Than 3 Days 22 Shutdowns More Than 3 D...

Page 5: ...rvicing internal printed circuit boards After service to the equipment is completed replace all protective devices such as ground ing cables and covers before operating the equipment It is extremely i...

Page 6: ...ick Start 5780 320 Operations Manual Rev C Page 2 Section 2 Quick Start Contents TJ500 Print Head Bracketry Kit Power Supply 15 V Power Supply Bracket Power Cord Software CD OPTIONAL IJ3000 ES CONTROL...

Page 7: ...Thermal Jet Section 2 Quick Start 5780 320 Operations Manual Rev C Page 3 Step 1 Assemble Bracketry Step 2 Assemble Bracketry to Conveyor...

Page 8: ...Thermal Jet Section 2 Quick Start 5780 320 Operations Manual Rev C Page 4 Step 3 Assemble TJ500 and Power Supply to Bracketry Ensure bar is behind front face of TJ500...

Page 9: ...5 Step 4 Adjust TJ500 Print Head to Substrate ADJUST TJ500 VERTICALLY WITH EITHER OF THESE TWO BRACKETS ADJUST THE PRINT HEAD TO THE SUBSTRATE WITH THIS BRACKET 1 2 5mm GAP RECOMMENDED Adjust TJ500 ve...

Page 10: ...naps in place NOTE The pen is released by press ing down on the Finger Release Tab and pulling up on the rear of the car tridge Close Cover PEN STOP When inserting cartridge aim nose at an angle towar...

Page 11: ...ables Electrical arcing may occur if external cabling is connected or disconnected while power is supplied to the unit Connect the included serial cable between a computer or an IJ3000 ES COM port to...

Page 12: ...rd or com parable material in front of the TJ500 print cartridge Print several purge images and validate that all channels are printing If not refer to Section 4 Maintenance Shutdowns on page 21 At th...

Page 13: ...aud button and ensure the baud rate is set for 57600 Press the OK button to exit the Serial Port Setup screen Press the first Function button and select the Serial Print Head option Press the OK but t...

Page 14: ...omatically detected via TJ500 photocells External Encoder Line speed measured by an externally mounted encoder and connected to the last TJ500 in the daisy chain Touch this box then type in the desire...

Page 15: ...uct Setup Product Side Zoom Field Coordinates Field Selection Font Selection Count Code Date Code Time Code Alpha Numeric Quick Save Create and save the message and then exit the message editor Messag...

Page 16: ...tart 5780 320 Operations Manual Rev C Page 12 Step 9 Print a Message From the home screen push the Print button Select the desired message to print and push the Print It button The message will print...

Page 17: ...ontrols Moves highlighted fields or the cursor around in the Message Editor Tab Shifts focus between screen controls Shifts focus between fields in the Message Editor Backspace in Message Editor Norma...

Page 18: ...Places focus on the selected task This allows one to view what is being printed on either task in the home screen Additionally items in the main menu vary from one task to the other Task Print Pause B...

Page 19: ...the Print It button The message will print after the next photocell trigger Zoom Expands the message window to full screen and magnifies the print message so that fine details may be seen F1 F2 F5 an...

Page 20: ...ter a confirmation dialog popup box Closes this menu immediately Fires all jets for a short period of time on the selected TJ500 Returns to Home Message List Selected Message Returns to Home Screen De...

Page 21: ...ulates estimated ink usage for the contents of the editor Prints the contents of this editor on the next photocell trigger Text field properties inactive Exits the editor to the Home screen Quick save...

Page 22: ...print head direction and quantity System Setup Screen Auto Speed Detect Line speed automatically detected via TJ500 photocells dis ables the External product sensor External Encoder Line speed measur...

Page 23: ...or GUI Functionality 5780 320 Operations Manual Rev C Page 19 Network Regional Settings User Access Utilities After performing the Restore default configura tion function the serial port must be recon...

Page 24: ...in a daisy chain The first print head Head 1 is properly connected and detected The second print head has not been properly connected to the daisy chain Indicates head number in daisy chain Right han...

Page 25: ...ton on the rear of the print head for 5 10 seconds to clear any excess deionized water in the orifices Because ink will eject dur ing the channel purging a piece of paper cloth or comparable material...

Page 26: ...in in the print head uncapped When restarting the print head follow the Daily Maintenance procedure Shutdowns More Than 3 Days For extended shutdowns follow the Daily Maintenance procedure remove the...

Page 27: ...r is installed navigate to the control ler Status screen from the Home screen While the encoder is turning check the line speed for greater than 0 ft min or 0 m min Ensure the product is within 1 4 of...

Page 28: ...p to three bitmap files 150 dots tall 5 in 12 7 mm X 2046 wide 6 82 173 mm Environment Ambient operating temperature 50 F to 104 F 10 C to 40 C Operating Humidity 10 80 RH Ink Type Dye or Pigmented ba...

Page 29: ...to 52 characters long per field Maximum Number of Vertical Fields 2 per print head Maximum Product Length 108 inches 2743 mm Maximum Repeat Print Distance 108 inches 2743 mm Ports 2 RS 232 ports 1 10...

Page 30: ...columns 6 82 in 173 mm Variable fields can only be change when the message is selected to print The difference between the TJ500 and other Diagraph inkjet technologies is its ability to store the mes...

Page 31: ...ser interface Controller Features The IJ3000 ES Controller has a graphical user interface consisting of a color LCD touch screen and 70 key QWERTY keypad Also housed in the controller are a CPU Board...

Page 32: ...ds it to the LCD with all necessary control signals Display data is written into the dis play memory by the CPU The touch screen controller U27 senses when the screen is touched and sends screen coord...

Page 33: ...am TO 5 7 OR 10 4 DISPLAY TO INTERFACE CARD 5 GND GND VBUS GND VBUS TPTX TPTX TPRX N C TPRX N C N C N C CPU BOARD J2 J1 J4 J5 N C N C N C RX N C N C N C P3 1 6 3 7 2 8 4 9 TX P1 P7 N C N C N C RX N C...

Page 34: ...unctional if used with non Diagraph ink cartridges Service Parts Porous Media Ink Part No Description Package 5780 201 TJ PM Porous Media Black 5 cartridges 5780 202 TJ PMX Porous Media Black Extended...

Page 35: ...iption 1 5760 122 Battery CPU Type CR2032 2 5760 746 Cable Display to CPU PCB 40 Conductor 3 5765 001DTJ IJ3000 ES Controller 4 5765 201 Keyboard Replacement 5 5765 202 CPU PCB Replacement 6 5765 205...

Page 36: ...th Mounting Bracket 25 Cable 2 5765 206 Encoder O ring Replacement Roller Retractor Bracketry Item Kit No Description 1 5780 206 Roller Bracket Only 2 5780 207 Roller and Retractor Bracket Maintenance...

Page 37: ...th the IJ3000 ES on page 36 1 Obtain the IJ3000 ES Controller s IP address Most IJ3000 ES controllers have an IP address of 10 1 2 3 It may be different if the controller is networked with other IJ300...

Page 38: ...ear Click the Save button A Save As dialog appears The IJ3000 ES files backed up are compressed and put into a single file and are given the default name and file extension backup tgz Following normal...

Page 39: ...roller s backed up system files click the Restore files from backup link The web page shown below appears Click the Browse button to locate and select the backup file to be sent to the controller Clic...

Page 40: ...00 ES This appendix has instructions for setting the IP address and subnet mask of the PC so it can communicate with the IJ3000 ES Controller Included are instructions for Windows XP Windows 2000 Wind...

Page 41: ...he IJ3000 ES 5780 320 Operations Manual Rev C Page 37 3 Select Internet Protocol TCP IP then click the Properties button 4 Click the Use the following IP address radio button Enter an IP address of 10...

Page 42: ...to Communicate with the IJ3000 ES 5780 320 Operations Manual Rev C Page 38 Windows 2000 1 Open the Start menu select Settings then Network and Dial up Connections 2 Click the desired connection then o...

Page 43: ...e IJ3000 ES 5780 320 Operations Manual Rev C Page 39 3 Select Internet Protocol TCIP IP then click the Properties button 4 Click the Use the following IP address radio button Enter an IP address of 10...

Page 44: ...Font Samples 5780 320 Operations Manual Rev C Page 40 Appendix F Font Samples Arial 30 1 8 in 3 1 mm AaBbCcDdEeFf 1234567890 Arial 75 1 4 in 6 35 mm AaBbCcDdEeFf 1234567890 Arial 150 1 2in 12 7 mm Aa...

Page 45: ...t Programs Accessories and then Paint Bring up the Attributes dialog box by selecting Image and then Attributes Enter the Width and Height of the logo in Pixels The maximum number of pixels for width...

Page 46: ...and Rotate dialog by selecting Image Flip Rotate Select Rotate by angle then 270 Click Ok From the File Menu select Save As and save in a directory location that you will remem ber NOTE If a PC is bei...

Page 47: ...xe program and step through the screens until the Serial port and operations selection screen appears If only BMP and or font files are to be uploaded then uncheck the Upgrade Firmware box Select Next...

Reviews: