background image

24

EN

6. OPERATION

W

ARNING!

 During operation fine dust will be generated!

Some dusts are highly inflammable and explosive!Do not smoke during operation, 
keep heat sources and open flames out of the working area!
Always use a dust extraction system and wear a dust mask to protect yourself 
against hazards resulting from fine dust! 

The installation and remove of belt

warning: Make sure the machine is turned off and unplug the power cord before install or 

remove the belt.

Please pull up the Clamp lever just above the tracking adjustment knob to release the tension 

on the belt, Silde out the belt to be replaced,then refit the requirede belt over the rear and 

front rollers.

Belt adjustment path

Check that the sanding belt is running centrally before using. Turn the machine with the belt 

facing the operator, Turn the tracking adjustment knob either clockwise or anti-clockwise to 

adjust the belt tracking until the sanding belt is running centrally.

Connect the dust bag

This machine is fitted with a dust extraction outlet and collection bag. We recommend that 

this facility is used at all times, as well as using an approved face mask. It can make the work 

cleaner. Fixed the outlet, and then fit the dust collection bag onto the dust extraction outlet.

Sanding operation

If the operation may occur during operation the work piece is moved, Please fix the work 

piece with clamps.   

When open or stop the machine, do not let the tool contact with the work piece. Otherwise, it 

will result the damage of sander belt or make the machine out of control.  

When using the machine operation, we should be careful to avoid any part of the body or 

come into contact with any of the items around machines or belt.

Hold the machine with both hands and assume a balanced posture. Press the On/Off trigger 

switch and allow the motor to reach full speed. Hold the machine parallel to the work piece. 

Gently bring belt contact with the work piece. Do not force tool. Use the correct tool for your 

application. The correct tool will do the job better and safer at the rate for which it is 

designed.

Summary of Contents for S1T-YH-13B

Page 1: ...2016 07 EAN CODE 3276000229285 Mini Belt Sander S1T YH 13B Legal Notices Safety Instructions FR ES PT IT EL PL RU UK RO EN 2 CZ 2016 11 28 ...

Page 2: ...rront être recyclés Pour obtenir des conseils sur le recyclage contactez votre mairie ou un magasin local Précautions Avertissements TABLE DES MATIÈRES 1 Domaine d application de la mini ponceuse à bande Dexter Power 2 Instructions de sécurité 3 Description 4 Données techniques 5 Avant d utiliser l outil 6 Fonctionnement 7 Entretien 8 Guide de dépannage 9 Mise au rebut et recyclage 10 Garantie 11 ...

Page 3: ...ée augmente les risques d accident N utilisez pas un outil électrique dans une atmosphère explosive par exemple en présence de liquides de gaz ou de poussières inflammables Les outils électriques génèrent des étincelles pouvant enflammer les poussières ou les vapeurs Veillez à ce que les enfants et les autres personnes restent à distance quand vous utilisez un outil électrique Un moment d inattent...

Page 4: ... de bon sens lors de l utilisation d un outil électrique N utilisez pas un outil électrique si vous êtes fatigué e sous l emprise de l alcool ou de drogues ou après avoir pris des médicaments Un moment d inattention lors de l utilisation d un outil électrique peut provoquer des blessures graves Utilisez des équipements de protection individuelle Portez toujours une protection pour les yeux Des équ...

Page 5: ...ctrique ou avec ces instructions utiliser cet outil Les outils électriques sont dangereux dans les mains de personnes inexpérimentées Entretenez les outils électriques Inspectez les pour vérifier qu aucune pièce mobile n est grippée ou mal alignée qu aucune pièce n est cassée et pour tout autre problème pouvant affecter leur fonctionnement Si un outil électrique est endommagé il doit être réparé av...

Page 6: ...amment le MDF Panneaux de Fibres de Moyenne Densité peuvent générer des poussières dangereuses pour votre santé Nous vous recommandons d utiliser un masque facial homologué avec filtres remplaçables quand vous utilisez cet outil en plus d utiliser un dispositif d extraction des poussières Réduction du bruit et des vibrations Afin de réduire l impact négatif des vibrations et du bruit limitez la du...

Page 7: ...aux personnes résultant de la projection d objets AVERTISSEMENT Ce produit génère un champ électromagnétique lorsqu il fonctionne Dans certaines circonstances ce champ magnétique peut interférer avec les implants médicaux actifs ou passifs Afin de réduire les risques de blessures graves voire mortelles les personnes portant des implants médicaux doivent consulter leur médecin et le fabricant de le...

Page 8: ... d alimentation 11 Bouton de verrouillage 12 Interrupteur marche arrêt 13 Carter arrière 14 Boîtier du moteur 15 Ouvertures de ventilation 16 Embout d extraction des poussières 17 Sac de récupération des poussières a Sac à poussière b Connecteur Tension nominale fréquence 220 240 V 50 Hz Puissance d entrée nominale 400 W Vitesse à vide n0 300 1700 m min Classe de protection II Poids Environ 2 0 kg...

Page 9: ...èces hors de l emballage et posez les sur une surface plane et stable Enlevez tous les matériaux d emballage ainsi que les accessoires pour le transport le cas échéant Vérifiez que le contenu est complet et en bon état Si l une des pièces est manquante ou endommagée n utilisez pas l outil et contactez votre revendeur L utilisation d un produit incomplet ou endommagé peut représenter un danger à la...

Page 10: ... bras Faites pivoter le bras le long du pivot jusqu à la position désirée puis bloquez le levier de verrouillage pour fixer le bras Fonctionnement de l interrupteur Assurez vous que l interrupteur est en état normal de fonctionnement avant de mettre l outil en marche Lorsque vous libérez l interrupteur il se remettra en position d arrêt L outil est démarré en appuyant sur l interrupteur ON OFF MAR...

Page 11: ...ion des poussières Ponçage Lorsque vous mettez la machine en marche ou l arrêtez ne la mettez pas en contact avec la pièce à poncer Dans le cas contraire il en résultera des dommages sur la bande de ponçage ou la machine pourra devenir hors de contrôle Lorsque vous utilisez la machine prenez des précautions afin d éviter que toute partie de votre corps n entre en contact avec l un des éléments de ...

Page 12: ...arer par un centre de réparation agréé ou par une personne de qualification similaire Rangement Éteignez l appareil et débranchez le de la prise d alimentation Nettoyez le produit comme décrit ci dessus Rangez l outil et ses accessoires dans un endroit sec sombre bien aéré et à l abri du gel L outil doit toujours être rangé dans un endroit hors de portée des enfants La température idéale de la piè...

Page 13: ...ation électrique 1 2 Le câble ou la prise d alimentation est défectueux se 1 3 Autre dysfonctionnement électrique de l appareil 1 1 Branchez le à une prise d alimentation électrique 1 2 Consultez un électricien qualifié 1 3 Consultez un électricien qualifié 2 L outil n atteint pas sa pleine puissance 2 1 La rallonge électrique ne convient pas pour faire fonctionner cet appareil 2 2 La source d ali...

Page 14: ...é par un tiers L outil n a pas été soumis à un usage non adapté surcharge de l outil ou utilisation d accessoires non approuvés Aucun dégât n a été causé par des influences extérieures ou des corps étrangers tels que du sable ou des pierres Aucun dommage n a été causé par le non respect des consignes de sécurité et des instructions d utilisation 6 Les dispositions de la garantie s appliquent en co...

Page 15: ...RECTIVECOMPATIBILITÉÉLECTROMAGNÉTIQUE2014 30 UE DIRECTIVEROHS2011 65 EU et est conforme aux normes suivantes N de série Reportez vous à la dernière page Deux derniers chiffres de l année d apposition du marquage CE 16 15 08 2016 EN 60745 1 2009 A11 2010 EN 60745 2 4 2009 A11 2011 EN 55014 1 2006 A1 2009 A2 2011 EN 55014 2 2015 EN 61000 3 2 2014 EN 61000 3 3 2013 IEC 62321 2008 IEC 62321 4 2013 IEC...

Page 16: ...ere facilities exist Check with your Local Authority or local store for recycling advice Caution Warning CONTENTS 1 Area of application for the Dexter Power Mini Belt Sander 2 Safety instructions 3 Description 4 Technical data 5 Before operating the equipment 6 Operation 7 Maintenance 8 Trouble shooting 9 Disposal and recycling 10 Warranty 11 CE Declaration Wear eye protection Wear hearing protect...

Page 17: ...lure to follow the warnings and instructions may result in electric shock fire and or serious injury Save all warnings and instructions for future reference The term power tool in the warnings refers to your mains operated corded power tool or battery operated cordless power tool This product is intended for sanding the following materials wood plastic metal and fillers as well as varnished surfac...

Page 18: ... of inattention while operating power tools may result in serious personal injury Usepersonalprotectiveequipment Alwaysweareyeprotection Protectiveequipment such as a dust mask non skid safety shoes hard hat or hearing protection used for appropriate conditions will reduce personal injuries Prevent unintentional starting Ensure the switch is in the off position before connecting to a power source a...

Page 19: ...eepcuttingtoolssharpandclean Properlymaintainedcuttingtoolswithsharpcutting edges are less likely to bind and are easier to control Use the power tool accessories and tool bits etc in accordance with these instructions taking into account the working conditions and the work to be performed Useofthepowertoolforoperationsdifferentfromthoseintendedcouldresult in a hazardous situation Service Have you...

Page 20: ...oductinaccordancewiththeseinstructionsandkeepitwelllubricated where appropriate Plan your work schedule to spread any high vibration tool use across a longer period of time Emergency Usethisinstructionmanualtofamiliariseyourselfwiththeuseofthisproduct Memorisethesafetydirectionsandfollowthemtotheletter Thiswillhelptoprevent risks and hazards Always be alert when using this product so that you can ...

Page 21: ...wer sanding sawing grinding drilling and otherconstructionactivitiescontainschemicalsknowntocausecancer birthdefects or other reproductive damage Some examples of these chemicals are Lead from lead based paint Crystalline silica from bricks and cement and other masonry products Arsenic and chromium from chemically treated timber Yourriskfromtheseexposuresvaries dependinguponhowoftenyoudothistype o...

Page 22: ...dial 9 Handle 10 Power cord with plug 11 Lock on button 12 On off switch 13 Rear safeguard 14 Motor housing 15 Air vents 16 Dust extraction outlet 17 Dust bag assembly a Dust bag b Connector Rated voltage frequency 220 240 V 50 Hz Rated power input 400 W Rated no load speed n0 300 1700 m min Protection class II Weight approx 2 0 kg Sanding belt dimensions approx 13 x 457 mm 4 TECHNICAL DATA ...

Page 23: ...play with plastic bags sheets and small parts There is a danger of choking and suffocation 5 BEFORE OPERATING THE EQUIPMENT Recommend the operator to wear hearing protection The declared vibration total value has been measured in accordance with a standard test method and may be used for comparing one tool with another that the declared vibration total value may also be used in a preliminary asses...

Page 24: ...t Loosen locking lever then can uplift the arm Rotate the arm along the pivot to the desired position then lock the locking lever and fix the arm Switch operation Make sure the switch is in normal state before get through the power When release the switch it can return to off The machine will start with pressing ON OFF switch and stop with release the ON OFF switch Press the ON OFF switch and the ...

Page 25: ...unning centrally Connect the dust bag This machine is fitted with a dust extraction outlet and collection bag We recommend that this facility is used at all times as well as using an approved face mask It can make the work cleaner Fixed the outlet and then fit the dust collection bag onto the dust extraction outlet Sanding operation If the operation may occur during operation the work piece is mov...

Page 26: ...ge Switch the product off and disconnect it from the power supply Clean the product as described above Store the product and its accessories in a dark dry frost free well ventilated place Always store the product in a place that is inaccessible to children The ideal storage temperature is between 10 C and 30 C We recommend using the original package for storage or covering the product with a suita...

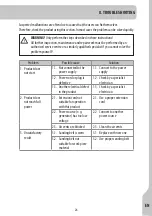
Page 27: ...ct does not start 1 1 Not connected to the power supply 1 2 Power cord or plug is defective 1 3 Another electrical defect in the product 1 1 Connect to the power supply 1 2 Check by a specialist electrician 1 3 Check by a specialist electrician 2 Product does not reach full power 2 1 Extension cord not suitable for operation with this product 2 2 Power source e g generator has too low voltage 2 3 ...

Page 28: ...nt of parts will not extend the original warranty period 4 Defectswhichhavearisenasaresultofimproperuseorweararenotcoveredbythewarranty Amongst other things this relates to switches protective circuit switches and motors in the event of wear 5 Your claim upon the warranty can only be processed if Proof of the purchase date can be provided in the form of a receipt No repairs and or replacements hav...

Page 29: ...ITYDIRECTIVE2014 30 EU THEROHSDIRECTIVE2011 65 EU and complieswith the following standards Serial No Please refer to the back cover page Last two numbers of the year CE label applied 16 15 08 2016 EN 60745 1 2009 A11 2010 EN 60745 2 4 2009 A11 2011 EN 55014 1 2006 A1 2009 A2 2011 EN 55014 2 2015 EN 61000 3 2 2014 EN 61000 3 3 2013 IEC 62321 2008 IEC 62321 4 2013 IEC 62321 5 2013 Bruno POTTIE Posit...

Page 30: ...29 EN ...
Page 31: ...vices 135RueSadiCarnot CS00001 59790RONCHIN France ОООЛЕРУАМЕРЛЕНВОСТОК 141031 Московскаяобласть Мытищинскийрайон г Мытищи Осташковскоешоссе д 1 РОССИЯ ТОВ ЛеруаМерленУкраїна вул Полярна17а м Київ04201 Україна FR RU UK Made in P R C in 2016 N desérie N o de serie N o de série N di serie Aρ oειράς Nr seryjny Cepийный нoмeр Cepiйний Nr de serie Serial No 2092370119121601206600 ...

Reviews: