3
ENGLISH
3. Fill the tank with cool water and chemical to the desired
level.
4. Reinstall the cap.
Pressurizing and Spraying
WARNING:
RISK OF PERSONAL INJURY AND/
OR PROPERTY DAMAGE DUE TO UNINTENDED
SPRAYING OF CHEMICAL. Ensure the shutoff is in
the closed position (lever released) before starting to
pressurize the sprayer. The sprayer will spray when
pressurizing, if the shutoff is open (lever depressed).
NOTICE:
RISK OF PROPERTY DAMAGE. Only spray when
the air is calm (no wind or air movement) to prevent
chemical spray from drifting onto non-targeted surfaces.
1. To begin pressurizing, be sure shut-off lever is not
depressed. Pump handle up and down in a smooth motion.
(Fig. H.) Operating pressure is reached when pumping
becomes difficult, which is no more than 5-7 full pumps.
(Do not over pressurize)
2. Direct nozzle away from you and squeeze shut-off lever to
begin spraying.
3. To maintain pressure while spraying, operate pump
handle every 8 sec. or as needed.
4. For continuous spraying, squeeze lever and rotate lock.
(Fig. I)
5. Unlock if needed and release shut-off lever to stop spraying.
CLEANING INSTRUCTIONS
WARNING:
RISK OF PERSONAL INJURY DUE TO
CHEMICAL EXPOSURE. Use the appropriate Personal
Protective Equipment (PPE) as recommended by the
chemical manufacturer and/or refer to the chemical
Safety Dada Sheet (SDS) of the chemical being used. This
includes at least goggles, gloves, and protective clothing.
1. Fill the tank with cool, clean tap water. Replace the cap
and tighten securely.
(Never use hot water for cleaning)
Fig. H
Fig. I
ASSEMBLY
Pump Handle
Tools Required: 13mm or Adjustable Wrench (not supplied)
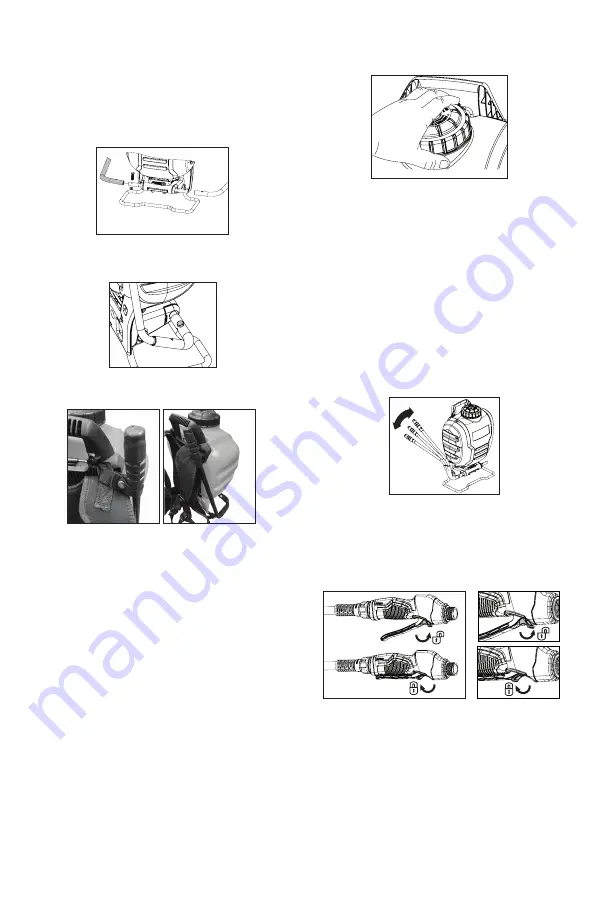
1. Slide handle onto shaft and line up holes. Thread bolt
through handle and shaft and securely tighten. Thread on
lock nut and tighten using a 13mm (or adjustable) wrench.
Handle can be mounted on left or right depending on user
preference. (Fig C )
Folding Handle
1. Thread bolt through handle and shaft as stated above. (Fig. D)
2. Snap strap around handle. (Fig. E)
3. Handle shown in folded position. (Fig. F)
OPERATING INSTRUCTIONS
WARNING:
RISK OF PERSONAL INJURY DUE TO CHEMICAL
EXPOSURE. Use the appropriate Personal Protective
Equipment (PPE) as recommended by the chemical
manufacturer and/or refer to the chemical Safety Data
Sheet (SDS) of the chemical being used. This includes at
least goggles, gloves, and protective clothing.
Filling
DANGER:
RISK OF DEATH, SEVERE PERSONAL INJURY
AND/OR PROPERTY DAMAGE FROM IMPROPER
CHEMICAL USE OR MIXTURE.
• Never use flammable or combustible chemicals in this
sprayer. Spraying flammable or combustible chemicals
can create combustible fumes that could be ignited,
causing an explosion.
• Use only chemicals indicated for spraying applications.
Some chemicals may create a toxic or other hazardous
atmosphere when sprayed.
• Always refer to chemical manufacturer’s instructions
and/or the chemical Safety Data Sheet (SDS) for proper
mixture and safe application.
1. Remove the cap from the tank. (Fig. G)
2. Make sure the filter basket is in place in the neck of the tank.
The filter basket includes the seal and must be in place to
prevent leaks.
Fig. C
Fig. D
Fig. E
Fig. F
Fig. G


