background image

7

English

ASSEMBLY AND ADJUSTMENTS


WARNING: To reduce the risk of serious personal 

injury, turn unit off and remove the battery pack 

before making any adjustments or removing/

installing attachments or accessories.

 An 

accidental start‑up can cause injury.

Wall Mounting

Some 

D

e

WALT


chargers are designed to be wall mountable 

or to sit upright on a table or work surface.  If wall mounting, 
locate the charger within reach of an electrical outlet, and 
away from a corner or other obstructions which may impede 
air flow. Use the back of the charger as a template for the 
location of the mounting screws on the wall. Mount the 
charger securely using drywall screws (purchased separately) 
at least 1” (25.4 mm) long, with a screw head diameter of 
0.28–0.35” (7–9 mm), screwed into wood to an optimal 
depth leaving approximately 7/32” (5.5 mm) of the screw 
exposed. Align the slots on the back of the charger with the 
exposed screws and fully engage them in the slots.

SAVE THESE INSTRUCTIONS FOR 

FUTURE USE

Electronic Protection System

Li-Ion tools are designed with an Electronic Protection 
System that will protect the battery pack against overloading, 
overheating or deep discharge. The tool will automatically 
turn off and the battery pack will need to be recharged.

Important Charging Notes

1.  The charger and battery pack may become warm to the 

touch while charging. This is a normal condition, and 

does not indicate a problem. To facilitate the cooling of 

the battery pack after use, avoid placing the charger or 

battery pack in a warm environment such as in a metal 

shed or an uninsulated trailer.

2.  If the battery pack does not charge properly:

a.  Check operation of receptacle by plugging in a lamp 

or other appliance;

b.  Check to see if receptacle is connected to a light 

switch which turns power off when you turn out  

the lights;

c.  If charging problems persist, take the tool, battery 

pack and charger to your local service center.

3.  You may charge a partially used pack whenever you 

desire with no adverse effect on the battery pack.

Charger Cleaning Instructions


WARNING: 

Shock hazard. Disconnect the charger 

from the AC outlet before cleaning. Dirt and grease 
may be removed from the exterior of the charger using 
a cloth or soft non‑metallic brush. Do not use water or 
any cleaning solutions.

• 

Do not operate the charger with a damaged cord 

or plug. 

Have them replaced immediately.

• 

Do not operate the charger if it has received a sharp 

blow, been dropped or otherwise damaged in any 

way.

 Take it to an authorized service center.

• 

Do not disassemble the charger; take it to an 

authorized service center when service or repair 

is required.

 Incorrect reassembly may result in a risk of 

electric shock, electrocution or fire.

• 

The charger is designed to operate on standard 

120V household electrical power. Do not attempt to 

use it on any other voltage.

 This does not apply to the 

vehicular charger.

• 

Foreign materials of a conductive nature, such as, but 

not limited to, grinding dust, metal chips, steel wool, 

aluminum foil or any buildup of metallic particles 

should be kept away from the charger cavities and 

ventilation slots.


• 

Always unplug the charger from the power supply 

when there is no battery pack in the cavity.

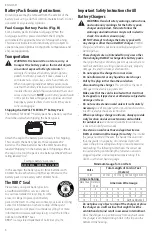
Charging a Battery (Fig. C)

1.  Plug the charger into an appropriate outlet. 
2.  Insert and fully seat battery pack.  The red charging light 

will continuously blink while charging.

3.  Charging is complete when the red charging light 

remains continuously ON. Battery pack can be left in 

charger or removed. Some chargers require the battery 
pack release button to be pressed for removal.


WARNING:

 Only charge batteries in air temperature 

over 40° F (4.5° C)  and below 105° F (+40.5° C).

4.  Charger will not charge a faulty battery pack, which 

may be indicated by the light staying OFF. Take charger 

and battery pack to an authorized service center if light 

stays OFF. 

nOTE: 

Refer to label near charging light on charger 

for blink patterns. Older chargers may have additional 
information and/or may not have a yellow indicator light.

hot/Cold Pack Delay

When the charger detects a battery pack that is too hot 
or too cold, it automatically starts a Hot/Cold Pack Delay, 
suspending charging until the battery pack has reached an 
appropriate temperature. The charger then automatically 
switches to the pack charging mode. This feature ensures 
maximum battery pack life.
A cold battery pack may charge at a slower rate than a warm 
battery pack.
The hot/cold pack delay will be indicated by the red light 
continuing to blink but with the yellow light continuously 
ON. Once the battery pack has reached an appropriate 
temperature, the yellow light will turn OFF and the charger 
will resume the charging procedure.

DCB118 and DCB1112 Chargers

The DCB118 and DCB1112 chargers are equipped with 
an internal fan designed to cool the battery pack. The fan 
will turn on automatically when the battery pack needs to 
be cooled.

Summary of Contents for DCST972

Page 1: ...ire nous contacter Si tiene dudas o comentarios contáctenos 1 800 4 DeWALT DCST972 60V Max Attachment Capable Powerhead 60 V Max Moteur Compatible Avec Les Accessoires Cabeza de Potencia con Capacidad de Conexión 60V Max Instruction Manual Guide D utilisation Manual de instrucciones ...

Page 2: ...English original instructions 3 Français traduction de la notice d instructions originale 11 Español traducido de las instrucciones originales 20 ...

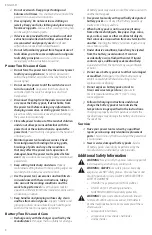
Page 3: ...itesse variable 2 Levier de verrouillage 3 Languette de verrouillage 4 Poignée du moteur 5 Bouton de réglage de la vitesse 6 Poignée auxiliaire 7 Pile 8 Bouton de libération de la pile Componentes 1 Gatillo de velocidad variable 2 Palanca de bloqueo de apagado 3 Lengüeta de bloqueo de apagado 4 Manija de cabeza de potencia 5 Interruptor de control de velocidad 6 Manija auxiliar 7 Batería 8 Botón d...

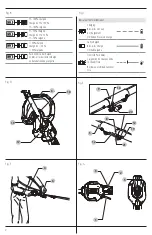
Page 4: ... cargada 50 charged Chargé de 50 50 cargada Pack needs to be charged Le bloc piles doit être rechargé La batería tiene que cargarse Indicators Témoin Indicador Charging Bloc piles en Cours de Chargement Unidad en Proceso de Carga Fully Charged Bloc piles Chargé Unidad Cargada Hot Cold Pack Delay Suspension de Charge Contre le Chaud Froid Restraso por Unidad Caliente Fría ...

Page 5: ...on invites accidents d Remove any adjusting key or wrench before turning the power tool on A wrench or a key left attached to a rotating part of the power tool may result in personal injury GENERAL POWER TOOL SAFETY WARNINGS WARNING Read all safety warnings instructions illustrations and specifications provided with this power tool Failure to follow all instructions listed below may result in elec...

Page 6: ...at all times This enables better control of the power tool in unexpected situations f Dress properly Do not wear loose clothing or jewelry Keep your hair clothing and gloves away from moving parts Loose clothes jewelry or long hair can be caught in moving parts g If devices are provided for the connection of dust extraction and collection facilities ensure these are connected and properly used Use...

Page 7: ...ack Do not use a battery pack or charger that has received a sharp blow been dropped run over or damaged in any way e g pierced with a nail hit with a hammer stepped on Damaged battery packs should be returned to the service center for recycling Storage Recommendations The best storage place is one that is cool and dry away from direct sunlight and excess heat or cold Store the fully charged batte...

Page 8: ...internal heat Place the charger in a position away from any heat source The charger is ventilated through slots in the top and the bottom of the housing The RBRC Seal Please take your spent battery packs to an authorized DeWALT service center or to your local retailer for recycling In some areas it is illegal to place spent battery packs in the trash You may also contact your local recycling cente...

Page 9: ...ve them replaced immediately Do not operate the charger if it has received a sharp blow been dropped or otherwise damaged in any way Take it to an authorized service center Do not disassemble the charger take it to an authorized service center when service or repair is required Incorrect reassembly may result in a risk of electric shock electrocution or fire The charger is designed to operate on s...

Page 10: ...NING To reduce risk of injury Before any use be sure everyone using this product reads and understands all safety instructions and other information contained in the powerhead and attachment manuals Never apply power without an attachment being properly mounted to the powerhead WARNING To reduce the risk of serious personal injury turn unit off and remove the battery pack before making any adjustm...

Page 11: ...dewalt com Cleaning WARNING Blow dirt and dust out of all air vents with clean dry air at least once a week To minimize the risk of eye injury always wear ANSI Z87 1 approved eye protection when performing this procedure WARNING Never use solvents or other harsh chemicals for cleaning the non metallic parts of the tool These chemicals may weaken the plastic materials used in these parts Use a clot...

Page 12: ...YEARS FREE SERVICE DeWALT will maintain the tool and replace worn parts caused by normal use for free any time during the first two years after purchase 2YEARS FREE SERVICE ON DeWALT BATTERY PACKS DC9071 DC9091 DC9096 DC9182 DC9280 DC9360 DCB120 DCB122 DCB124 DCB127 DCB201 DCB203BT DCB207 DCB361 3 YEARS FREE SERVICE ON DeWALT BATTERY PACKS DCB200 DCB203 DCB204 DCB204BT DCB205 DCB205BT DCB206 DCB20...

Page 13: ...l dans une prise ou sur un circuit d alimentation dotés d un disjoncteur de fuite à la terre GFCI L utilisation de ce type de disjoncteur réduit les risques de choc électrique AVERTISSEMENTS GÉNÉRAUX SUR LA SÉCURITÉ DES OUTILS AVERTISSEMENT lisez tous les avertissements de sécurité toutes les instructions les illustrations Définitions symboles et termes d alarmes sécurité Ces guides d utilisation ...

Page 14: ... Si un contact accidentel se produit laver à grande eau Si le liquide entre en contact avec les yeux obtenir également des soins médicaux 3 Sécurité personnelle a Être vigilant surveiller le travail effectué et faire preuve de jugement lorsqu un outil électrique est utilisé Ne pas utiliser d outil électrique en cas de fatigue ou sous l influence de drogues d alcool ou de médicaments Un simple mome...

Page 15: ...bijoux ou les cheveux longs peuvent se coincer dans des pièces qui déplacent Renseignements de sécurité supplémentaires AVERTISSEMENT Ne jamais modifier l outil électrique ou toute pièce de celui ci Cela pourrait entraîner des dommages matériels ou des blessures corporelles AVERTISSEMENT Portez TOUJOURS des lunettes de sécurité Les lunettes de tous les jours NE SONT PAS des lunettes de sécurité De...

Page 16: ...tions peut entraîner un choc électrique un incendie et ou des blessures graves Ne pas charger ou utiliser le bloc piles en atmosphères explosibles comme la présence de liquides inflammables de gaz ou de poussière Insérer ou retirer la pile du bloc piles peut enflammer la poussière ou les vapeurs Ne JAMAIS forcer le bloc piles dans le chargeur NE PAS modifier le bloc piles de quelque façon que ce s...

Page 17: ...etirer Consignes de sécurité importantes pour tous les chargeurs de piles AVERTISSEMENT lisez toutes les consignes de sécurité les instructions et les symboles d avertissements du bloc piles du chargeur et du produit Ne pas suivre les avertissements et les instructions peut entraîner un choc électrique un incendie et ou des blessures graves NE PAS tenter de charger le bloc piles avec un chargeur a...

Page 18: ...RTISSEMENT chargez les batteries uniquement à une température de l air supérieure à 4 5 C 40 F et inférieure à 40 5 C 105 F 4 Le chargeur ne charger pas un bloc piles défectueux ce qui peut être indiqué par le voyant qui reste éteint Apportez le chargeur et le bloc piles dans un centre de services autorisé si le voyant reste éteint REMARQUE Consultez l étiquette près du voyant de chargement sur le...

Page 19: ...ser avec ce moteur Assembler l accessoire au moteur Fig B 1 Le manche supérieur du moteur 7 est équipé de trois trous de verrouillage 8 9 10 pour le bouton de verrouillage 21 2 En installant le manche de l accessoire 5 dans le manche supérieur du moteur 7 alignez le bouton de verrouillage 21 avec le trou de verrouillage correct 8 Voir les instructions spécifiques à l accessoire pour plus de détail...

Page 20: ...hargeur et le bloc piles ne sont pas réparables Le chargeur ou le bloc piles ne comportent aucune pièce réparable AVERTISSEMENT pour assurer la SÉCURITÉ et la FIABILITÉ du produit les réparations l entretien et les réglages doivent être réalisés cela comprend l inspection et le remplacement du balai le cas échéant par un centre de réparation en usine DeWALT ou un centre de réparation agréé DeWALT ...

Page 21: ...oi GARANTIE DE REMBOURSEMENT DE 90 JOURS Si l acheteur n est pas entièrement satisfait pour quelque raison que ce soit du rendement de l outil électrique ou de la cloueuse DeWALT celui ci peut le retourner accompagné d un reçu dans les 90 jours à compter de la date d achat pour obtenir un remboursement intégral sans aucun problème AMÉRIQUE LATINE cette garantie ne s applique aux produits vendus en...

Page 22: ...terruptor de circuito por falla a tierra GFCI El uso de un GFCI reduce el riesgo de descargas eléctricas ADVERTENCIAS GENERALES DE SEGURIDAD PARA HERRAMIENTAS ELÉCTRICAS ADVERTENCIA Lea todas las advertencias de seguridad instrucciones ilustraciones y especificaciones incluidas con esta herramienta eléctrica La falla en seguir todas las instrucciones Definiciones Símbolos y Palabras de Alerta de S...

Page 23: ...ete de baterías manténgalo lejos de otros objetos metálicos como sujetapapeles monedas llaves clavos tornillos u otros objetos metálicos pequeños que puedan realizar una conexión desde un terminal 3 Seguridad Personal a Permanezca alerta controle lo que está haciendo y utilice el sentido común cuando emplee una herramienta eléctrica No utilice una herramienta eléctrica si está cansado o bajo el ef...

Page 24: ...partes móviles Información de Seguridad Adicional ADVERTENCIA Nunca modifique la herramienta eléctrica o ninguna parte de ella Podría resultar en daño o lesiones personales ADVERTENCIA SIEMPRE use gafas de seguridad Las gafas de uso diario NO son gafas de seguridad También use una careta o máscara de polvo si la operación produce polvo SIEMPRE USE EQUIPO DE SEGURIDAD CERTIFICADO Protección para lo...

Page 25: ...endio y o lesiones serias No cargue o use el paquete de batería en atmósferas explosivas como en la presencia de líquidos gases o polvo inflamables Insertar o retirar el paquete de batería del cargador puede encender el polvo y los vapores NUNCA fuerce el paquete de batería dentro del cargador NO modifique el paquete de batería en ninguna forma para instalarlo en un cargador no compatible ya que e...

Page 26: ...tinuamente mientras carga Instrucciones de Seguridad Importantes para Todos los Cargadores de Batería ADVERTENCIA Lea todas las advertencias de seguridad instrucciones y marcas de precaución para el paquete de la batería el cargador y el producto La falla en seguir las advertencias e instrucciones puede resultar en descarga eléctrica incendio y o lesiones serias NO intente cargar el paquete de bat...

Page 27: ...es completa cuando la luz roja permanece encendida continuamente El paquete de batería se puede dejar en el cargador o retirarse Algunos cargadores requieren que se presione el botón de liberación del paquete de batería para retirarlo ADVERTENCIA Cargue las baterías únicamente a una temperatura del aire superior a 4 5 C 40 F y por debajo de 40 5 C 105 F 4 El cargador no cargará un paquete de bater...

Page 28: ...nexión correctamente Ensamble de conexión a cabeza de potencia Fig B 1 El poste de la cabeza de potencia superior 7 está equipado con tres orificios de bloqueo 8 9 10 para el botón de bloqueo 21 2 Cuando instale el poste de conexión 5 en el poste de la cabeza de potencia superior 7 alinee el botón de bloqueo 21 con el orificio de bloqueo correcto 8 Consulte las instrucciones de conexión específica...

Page 29: ... para utilizar con la herramienta están disponibles a un costo adicional en su distribuidor local o en un centro de mantenimiento autorizado Si necesita ayuda para localizar algún accesorio póngase en contacto com DeWALT llame al 1 800 4 DeWALT 1 800 433 9258 o visite nuestro sitio web www dewalt com Limpieza ADVERTENCIA Sople la suciedad y el polvo de todos los conductos de ventilación con aire s...

Page 30: ...umidor Registro en línea en www dewalt com Póliza de Garantía IDENTIFICACIÓN DEL PRODUCTO Sello o firma del Distribuidor Nombre del producto ___________________________ Mod Cat ____________________________________ Marca ______________________________________ Núm de serie _________________________________ Datos para ser llenados por el distribuidor Fecha de compra y o entrega del producto _________...

Page 31: ...cedimiento judicial por fraude de garantía hasta el máximo grado permisible por la ley GARANTÍA DE REEMBOLSO DE SU DINERO POR 90 DÍAS Si no está completamente satisfecho con el desempeño de su máquina herramienta o clavadora DeWALT cualquiera sea el motivo podrá devolverlo hasta 90 días de la fecha de compra con su recibo y obtener el reembolso completo de su dinero sin necesidad de responder a ni...

Page 32: ...edido sin carga de trabajo es 20 o 60 voltios El voltaje nominal es de 18 54 o 108 V 120 V Máx se basan en el uso de 2 baterías de iones de litio DeWALT de 60 V Máx combinadas BT Bluetooth NOTE The Bluetooth word mark and logos are registered trademarks owned by the Bluetooth SIG Inc and any use of such marks by DeWALT is under license Other trademarks and trade names are those of their respective...

Reviews: