background image

9

English

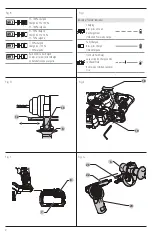
Belt Hook (Fig. E)

Optional Accessory 


WARNING: To reduce the risk of serious personal 

injury, ONLY use the tool’s belt hook to hang the 

tool from a work belt. DO NOT

 use the belt hook 

for tethering or securing the tool to a person or object 

during use. 

DO NOT

 suspend tool overhead or suspend 

objects from the belt hook.


WARNING: To reduce the risk of serious personal 

injury, 

ensure the screw holding the belt hook is secure.

iMPORTAnT: 

When attaching or replacing the belt hook, 

only use the screw 

 19 

 that is provided with the belt hook. Be 

sure to securely tighten the screw.
To accommodate left‑ or right‑ handed users the belt 
hook 

 18 

 can be attached to the tool using one of the 

slots below the main handle on left or right side and using 
the provided screw 

 19 

 installed on the underside of the 

main handle. 
If the belt hook is not desired at all, it can be removed from 

the tool.

To Adjust the Depth Rod (Fig. D)

1.  Push in and hold the depth rod release button 

 13 

 on the 

side handle.

2.  Move the depth rod 

 12 

 so the distance between the 

end of the rod and the end of the bit equals the desired 
drilling depth.

3.  Release the button to lock rod into position. When 

drilling with the depth rod, stop when end of rod reaches 
surface of material.

Bit and Bit Holder


WARNING:

 Burn Hazard. 

ALWAYS

 wear gloves when 

changing bits. Accessible metal parts on the tool and 
bits may get extremely hot during operation. Small bits 
of broken material may damage bare hands.

The hammerdrill can be fitted with different bits depending 
on the desired application. 

Use sharp drill bits only.

Bit Recomendations

•  For wood, use twist bits, spade bits, power auger bits or 

hole saws.

•  For metal, use high‑speed steel twist drill bits or 

hole saws. Use a cutting lubricant when drilling metals. 
The exceptions are cast iron and brass which should be 
drilled dry.

•  For masonry, such as brick, cement, cinder block, etc., use 

carbide‑tipped bits rated for percussion drilling.

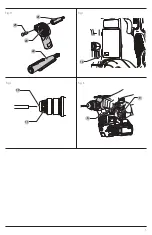
Bit Holder (Fig. J)

nOTE:

 Special adapters are needed to use with straight 

shank bits and hexagonal screwdriver bits.

To insert a Drill Bit or Other Accessory:

1.  Insert the shank of the SDS PLUS bit about 3/4" (19 mm) 

into tool holder  

 10 

.

2.  Push down and rotate bit until it locks in place. The bit 

will be securely held.

3.  To release bit, pull the sleeve 

 11 

 back and remove 

the bit.

Side Handle (Fig. A, D)


WARNING: 

To reduce the risk of personal injury, 

ALWAYS

 operate the tool with the side handle properly 

installed. Failure to do so may result in the side handle 
slipping during tool operation and subsequent loss of 
control. Hold tool with both hands to maximize control.

The side handle 

 6 

 clamps to the front of the gear case 

and may be rotated 360˚ to permit right‑ or left‑hand use. 
The side handle must be tightened sufficiently to resist the 
twisting action of the tool if the accessory binds or stalls. Be 
sure to grip the side handle at the far end to control the tool 
during a stall.
To loosen side handle, rotate counterclockwise.

ASSEMBLY AND ADJUSTMENTS


WARNING: To reduce the risk of serious personal 

injury, turn unit off and remove the battery pack 

before making any adjustments or removing/

installing attachments or accessories.

 An 

accidental start‑up can cause injury.

Wall Mounting

Some 

D

e

WALT


chargers are designed to be wall mountable 

or to sit upright on a table or work surface.  If wall mounting, 
locate the charger within reach of an electrical outlet, and 
away from a corner or other obstructions which may impede 
air flow. Use the back of the charger as a template for the 
location of the mounting screws on the wall. Mount the 
charger securely using drywall screws (purchased separately) 
at least 1” (25.4 mm) long, with a screw head diameter of 
0.28–0.35” (7–9 mm), screwed into wood to an optimal 
depth leaving approximately 7/32” (5.5 mm) of the screw 
exposed. Align the slots on the back of the charger with the 
exposed screws and fully engage them in the slots.

SAVE THESE INSTRUCTIONS FOR 

FUTURE USE

battery pack in a warm environment such as in a metal 

shed or an uninsulated trailer.

2.  If the battery pack does not charge properly:

a.  Check operation of receptacle by plugging in a lamp 

or other appliance;

b.  Check to see if receptacle is connected to a light 

switch which turns power off when you turn out  

the lights;

c.  If charging problems persist, take the tool, battery 

pack and charger to your local service center.

3.  You may charge a partially used pack whenever you 

desire with no adverse effect on the battery pack.

Charger Cleaning Instructions


WARNING: 

Shock hazard. Disconnect the charger 

from the AC outlet before cleaning. Dirt and grease 
may be removed from the exterior of the charger using 
a cloth or soft non‑metallic brush. Do not use water or 
any cleaning solutions.

Summary of Contents for DCH416

Page 1: ...contacter Si tiene dudas o comentarios contáctenos 1 800 4 DeWALT DCH416 Heavy Duty 60V Max Cordless Rotary Hammer Perceuse à Percussion Haute Résistance Sans Fil 60 V max Rotomartillo Inalámbrico de 60 V Máx Para Trabajo Pesado Instruction Manual Guide D utilisation Manual de instrucciones ...

Page 2: ...English original instructions 4 Français traduction de la notice d instructions originale 14 Español traducido de las instrucciones originales 25 ...

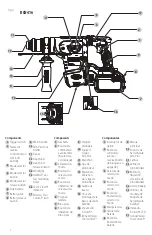
Page 3: ...de modo 6 Manija lateral 7 Paquete de batería 8 Botón de liberación de batería 9 Manija principal 10 Soporte de herramienta SDS Plus 11 Camisa 12 Varilla de profundidad 13 Botón de liberación de varilla de profundidad 14 Luz de trabajo 15 Orificios de montaje de etiqueta de herramienta DeWALT 16 Indicador E Clutch LED 17 IconoWireless Tool Control Composants 1 Gâchette 2 Bouton de commande avant a...

Page 4: ...rgada Pack needs to be charged Le bloc piles doit être rechargé La batería tiene que cargarse Indicators Témoin Indicador Charging Bloc piles en Cours de Chargement Unidad en Proceso de Carga Fully Charged Bloc piles Chargé Unidad Cargada Hot Cold Pack Delay Suspension de Charge Contre le Chaud Froid Restraso por Unidad Caliente Fría 6 12 13 18 19 8 7 22 20 23 6 ...

Page 5: ...3 Fig H 16 Fig I Fig J Fig K 10 6 9 11 20 22 21 25 ...

Page 6: ... tool may result in personal injury e Do not overreach Keep proper footing and balance at all times This enables better control of the power tool in unexpected situations f Dress properly Do not wear loose clothing or jewelry Keep your hair clothing and gloves away from moving parts Loose clothes jewelry or long hair can be caught in moving parts g If devices are provided for the connection of dus...

Page 7: ...nly be performed by the manufacturer or authorized service providers h Do not let familiarity gained from frequent use of tools allow you to become complacent and ignore tool safety principles A careless action can cause severe injury within a fraction of a second 4 Power Tool Use and Care a Do not force the power tool Use the correct power tool for your application The correct power tool will do ...

Page 8: ...afety glasses Everyday eyeglasses are NOT safety glasses Also use face or dust mask if cutting operation is dusty ALWAYS WEAR CERTIFIED SAFETY EQUIPMENT ANSI Z87 1 eye protection CAN CSA Z94 3 ANSI S12 6 S3 19 hearing protection NIOSH OSHA MSHA respiratory protection WARNING Some dust created by power sanding sawing grinding drilling and other construction activities contains chemicals known to th...

Page 9: ...ons where the temperature may reach or exceed 104 F 40 C such as outside sheds or metal buildings in summer For best life store battery packs in a cool dry location NOTE Do not store the battery packs in a tool with the trigger switch locked on Never tape the trigger switch in the ON position Do not incinerate the battery pack even if it is severely damaged or is completely worn out The battery pa...

Page 10: ...arging This is a normal condition and does not indicate a problem To facilitate the cooling of the battery pack after use avoid placing the charger or These chargers are not intended for any uses other than charging DeWALT rechargeable battery packs Charging other types of battery packs may cause them to overheat and burst resulting in personal injury property damage fire electric shock or electro...

Page 11: ...ase bit pull the sleeve 11 back and remove the bit Side Handle Fig A D WARNING To reduce the risk of personal injury ALWAYS operate the tool with the side handle properly installed Failure to do so may result in the side handle slipping during tool operation and subsequent loss of control Hold tool with both hands to maximize control The side handle 6 clamps to the front of the gear case and may b...

Page 12: ...e To remove the battery pack from the tool press the release button 8 and firmly pull the battery pack out of the tool handle Insert it into the charger as described in the charger section of this manual OPERATION WARNING To reduce the risk of serious personal injury turn unit off and remove the battery pack before making any adjustments or removing installing attachments or accessories An acciden...

Page 13: ...mmering only Light chipping To Select an Operating Mode 1 Depress the mode selector release button 4 2 Rotate the mode selector dial 3 so that the arrow points to the symbol corresponding with the desired mode NOTE The mode selector dial 3 must be in rotary drilling rotary hammering or hammering only mode at all times There are no operable positions in between It may be necessary to briefly run th...

Page 14: ...with the performance of your DeWALT Power Tool or Nailer for any reason you can return it within 90 days from the date of purchase with a receipt for a full refund no questions asked LATIN AMERICA This warranty does not apply to products sold in Latin America For products sold in Latin America see country specific warranty information contained in the packaging call the local company or see websit...

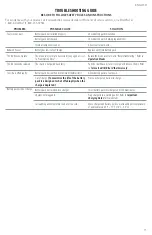
Page 15: ...or dial to Rotary Hammering Refer to Operation Modes The bit cannot be released The chuck is not pulled back fully Pull the chuck back as far as it will go and remove the bit Refer to To Insert a Drill Bit or Other Accessory Tool shuts off abruptly Battery pack has reached its maximum thermal limit Allow battery pack to cool down Out of charge To maximize the life of the battery pack it is designe...

Page 16: ... de disjoncteur réduit les risques de choc électrique 3 Sécurité personnelle a Être vigilant surveiller le travail effectué et faire preuve de jugement lorsqu un outil électrique est utilisé Ne pas utiliser d outil électrique en cas de fatigue ou sous l influence de drogues d alcool ou de médicaments Un simple moment d inattention en utilisant un outil électrique peut entraîner des blessures corpo...

Page 17: ...pératures excessives L exposition aux flammes ou à une température au dessus de 129 C 265 F pourrait causer une explosion antidérapantes un casque de sécurité ou des protecteurs auditifs lorsque la situation le requiert réduira les risques de blessures corporelles c Empêcher les démarrages intempestifs S assurer que l interrupteur se trouve à la position d arrêt avant de relier l outil à une sourc...

Page 18: ...ures Ne frappez pas les mèches bloquées avec un marteau pour les déloger Des fragments ou des copeaux de métal peuvent se déloger et provoquer des blessures Consignes de sécurité supplémentaires pour marteaux rotatifs Portez une protection auditive L exposition au bruit peut entraîner la perte de l ouïe Utilisez la ou les poignées auxiliaires si elles sont fournies avec l outil La perte de contrôl...

Page 19: ...tier du bloc piles est fendu ou endommagé ne pas l insérer dans le chargeur Ne pas écraser échapper ou endommager le bloc piles Ne pas se servir d un bloc piles ou chargeur qui a subi un impact a été échappé renversé par un véhicule ou endommagé d une façon ou d une autre par ex perforé par un clou frappé par un marteau sur lequel on a marché Les LISEZ TOUTES LES INSTRUCTIONS Consignes de sécurité...

Page 20: ...e dans la collecte sélective Pour de plus amples renseignements visitez www call2recycle org ou appelez au numéro sans frais dans le sceau SRPRCMD SRPRCMD est une marque de commerce déposée de Call 2 Recycle Inc Expédier la bloc pile FLEXVOLT de DeWALT Le bloc piles FLEXVOLT de DeWALT a un couvercle des piles qui doit être utilisé lorsque vous expédiez le bloc piles Fixez le couvercle au bloc pile...

Page 21: ...s éteignez les lumières c Si les problèmes de chargement persistent apportez l outil le bloc piles et le chargeur dans votre centre de services local 3 Vous pouvez charger un bloc partiellement utilisé au moment désiré sans effet indésirable sur le bloc piles les rallonges branchées ensemble et l intensité nominale de la plaque signalétique En cas de doute utilisez le calibre le plus lourd suivant...

Page 22: ...ig A D AVERTISSEMENT Afin de réduire le risque de blessure corporelle utilisez TOUJOURS l outil avec la poignée latérale bien installée et serrée Ne pas le faire peut entraîner le glissement de la poignée latérale durant le fonctionnement de l outil et une perte de contrôle subséquente Tenez l outil avec les deux mains pour maximiser le contrôle La poignée latérale 6 se fixe sur le devant du boîti...

Page 23: ...aller des pièces ou des accessoires Un déclenchement accidentel du démarrage peut causer des blessures Contrôle de l outil sans fil Fig A ATTENTION Lisez tous les avertissements de sécurité toutes les instructions et toutes les caractéristiques de l appareil qui est apparié à l outil Votre outil est muni d un émetteur de contrôle sans fil qui permet de l apparier sans fil avec un autre dispositif ...

Page 24: ... la gâchette AVERTISSEMENT Ne pas utiliser cet outil pour mélanger ou pomper des liquides facilement combustibles ou explosifs benzène alcool etc Ne pas mélanger des liquides inflammables portant une étiquette appropriée Modes de fonctionnement Fig A AVERTISSEMENT Ne sélectionnez pas le mode de fonctionnement lorsque l outil fonctionne Votre outil est équipé d un sélecteur rotatif 3 pour sélection...

Page 25: ...la comprend l inspection et le remplacement du balai le cas échéant par un centre de réparation en usine DeWALT ou un centre de réparation agréé DeWALT Toujours utiliser des pièces de rechange identiques Réparations Le chargeur et le bloc piles ne sont pas réparables Le chargeur ou le bloc piles ne comportent aucune pièce réparable Accessoires AVERTISSEMENT puisque les accessoires autres que ceux ...

Page 26: ...chargeur dans une prise qui fonctionne Consultez Remarques importantes sur la recharge pour de plus amples détails La température de l air ambiant est trop chaude ou trop froide Déplacez le chargeur et le bloc piles dans une température de l air ambiant d environ 18 à24 C 65 à 75 F CONTRAT D ENTRETIEN GRATUIT DE DEUX ANS SUR LES BLOC PILES DeWALT DC9071 DC9091 DC9096 DC9182 DC9280 DC9360 DCB120 DC...

Page 27: ...o de descargas eléctricas 3 Seguridad Personal a Permanezca alerta controle lo que está haciendo y utilice el sentido común cuando emplee una herramienta eléctrica No utilice una herramienta eléctrica si está cansado o bajo el efecto de drogas alcohol o medicamentos Un momento de descuido mientras se opera una herramienta eléctrica puede provocar lesiones personales graves b Utilice equipos de pro...

Page 28: ...r irritación o quemaduras e No use un paquete de batería o herramienta que estén dañados o modificados Las baterías dañadas o modificadas pueden presentar un comportamiento como máscaras para polvo calzado de seguridad antideslizante cascos o protección auditiva reducirá las lesiones personales c Evite el encendido por accidente Asegúrese de que el interruptor esté en la posición de apagado antes ...

Page 29: ...causar lesiones No golpee las brocas atascadas con un martillo para sacarlas Los fragmentos de metal o virutas de material podrían desprenderse y causar lesiones Instrucciones de seguridad adicionales para rotomartillos Use protección para los oídos La exposición al ruido puede causar pérdida de audición Use la s manija s auxiliar es si se suministra con la herramienta La pérdida de control puede ...

Page 30: ...ía entra en contacto con la piel lave de inmediato el área con jabón suave y agua Si el líquido de la batería entra en los ojos enjuague con agua sobre el ojo abierto durante 15 minutos o hasta que desaparezca la irritación Si se necesita atención BATERÍAS Y CARGADORES El paquete de batería no está completamente cargado cuando se retira del cartón Antes de usar la batería y el cargador lea las sig...

Page 31: ... de batería es de 120 Watts hora médica el electrólito de la batería está compuesto por una mezcla de carbonatos orgánicos líquidos y sales de litio El contenido de las celdas de batería abiertas puede causar irritación respiratoria Proporcione aire fresco Si los síntomas persisten busque atención médica El líquido de la batería puede ser inflamable si se expone a chispas o llamas Nunca intente ab...

Page 32: ...funda La herramienta se apagará automáticamente y el paquete de batería se necesitará volver a cargar Asegúrese que el cable esté ubicado de forma que no se pueda pisar provoque tropiezos o de otra forma esté sujeto a daño o esfuerzo No use un cable de extensión a menos que sea absolutamente necesario El uso de un cable de extensión inadecuado podría resultar en riesgo de incendio descarga eléctri...

Page 33: ...e destornillador hexagonales Para insertar la Broca u otro Accesorio 1 Inserte el vástago de la broca SDS PLUS aproximadamente 3 4 19 mm en el portaherramientas 10 MONTAJE Y AJUSTES ADVERTENCIA Para reducir el riesgo de lesiones personales apague la unidad y retire el paquete de batería antes de realizar cualquier ajuste o retirar instalar conexiones o accesorios Una activación de arranque acciden...

Page 34: ...mienta SDS Plus estándar corto viene conectado en la DWH200D Su herramienta requiere el adaptador de soporte más largo incluido 1 Retire el tornillo de cabeza de cruz 25 del adaptador corto 21 con un destornillador de cabeza de cruz Fig H 2 Después use el tornillo 25 para ensamblar el adaptador de soporte de herramienta largo 22 al cuerpo del cepillo de polvo 20 Apriete firmemente 3 Deslice el cep...

Page 35: ...siones Embrague de sobrecarga En caso de atascamiento de una broca el embrague de sobrecarga interrumpe el accionamiento del eje de perforación Debido a las fuerzas resultantes sujete siempre la herramienta con ambas manos y adopte una postura Etiqueta de herramienta DeWALT lista Fig A Accesorio opcional Su herramienta viene con orificios de montaje 15 y sujetadores para instalar una Etiqueta de h...

Page 36: ... menos una vez por semana Para reducir el riesgo de lesiones utilice siempre protección para los ojos aprobada ANSI Z87 1 al realizar esta tarea ADVERTENCIA Nunca utilice solventes ni otros químicos abrasivos para limpiar las piezas no metálicas Reemplazo de cepillo de polvo Fig H ADVERTENCIA Use protección para los ojos aprobada y máscara de polvo aprobada cuando realice este procedimiento El cep...

Page 37: ...arantía y adquirir partes refacciones y accesorios originales Solamente para propósito de México Importado por DeWALT Tool Co S A de C V Avenida Antonio Dovali Jaime 70 Torre B Piso 9 Colonia La Fe Santa Fé Código Postal 01210 Delegación Alvaro Obregón México D F Tel 52 555 326 7100 R F C BDE810626 1W7 SAN LUIS POTOSI SLP Av Universidad 1525 Col San Luis 444 814 2383 TORREON COAH Blvd Independenci...

Page 38: ... no está conectado Conecte el cargador en un tomacorriente que funcione Consulte Notas de carga importantes respecto a más detalles Temperatura de aire ambiente demasiado caliente o demasiado fría Mueva el cargador y el paquete de batería a una temperatura ambiente de aproximadamente 65 F 75 F 18 C 24 C 2 AÑOS DE SERVICIO GRATUITO PARA UNIDADES DE ALIMENTACIÓN DeWALT DC9071 DC9091 DC9096 DC9182 DC...

Page 39: ...37 ...
Page 40: ...ía medido sin carga de trabajo es 20 o 60 voltios El voltaje nominal es de 18 54 o 108 V 120 V Máx se basan en el uso de 2 baterías de iones de litio DeWALT de 60 V Máx combinadas BT Bluetooth NOTE The Bluetooth word mark and logos are registered trademarks owned by the Bluetooth SIG Inc and any use of such marks by DeWALT is under license Other trademarks and trade names are those of their respec...

Reviews: