background image

5

Making Copies

5-16

D1531iD/D1831iD

5.5

Adjusting the Image Density

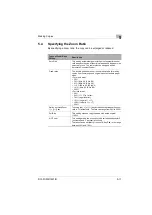
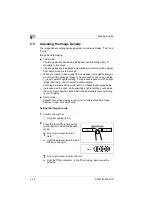
The image density setting can be adjusted in two broad modes, “Text” and 
“Photo.”

Image Density Setting

G

Text mode:
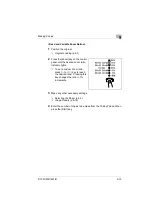
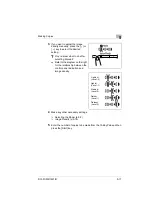
The image density can be adjusted either automatically (Auto) or 
manually in five steps.

The image density is adjusted automatically according to the original 
from which a copy is to be made.

When you want to make a copy from newspaper or magazine and you 
do not want the backside image to be produced on the copy, use the 
[

] key to select a lighter setting.  To reproduce a pale color of a bright 

image, use the [

] key to select a darker setting.

Selecting a darker setting could result in a background image being 
reproduced on the copy, while selecting a lighter setting could make 
the copy image itself too light: Select the appropriate level according 
to your original.

G

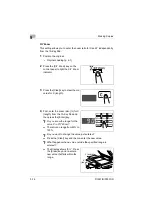
Photo mode:
Select Photo when making a copy from an original having a large 
halftone image, such as photos.

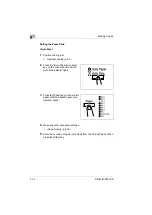
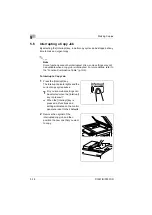
Setting the Image Density

1

Position the original.

Original Loading (p.4-1)

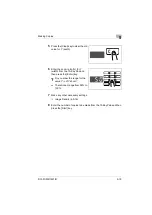
2

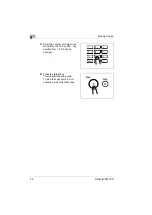
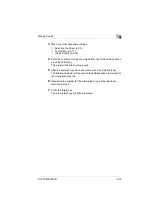
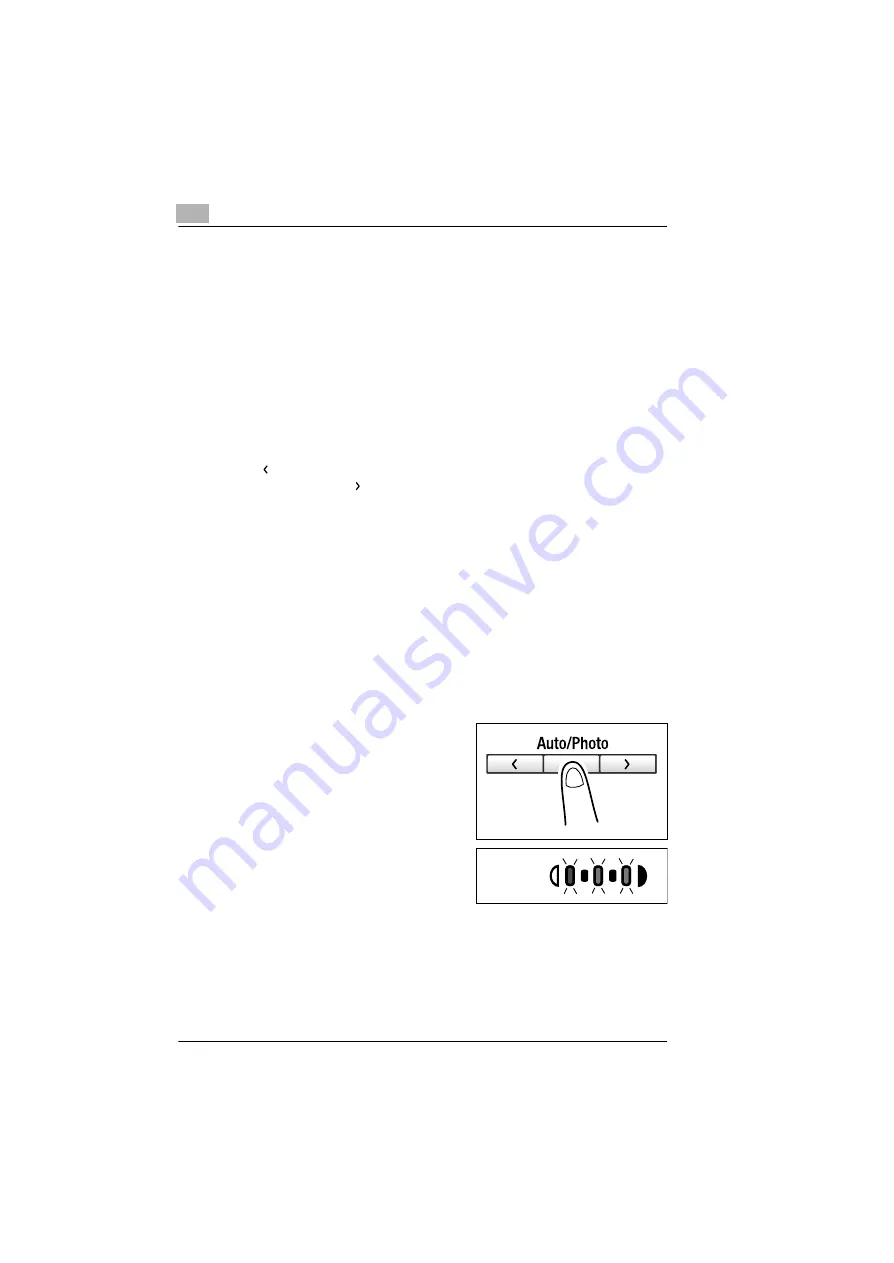
Press the [Auto/Photo] key on the 
control panel to select the desired 
mode.

?

Do you know how to select 
Auto?

Light the auto exposure lamp as 
shown on the right.

?

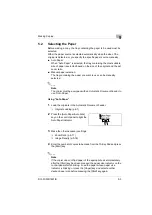
Do you know how to select Photo?

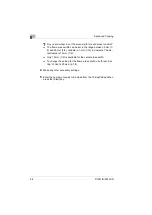
Light the Photo indicator.  In the Photo mode, Auto cannot be 
selected.

Auto

Summary of Contents for D1531iD

Page 1: ...ined in this manual is subject to change without notice to incorporate improvements made on the product or products the manual covers DEVELOP GmbH Dieselstrasse 8 D 70839 Gerlingen Telefon 07156 208 0 Telefax 07156 208 180 D1531iD D1831iD User Manual 4021 7734 02 ...

Page 2: ...es for energy efficiency What is an ENERGY STAR Product An ENERGY STAR product has a special feature that allows it to automatically switch to a low power mode after a period of inactivity An ENERGY STAR product uses energy more efficiently saves you money on utility bills and helps protect the environment ...

Page 3: ... 1 7 For Denmark Users 1 8 For Finland Sweden Users 1 8 For Norway Users 1 8 Laser Safety Label 1 9 Ozone Release 1 9 Acoustic Noise 1 9 1 3 About the User Manual 1 10 Explanation of Manual Conventions 1 10 key 1 10 1 4 Explanation of Basic Concepts and Symbols 1 11 Paper Feeding 1 11 Width and Length 1 12 Paper Orientation 1 12 2 Precautions 2 1 Installation Precautions 2 1 Installation site 2 1 ...

Page 4: ... Auto Panel Reset 3 17 Energy Saver 3 18 Auto Shut OFF 3 18 Auto Copy Start 3 18 Interrupting Copy Jobs 3 19 Auto Tray Switching 3 19 Account Number 3 20 To enter an account number 3 20 Printing from the Personal Computer 3 21 Sending and Receiving Faxes Using the Copier 3 21 3 7 Copy Paper 3 22 Paper Specifications 3 22 4 Loading Originals 4 1 Two Ways of Loading the Original 4 1 Specific Types o...

Page 5: ...ng Types 6 5 Sorting 6 6 Grouping 6 7 6 3 Erasing Part of Original Image Erase 6 10 Precautions for Erase Position 6 11 6 4 Reversing Original Tonal Arrangements Neg Pos Reverse 6 13 6 5 Providing a File Margin 6 14 Precautions for File Margin Position 6 14 7 Using the Utility Mode 7 1 User s Choice 7 2 Mixed Orig 7 6 Paper Priority 7 6 Copy Priority 7 6 Density Priority 7 7 Exposure Level Priorit...

Page 6: ...Total Number of Copies Prints Produced 7 28 7 7 Storing a Job 7 30 8 Error Displays and Other Indicators 8 1 Major Error Displays and Remedial Actions 8 1 8 2 When the Add Paper Indicator Lights up 8 4 Adding Paper 8 4 8 3 When the Add Toner Indicator Lights up 8 8 8 4 When the Paper Misfeed Indicator Lights 8 11 Misfeed Indications and Misfeed Locations 8 11 Clearing a Paper Misfeed 8 12 9 Troubl...

Page 7: ... 10 2 Care of the Copier 10 5 Cleaning 10 5 10 3 Function Combination Table 10 6 Function Combination Table 10 6 Conditions for Combined Functions 10 6 10 4 List of Paper Sizes and Zoom Ratios 10 7 Paper Sizes 10 7 Zoom Ratios Original Size to Paper Size 10 8 ...

Page 8: ...Contents vi D1531iD D1831iD ...

Page 9: ...ou have gone through the manual store it in the holder and keep it handy at all times Note that some of the illustrations of the machine used in the User Manual may be different from what you actually see on your machine CE Marking Declaration of Conformity This product complies with the following EU directives 89 336 EEC 73 23 EEC and 93 68 EEC directives This declaration is valid for the area of...

Page 10: ...s Please read the next section before using this device It contains important information related to user safety and preventing equipment problems Make sure you observe all of the precautions listed in this manual Ignoring this warning could cause serious injury or even death Ignoring this caution could cause injury or damage to property WARNING CAUTION A triangle indicates a danger against which ...

Page 11: ...from the power outlet and then call your authorized service representative In principle do not use an extension cord Use of an extension cord could cause fire or electrical shock Contact your authorized service representa tive if an extension cord is required Do not place a flower vase or other container that contains water or metal clips or other small metallic objects on this product Spilled wat...

Page 12: ...e susceptible to magnetism They could cause these products to mal function The inside of this product has areas subject to high temperature which may cause burns When checking the inside of the unit for malfunctions such as a paper misfeed do not touch the locations around the fusing unit etc which are indicated by a Caution High Temperature warning label Do not place any objects around the power ...

Page 13: ...side down as poor image quality could result Do not throw or drop a toner unit or PC drum unit as poor image quality could result Do not use this product in an area where ammonia or other gases or chem icals are present Failure to do so may shorten the service life of the prod uct cause damage or decrease performance Do not use this product in an environment with a temperature outside the range sp...

Page 14: ...phase of user operation This machine is certified as a Class 1 laser product This means the machine does not produce hazardous laser radiation Internal Laser Radiation Maximum Average Radiation Power 26 4 µW at the laser aperture of the print head unit Wavelength 770 795 nm This product employs a Class 3b laser diode that emits an invisible laser beam The laser diode and the scanning polygon mirro...

Page 15: ...evice does not produce hazardous laser radiation The label shown on page 1 9 indicates compliance with the CDRH regulations and must be attached to laser products marketed in the United States This is a semiconductor laser The maximum power of the laser diode is 5 mW and the wavelength is 770 795 nm For European Users This is a semiconductor laser The maximum power of the laser diode is 5 mW and t...

Page 16: ...op fylder IEC60825 sikkerheds kravene LOUKAN 1 LASERLAITE KLASS 1 LASER APPARAT VAROITUS Laitteen Käyttäminen muulla kuin tässä käyttöohjeessa mainitulla taval la saattaa altistaa käyttäjän turvallisuusluokan 1 ylittävälle näkymät tömälle lasersäteilylle VARNING Om apparaten används på annat sätt än i denna bruksanvisning speci ficerats kan användaren utsättas för osynlig laserstrålning som över s...

Page 17: ...npleasant odor may however be created in poorly ventilated rooms during extensive machine operations For a comfort able healthy and safe operating environment it is recommended that the room well ventilated REMARQUE Placer l appareil dans une pièce largement ventilée Une quantité d ozone négligable est dégagée pendant le fonctionne ment de l appareil quand celui ci est utilisé normalement Cependan...

Page 18: ... copier Note May also appear as Important or Tip Text highlighted in this manner contains useful information and tips to ensure safe use of the copier and serve as supplementary information It is recommended that you read all of them 1 The number 1 as formatted here in dicates the first step of a sequence of actions 2 Subsequent numbers as formatted here indicate subsequent steps of a sequence of ...

Page 19: ... of words and symbols in this manual are explained below Paper Feeding During printing paper is supplied from the right side of the copier and fed into the Exit Tray on top with the printed surface of the page facing down The paper feed direction is shown by the arrows in the diagram below ...

Page 20: ...n the illustration and the second to the length shown as B A Width B Length Paper Orientation Lengthwise If the width A of the paper is shorter than the length B the paper has a vertical or portrait orientation indicated by either L or Crosswise If the width A of the paper is longer than the length B the paper has a horizontal or landscape orientation indicated by either C or ...

Page 21: ...rflow of an air conditioner or heater and not exposed to extremely high or low temperatures A well ventilated location A location that is not exposed to high humidity A location that is not extremely dusty A location not subjected to undue vibrations A stable and level location A location where ammonia or other organic gases are not generated A location that does not put the operator in the direct...

Page 22: ...here to the recommended space requirements detailed below Note Be sure to allow a clearance of 100 mm 4 inch or more at the back of the copier and 150 mm 6 inch or more at the right of the copier for the removal of the misfed papers 1038 40 3 4 1065 42 959 37 3 4 D1531iD Unit mm inch 1038 40 3 4 1524 60 995 39 1 4 D1831iD ...

Page 23: ...nting as a paper misfeed could result Never bring any magnetized object or use flammable sprays or liquids near the copier Always make sure that the power plug is completely plugged into the electrical output Always make sure that the copier s power plug is visible and not hidden by the copier Always unplug the copier from the electrical outlet if the copier is not to be used for a long period of ...

Page 24: ...upplies toner paper etc Store the supplies in a location that meets the following requirements Free from direct sunlight Away from any heating apparatus Not subjected to high humidity Not extremely dusty Paper that has been removed from its wrapper but not loaded in the copier should be stored in a sealed plastic bag in a cool dark place Use only toner that has been manufactured specifically for t...

Page 25: ...ess G Stock certificates Legal Documents G Food stamps G Postage stamps canceled or uncanceled G Checks or drafts drawn by government agencies G Internal revenue stamps canceled or uncanceled G Passports G Immigration papers G Motor vehicle licenses and titles G House and property titles and deeds General G Identification cards badges or insignias G Copyrighted works without permission of the copy...

Page 26: ...2 Precautions 2 6 D1531iD D1831iD ...

Page 27: ...g Copies 3 1 Available Features The main copy settings available with this copier are listed below For details on their operation refer to the pages indicated Copies G 1 sided copies p 6 1 G 2in1 copies p 6 1 G 4in1 copies p 6 1 G Book separation copies p 6 2 ...

Page 28: ...king Copies 3 2 D1531iD D1831iD Zoom Ratio G Reduced Full Size Enlarge p 5 11 Finishing G Sort p 6 6 G Group p 6 7 Note The Finishing functions available are limited according to the options equipped to the copier ...

Page 29: ...ations G Erase p 6 10 G Neg Pos Reverse p 6 13 G X Y Zoom p 5 14 G File Margin p 6 14 Mixed Orig Detection G Mixed Originals p 4 4 Note The Mixed Orig Detection function is available when the copier is equipped with an Automatic Document Feeder option ...

Page 30: ...matic Document Feeder AF 10 option G Automatically feeds originals one page after another for scanning Paper Feed Cabinet PF 120 option G Capable of holding up to 250 sheets of paper Shifting Unit OT 103 option G Permits sorting or grouping of copies according to the particular finishing setting made Job Tray JS 202 option G Performs sorting and grouping of faxes printed pages and copies into the ...

Page 31: ...smission using this copier Printer Controller Pi1802e option G A built in type printer controller that allows the copier to be used as a printer with the copier connected to a personal computer Network Interface Card NC 3 option G Allows the copier to be used as a network printer 16MB Memory for Copier M16 4 option 32MB Memory for Copier M32 3 option G Expands the memory capacity of the copier 16 ...

Page 32: ...3 Before Making Copies 3 6 D1531iD D1831iD 3 3 Parts Names and Their Functions Copier The above illustrations represent a copier mounted with the optional Original Cover Kit 6 1 2 3 5 4 8 7 9 10 11 ...

Page 33: ... paper The paper is fed one sheet at a time Special paper can be used p 5 6 5 Lock Release Lever Use to unlock the Side Cover 6 Side Cover Open to clear a misfed sheet of paper 7 Power Switch Use to turn the copier ON and OFF p 3 15 8 Original Scales Use to align the original p 4 7 9 Original Cover Holds the original against the Original Glass 10 Original Glass Place your original on this glass to...

Page 34: ...er No Part Name Description 1 Imaging Unit Forms a copy image The Imaging Unit is to be replaced only by your Tech Rep 2 Toner Bottle Holder Open to replace the Toner Bottle 3 Pressure Lever Use to clear a misfed sheet of paper at the Fusing Unit p 8 12 2 1 3 ...

Page 35: ...to the size of the originals p 4 3 3 Document Feeder Cover Doc Feed Cover Open when clearing an original that has been misfed p 8 18 4 Document Feeder Tray Load the originals to be copied face up on this tray p 4 3 No Part Name Description 5 Bypass Tray Up to 50 sheets of plain paper or 20 sheets of special paper can be loaded on this tray p 8 7 6 Bypass Tray Extender Slide this Bypass Tray Extend...

Page 36: ...Description 7 2nd Tray Up to 250 sheets of plain paper can be loaded p 8 6 D1831iD accepts a Paper Feed Cabinet of four trays D1531iD accepts a Paper Feed Cabinet of one tray 8 3rd Tray 9 4thTray 10 5thTray 11 Side Cover Open to clear a misfed sheet of paper p 8 15 7 8 11 9 10 ...

Page 37: ...y Tray Receives copy sets sorted No Part Name Description 13 Copy Tray Lamp Lights up when paper is fed into the Upper Copy Tray 14 Upper Copy Tray Receives printed pages produced via the personal computer or faxes received 15 Lower Copy Tray Receives copies made 15 14 13 12 When Job Tray is Mounted ...

Page 38: ...e Printer Controller User Manual 2 Job Input key Press to select the Job Input mode Two different jobs can be programmed 3 Meter Count key Press to display the Total Counter or Size Counter value 4 Neg Pos key Press to copy an original with the original tonal arrangements reversed 5 Original key Press to select the Mixed Org or Book Separation function 6 Copy key Press to select the 2in1 or 4in1 f...

Page 39: ...s when entering an account number Becomes valid only when Copy Track has been set 17 Energy Saver key Press to set the copier into the Energy Saver mode 18 Interrupt key Press to interrupt a copy job 19 Panel Reset key Press to reset all copy functions and settings to their defaults Holding down the key for 3 seconds or more will set the copier into the Utility mode 20 Clear key Press to reset the...

Page 40: ...he copier Malfunction indicator Lights up when a malfunction occurs in the copier Maintenance indicator Blinks or lights up when the time approaches that copier needs maintenance service Call your Tech Rep Add Paper indicator Lights up when the paper source currently selected for use runs out of paper Add Toner indicator Lights up when toner will soon run out ...

Page 41: ... enters the Energy Saver mode 15 min after it has been touched last It also enters the Auto Shut OFF mode automatically 30 min after it has been touched last The time for the copier to enter the Energy Saver and Auto Shut OFF mode can be set by selecting User s Choice For details refer to Using the Utility Mode p 7 1 p 7 8 When Copier is Turned ON When the Power Switch is turned ON the Start key s...

Page 42: ...control panel settings to be made later Default settings G Number of copies 1 G Exposure Auto G Zoom ratio 100 full size G Paper Auto Paper When Automatic Document Feeder is mounted G Finishing Non Sort Note For inch area only For size setting enter the value by mm using the 10 Key Pad Refer to conversion rate below 1 inch 25 4 mm Tip The default settings can be customized by selecting User s Choi...

Page 43: ...ous copy job press the Panel Reset key to return all functions and settings to their defaults before making any setting for your current job Auto Panel Reset Without pressing the Panel Reset key the copier automatically resets all functions and settings to their defaults 1 min after a copy cycle has been completed or a key operated Tip The length of time before the copier automatically resets itse...

Page 44: ...ore the copier enters the Energy Saver mode can be set between 1 min and 240 min For more details refer to User s Choice p 7 2 p 7 8 Auto Shut OFF If a set length of time elapses after the copier has been operated last the copier is designed to automatically turn itself OFF to save energy The default length of time is 30 min Tip The length of time before the Auto Shut OFF function is activated can...

Page 45: ... to the stopped job Note Depending on the specific settings made the current job may reject the Interrupt mode Also some functions are not available for the Interrupt mode For more details refer to the Function Combination Table p 10 6 Auto Tray Switching If the current tray runs out of paper during a copy cycle and there is another tray loaded with paper of the same size and in the same direction...

Page 46: ...try screen To use this function set Copy Track of Administrator Mode under the Utility mode p 7 20 To enter an account number 1 Enter the 3 digit account number from the 10 Key Pad Do you want to correct the access number just entered Press the Clear key and then enter the correct account number 2 Press the Access key 3 The account number entry screen changes to the default setting indication indi...

Page 47: ...er can be used as a printer configured to a computer network For details of operation refer to the Printer Controller User Manual Sending and Receiving Faxes Using the Copier When the optional Fax unit is mounted fax transmission can be made using this copier For details of operation refer to the Fax unit User Manual separately available ...

Page 48: ...dth 90 mm to 297 mm length 140 mm to 432 mm When the Length is set 421 mm to 432 mm the maximum Width size that can be set becomes 279 mm When the Width is set 280 mm to 297 mm the maximum Length size that can be set becomes 420 mm Capacity Plain paper recycled paper 250 sheets Special paper 20 sheets 2nd Tray Specifications Paper Type Plain paper recycled paper 60 g m2 to 90 g m2 Paper Size A3 L ...

Page 49: ... 11 16 length 5 1 2 to 17 Metric system equivalent A3 L to A5 C FLS 8 1 4 13 Width 3 9 16 to 11 11 16 length 5 1 2 to 17 When the Length is set 16 9 16 to 17 the maximum Width size that can be set becomes 11 When the Width is set 11 1 16 to 11 11 16 the maximum Length size that can be set becomes 16 1 2 Capacity Plain paper recycled paper 250 sheets Special paper 20 sheets 2nd Tray Specifications ...

Page 50: ... nonstandard size in the Bypass Tray perform the Custom Size Input Bypass Tray procedure under Making Copies p 5 9 G When loading Cards OHP transparencies or postcards in the 1st Tray change Paper Type 1st Tray of User s Choice p 7 9 G When loading Cards OHP transparencies or postcards in the Bypass Tray change Paper Type Bypass Tray of User s Choice p 7 9 G To disable Auto Paper or Auto Tray Swit...

Page 51: ...s 60 g m2 to 90 g m2 A3 L to A5 L Original width 90 mm to 297 mm Original length 210 mm to 432 mm Original Glass Max weight of sheet originals books or three dimensional objects 3 kg A3 L to A5 Original width Up to 297 mm Original length Up to 432 mm Original Loading Original Type Original Size Automatic Document Feeder Sheet originals Weight of originals 13 1 4 lb to 29 1 4 lb Weight of originals...

Page 52: ...s G Typing paper paraffin paper and other thin paper G Cards G Originals larger than A3 11 17 or smaller than A5 5 1 2 8 1 2 G OHP transparencies translucent paper G Wrinkled dog eared curled or torn originals G Clipped or stapled originals G Coated originals such as carbon backed paper Note For metric area When the original are loaded into the Automatic Document Feeder the original sizes that can...

Page 53: ... the original stack does not exceed the Ä marking Be sure that the Document Guide Plates touch both the front and rear edges of the original stack If they are not pressed snugly against the original stack skewed feeding could result You can make copies automatically from originals of assorted sizes loaded in the Automatic Document Feeder Refer to Mixed Originals p 4 4 3 Make the necessary settings...

Page 54: ...tic Document Feeder Note This feature can be used only if the width of the originals is the same E g A3 L 11 17 L and A4 C Letter C Making Copies from Originals of Mixed Sizes 1 Slide the front adjustable Document Guide Plate to the front of the copier 2 Load the originals face up in the Document Feeder Tray Originals Copies Auto Paper ...

Page 55: ... top level of the original stack does not exceed the Ä marking Be sure that the Document Guide Plates touch both the front and rear edges of the original stack If they are not pressed snugly against the original stack skewed feeding could result 4 Press the Original key to light the Mixed Orig lamp 5 Press the Auto Paper Auto Size key to light the Auto Paper lamp 6 Press the Start key to start fee...

Page 56: ...ze G The copier is unable to detect the original size automatically meaning that neither Auto Paper nor Auto Size can be used Therefore use the Paper key to select the paper size or the Zoom key to select the zoom ratio p 5 11 A highly transparent original OHP transparencies translucent paper etc G Place a blank sheet of paper of the same size over the original p 4 8 A book or other three dimensio...

Page 57: ...cument Feeder 1 Raise the Automatic Document Feeder or Original Cover 2 Place the original face down on the Original Glass 3 Position the original in the left rear corner aligned with the marker on the scale 4 Gently lower the Automatic Document Feeder or Original Cover 5 Make the necessary settings Making Copies p 5 1 Advanced Copying p 6 1 6 Press the Start key to start the copy cycle ...

Page 58: ...matic Document Feeder or Original Cover 2 Place the original face down on the Original Glass 3 Position the original in the left rear corner aligned with the marker on the scale 4 Place a blank sheet of paper of the same size over the original 5 Gently lower the Automatic Document Feeder or Original Cover 6 Make the necessary settings Making Copies p 5 1 Advanced Copying p 6 1 7 Press the Start ke...

Page 59: ...ginal Glass Do not place any object that weighs more than 3 kg 6 1 2 lb on the Original Glass In addition do not press down hard on the book as a damaged Original Glass could result 3 Gently lower the Automatic Document Feeder or Original Cover Is a thick book or object being copied Let the copier scan the original without lowering the Automatic Document Feeder or Original Cover Do not look direct...

Page 60: ...4 Loading Originals 4 10 D1531iD D1831iD ...

Page 61: ...g The following procedure describes how to place an original and make a basic copy of it Making a Basic Copy 1 Position the original Original Loading p 4 1 2 Make the necessary control panel settings Selecting the Paper p 5 3 Zoom Ratio p 5 11 Image Density p 5 16 ...

Page 62: ...531iD D1831iD 3 Enter the number of copies to be made from the 10 Key Pad Any number from 1 to 99 can be entered 4 Press the Start key This will start the copy cycle To stop the copy cycle in mid operation press the Stop key ...

Page 63: ...e copier must be equipped with an Automatic Document Feeder to use Auto Paper Using Auto Paper 1 Load the originals in the Automatic Document Feeder Original Loading p 4 1 2 Press the Auto Paper Auto Size key on the control panel to light the Auto Paper indicator 3 Make the other necessary settings Zoom Ratio p 5 11 Image Density p 5 16 4 Enter the number of copies to be made from the 10 Key Pad a...

Page 64: ...ngs Zoom Ratio p 5 11 Image Density p 5 16 4 Enter the number of copies to be made from the 10 Key Pad and press the Start key Tip The Display shows different marks according to the type of paper set by selecting User s Choice Details If plain paper is set in User s Choice the 1 mark will not be displayed even if cards or postcards or OHP transparencies are loaded in the tray OHP transparencies Ca...

Page 65: ...to 90 g m2 24 lb G Recycled paper weighing 60 g m2 16 lb to 90 g m2 24 lb G Special paper Card weighing 91 g m2 24 1 4 lb to 157 g m2 41 3 4 lb OHP transparencies postcards and labels Sizes of paper that can be fed through the Bypass Tray G Maximum size 297 mm 432 mm 11 11 16 17 G Minimum size 90 mm 140 mm 3 9 16 5 1 2 Note Insert one sheet of paper at a time when using the Manual Bypass Tray to m...

Page 66: ...ain paper To use cards postcards or OHP transparencies first change the type of paper selecting User s Choice Refer to Paper Type Bypass Tray p 7 9 When loading cards or postcard be sure to smooth out any curl in the paper 3 Press the Bypass Tray Size Select key until the size of the paper loaded blinks If the paper used is of custom size its size must be input Refer to the Custom Size Input Bypas...

Page 67: ...ey Tip If the same settings apply to the second and subsequent sheets of paper you have only to load the paper in the Bypass Tray This will automatically start the new copy cycle Tip To make copies continuously on cards OHP transparencies or postcards load the paper in the 1st Tray Refer to Copy Paper p 3 22 and Adding Paper p 8 4 ...

Page 68: ...cies first change the type of paper selecting User s Choice Refer to Paper Type Bypass Tray p 7 9 When loading cards or postcards be sure to smooth out any curl in the paper 3 Press the Bypass Tray Size Select key until the size of the paper loaded blinks If the paper used is of custom size its size must be input Refer to the Custom Size Input Bypass Tray procedure that follows p 5 9 Do you know w...

Page 69: ...y insert the paper with the front side of the paper facing down until it is stopped Note that the Bypass Tray location indicator on the control panel lights 2 Press the Bypass Tray Size Select key until the Custom Size indicator blinks 3 Press the Enter key 4 Press the Clear key to clear the old value shown on the Display ...

Page 70: ... Note the conventions for the paper dimensions width and length 6 Press the Enter key 7 Press the Clear key to clear the old value shown on the Display 8 Enter the width mm of the paper from the 10 Key Pad Do you know the range for paper width of custom size The width can range from 90 mm 3 9 16 to 297 mm 11 11 16 Do you want to change the value just entered Press the Clear key and then re enter t...

Page 71: ... copies from commonly used original sizes to standard paper sizes For metric area 50 70 A3 Ö A4 B4 Ö B5 81 B4 Ö A4 B5 Ö A5 115 B4 Ö A3 B5 Ö A4 141 A4 Ö A3 B5 Ö B4 200 For inch area 50 64 11 17 Ö Letter 78 Legal Ö Letter 121 Legal Ö 11 17 129 Letter Ö 11 17 200 Ratios set using Zoom key Touching the or key increases or decreases the zoom ratio in 1 increments The ratio can range from 50 to 200 Full...

Page 72: ...ss the Auto Paper Auto Size key on the control panel until the Auto Size indicator lights 3 Press the Paper key on the control panel until the desired paper size indicator lights 4 Make any other necessary settings Image Density p 5 16 5 Enter the number of copies to be made from the 10 Key Pad and then press the Start key ...

Page 73: ...trol panel until the desired zoom ratio indicator lights To set a custom zoom ratio press or key to reach the desired ratio Pressing this key changes the ratio in 1 increments 3 Make any other necessary settings Selecting the Paper p 5 3 Image Density p 5 16 4 Enter the number of copies to be made from the 10 Key Pad and then press the Start key ...

Page 74: ...y to clear the old value for X length 4 First enter the zoom ratio for X length from the 10 Key Pad and then press the Enter key Do you know the range for the value X in X Y Zoom The ratio can range from 50 to 100 Do you want to change the value just entered Press the Clear key and then re enter the new value What happens when a value outside the specified range is entered The Display shows Err Pr...

Page 75: ...he zoom ratio for Y width from the 10 Key Pad and then press the Enter key Do you know the range for the value Y in X Y Zoom The ratio can range from 50 to 100 7 Make any other necessary settings Image Density p 5 16 8 Enter the number of copies to be made from the 10 Key Pad and then press the Start key ...

Page 76: ...uce a pale color of a bright image use the key to select a darker setting Selecting a darker setting could result in a background image being reproduced on the copy while selecting a lighter setting could make the copy image itself too light Select the appropriate level according to your original G Photo mode Select Photo when making a copy from an original having a large halftone image such as ph...

Page 77: ...ing Manual Refer to the diagram on the right for the relationship between the control panel indication and image density 4 Make any other necessary settings Selecting the Paper p 5 3 Image Density p 5 16 5 Enter the number of copies to be made from the 10 Key Pad and then press the Start key Lightest Lighter Medium Darker Darkest Level 2 Level 1 Level 0 Level 1 Level 2 ...

Page 78: ...d For more details refer to the Function Combination Table p 10 6 To Interrupt a Copy Job 1 Press the Interrupt key The Interrupt indicator lights and the current copy cycle pauses Do you know what settings can be selected when the Interrupt key is pressed When the Interrupt key is pressed all functions and settings indicated on the control panel are reset to their defaults 2 Remove the original o...

Page 79: ...Key Pad and then press the Start key This will start the interrupt copy cycle 5 After the interrupt copy has been made press the Interrupt key The Interrupt indicator will go out and the settings will be recovered for the interrupted copy job 6 Reposition the original for the interrupted copy job that has been removed in step 2 7 Press the Start key The interrupted copy job will be resumed ...

Page 80: ...5 Making Copies 5 20 D1531iD D1831iD ...

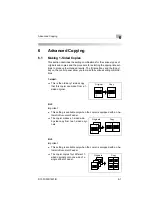
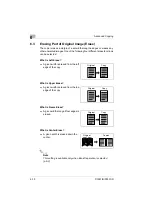
Page 81: ...arious setting combina tions 1 sided This is the ordinary 1 sided copy that this copier can make from a 1 sided original 2in1 Important This setting is available only when the copier is equipped with an Au tomatic Document Feeder The copier makes a 1 sided side by side copy from two 1 sided origi nals 4in1 Important This setting is available only when the copier is equipped with an Au tomatic Docu...

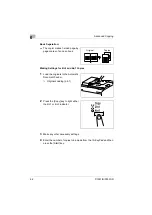
Page 82: ...king Settings for 2in1 and 4in1 Copies 1 Load the originals in the Automatic Document Feeder Original Loading p 4 1 2 Press the Copy key to light either the 2in1 or 4in1 indicator 3 Make any other necessary settings 4 Enter the number of copies to be made from the 10 Key Pad and then press the Start key Original Copies ...

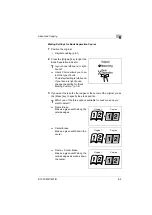
Page 83: ...If your book is right bound change the setting for Book Binding Position p 7 8 3 If you want to erase the four edges or the center of the original press the Erase key to specify the erase position Which one of the three options available for book erase do you want to select Frame Erase Erases a given width along the outside edges Center Erase Erases a given width down the center Frame Center Erase...

Page 84: ...5 mm 1 4 and 20 mm 3 4 variable in 1 mm 1 16 increments The de fault value is 10 mm 1 2 Only 10 mm 1 2 is available for the center erase width To change the setting for the frame erase width use Erase Set ting of User s Choice p 7 8 4 Make any other necessary settings 5 Enter the number of copies to be made from the 10 Key Pad and then press the Start key ...

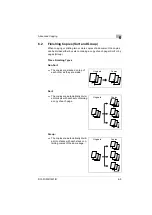
Page 85: ...copy of each page Sort or by pages Group Three Finishing Types Non Sort The copies are stacked on top of each other as they are made Sort The copies are automatically divid ed into sets with each set containing a copy of each page Group The copies are automatically divid ed into stacks with each stack con taining copies of the same page Originals Copies Originals Copies Originals Copies ...

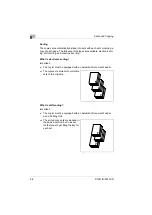
Page 86: ...ng and crisscross sorting What is electronic sorting Important The copier must be equipped with an Automatic Document Feeder The copies are sorted into complete sets of the originals What is shift sorting Important The copier must be equipped with an Automatic Document Feeder and a Shifting Unit The sorted copy sets are stacked in the same direction but in a saw tooth manner by shifting the tray f...

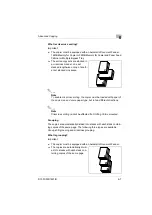
Page 87: ...scross sorting the copier must be loaded with paper of the same size and same paper type but in two different directions Note Crisscross sorting cannot be effected if a Shifting Unit is mounted Grouping The copies are automatically divided into stacks with each stack contain ing copies of the same page The following three types are available Group shift grouping and crisscross grouping What is gro...

Page 88: ... each stack What is crisscross grouping Important The copier must be equipped with an Automatic Document Feeder 16MB Memory for Copier or 32MB Memory for Copier and Paper Feed Cabinet or Multiple Bypass Tray The grouped copy stacks are stacked in a crisscross manner one stack lengthwise on top of another stack crosswise Note To enable crisscross grouping the copier must be loaded with paper of the...

Page 89: ...n the Automatic Document Feeder Original Loading p 4 1 2 Press the Finishing key to select the desired finishing function Do you know what it means when both Sort and Group lamps are off It means that Non Sort is cur rently selected for use 3 Make any other necessary settings 4 Enter the number of copies to be made from the 10 Key Pad and then press the Start key ...

Page 90: ...ns can be selected What is Left Erase A given width is erased from the left edge of the copy What is Upper Erase A given width is erased from the top edge of the copy What is Frame Erase A given width along all four edges is erased What is Center Erase A given width is erased down the center Note This setting is available only when Book Separation is selected p 6 3 Original Copy Original Copy Orig...

Page 91: ...Separation has been selected p 6 3 Precautions for Erase Position Note the correct direction of positioning the original when making copies in the Erase mode For more details refer to the table given below Result Original Glass Automatic Document Feeder Left Erase Upper Erase Frame Erase ...

Page 92: ...ase func tion The Left Upper and Frame erase width can be set in the range between 5 mm 1 4 and 20 mm 3 4 variable in 1 mm 1 16 increments The default value is 10 mm 1 2 Only 10 mm 1 2 is available for the Center erase width To change the erase width change the setting for Erase Setting of User s Choice p 7 8 3 Make any other necessary settings 4 Enter the number of copies to be made from the 10 K...

Page 93: ...and the black part text are reversed on the copy Setting Neg Pos Reverse 1 Position the original Original Loading p 4 1 2 Press the Neg Pos key and make sure that the Neg Pos lamp lights 3 Make any other necessary settings 4 Enter the number of copies to be made from the 10 Key Pad and then press the Start key Original Copy ...

Page 94: ...y with a file margin Setting File Margin 1 Position the original Original Loading p 4 1 2 Press the File Margin key to light the File Margin indicator Do you know how to set the file margin width The file margin width can be set in the range between 0 mm 0 and 20 mm 3 4 variable in 1 mm 1 16 increments The de fault value is 10 mm 1 2 To change the file margin width change the setting for Margin Se...

Page 95: ...for User s Choice 4 Press the Start key Code Name Description 1 User s Choice Allows you to select the default setting for each of the various functions 2 Drum Dehumidify Removes dewdrops that have formed on the surface of the PC Drum 3 Toner Replenisher Replenishes the supply of toner to make up for a lower toner to carrier ratio 4 Custom Size Input Sets a custom size for the 1st Tray if it is lo...

Page 96: ...le given below for the code and default value of each function Code Name Setting Setting Details Default Value 1 Mixed Orig 0 Mixed Orig enabled 1 Mixed Orig disabled 2 2 Paper Priority 0 A3 L 1 B4 L 2 A4 L 3 B5 L 4 A5 L 5 FLS L 6 A4 C 2 7 B5 C 8 A5 C 10 11 17 L 11 11 14 L 12 Legal L 13 Letter L 14 5 1 2 8 1 2 L 15 Letter C 2 2 16 5 1 2 8 1 2 C 20 1st Tray 21 2nd Tray 22 3rd Tray 1 23 4th Tray 1 2...

Page 97: ...2 Group 8 Crisscross Mode 0 Crisscross stacking enabled 2 1 Crisscross stacking disabled 9 4in1 Copy Order 0 Pattern A 2 1 Pattern B 10 Book Binding Position 0 Left bound 2 1 Right bound 11 Margin Setting 0 0 mm 0 inch 10 10 mm 1 2 inch 2 20 20 mm 3 4 inch 12 Erase Setting Left 5 5 mm 1 4 inch 10 10 mm 1 2 inch 2 20 20 mm 3 4 inch 13 Erase Setting Upper 5 5 mm 1 4 inch 10 10 mm 1 2 inch 2 20 20 mm...

Page 98: ...5 5 min 6 Auto Panel Reset disabled 16 Energy Saver 1 1 min 15 15 min 2 240 240 min 17 Auto Shut OFF 0 Auto Shut OFF disabled 15 15 min 30 30 min 2 240 240 min 18 Density ADF 0 Mode 1 2 1 Mode 2 19 Print Density 0 2 1 1 2 0 2 3 1 4 2 20 Paper Auto Detection 1st Tray 0 Inch 2 2 1 Metric 2 21 Paper Auto Detection 2nd Tray 0 Inch 2 2 1 Metric 2 Code Name Setting Setting Details Default Value ...

Page 99: ...tting OFF 2 1 Auto Paper disabled Auto Tray Switching enabled 2 Auto Paper disabled Auto Tray Switching disabled 29 Special Paper Setting 2nd Tray 0 Auto Paper enabled Special Paper Setting OFF 2 1 Auto Paper disabled Auto Tray Switching enabled 2 Auto Paper disabled Auto Tray Switching disabled 30 Special Paper Setting 3rd Tray 1 0 Auto Paper enabled Special Paper Setting OFF 2 1 Auto Paper disab...

Page 100: ...c area G The default value is Letter C for inch area Copy Priority Choose the default mode to be selected automatically when power is turned ON or panel reset from among Auto Paper Auto Size or Manual G The default value is Auto Paper 32 Special Paper Setting 5thTray 1 0 Auto Paper enabled Special Paper Setting OFF 2 1 Auto Paper disabled Auto Tray Switching enabled 2 Auto Paper disabled Auto Tray...

Page 101: ...xposure level for the Manual exposure mode The image becomes lighter toward a smaller number and darker toward a larger number with 3 as the central value G The default value is 3 Output Priority Choose the finishing function to be selected automatically when power is turned ON or panel reset from among Non Sort Sort or Group G The default value is Non Sort Crisscross Mode Select whether to enable...

Page 102: ... and 20 mm 3 4 in 1 mm 1 16 increments G The default value is 10 mm 1 2 for Left Upper and Frame Erase Auto Panel Reset Select the time it takes the auto panel reset function to be activated from among 30 seconds 1 min 2 min 3 min 4 min or 5 min or not activated at all G The default value is 1 min Energy Saver Set the time it takes the copier to enter the Energy Saver mode from 1 min to 240 min in...

Page 103: ...o Detection Select Inch if the size of the paper loaded in each tray is designated according to the inch system such as Letter Select Metric if the size of the paper loaded in each tray is designated according to the metric system such as A4 and B4 G The default value is Metric for metric area G The dafault value is Inch for inch area Paper Size Detection Select whether to automatically detect or ...

Page 104: ... Tray Switching disabled Select this option for paper that is to be used only for special purposes such as colored paper and paper printed with a company logo Auto Paper disabled Auto Tray Switching enabled Select this option in cases where you give priority to plain paper for use but you want an uninterrupted copy cycle to use recycled paper even when plain paper runs out G The default value is A...

Page 105: ...he Start key 7 Press the Clear key This clears the current setting 8 Enter the new setting from the 10 Key Pad E g Enter 2 to change Copy Priority to Manual Do you want to correct the setting just entered Press the Clear key and then enter the new setting 9 Press the Start key To further change the setting for another function repeat steps 4 through 9 10 Press the Panel Reset key to return to the ...

Page 106: ...ies In such instances use the Drum Dehumidify function to dry the surface of the PC Drum Tip A copy or print cycle can be run while in the Drum Dehumidify mode The copier automatically leaves the Drum Dehumidify mode after the lapse of a given period of time Running the Drum Dehumidify Sequence 1 Call the Utility Mode to the Display Calling the Utility Mode to the Display p 7 1 2 Making sure that ...

Page 107: ...e you can use Toner Replenisher to quickly restore the normal image density Note Do not turn OFF the Power Switch or open the Front Cover while the copier is replenishing toner Toner will not be replenished if the image density is sufficiently high The toner replenisher sequence ends automatically Running the Toner Replenisher Sequence 1 Call the Utility Mode to the Display Calling the Utility Mod...

Page 108: ...e input for Paper Size Detection of User s Choice Tip To make sure that the correct values are entered refer to the illustration on the right to study the convention of the paper length and width Custom Size Input Procedure 1st Tray 1 Call the Utility Mode to the Display Calling the Utility Mode to the Display p 7 1 2 Making sure that U appears on the Display enter 4 from the 10 Key Pad 3 Press th...

Page 109: ...gth is set 421 mm 16 9 16 to 432 mm 17 the maximum Width size that can be set becomes 279 mm 11 6 Press the Start key 7 Press the Clear key 8 Enter the value of Y width of the paper to be loaded from the 10 Key Pad E g Paper width 200 mm Do you want to change the value just entered Press the Clear key and then enter the new value Do you know the range for the paper width of custom size The width c...

Page 110: ...tting according to operating needs Note The administrator number is to be programmed by your Tech Rep Ask him her for more details The administrator of this copier must remember the administrator number Settings for the Administrator Mode 1 Call the Utility Mode to the Display Calling the Utility Mode to the Display p 7 1 2 Making sure that U appears on the Display enter 5 from the 10 Key Pad 3 Pr...

Page 111: ...t to correct a wrong number just entered Press the Clear key and then enter the correct number 5 Press the Start key 6 Check that Ad appears on the Display 7 Enter the code assigned to the desired subfunction from the 10 Key Pad Do you know the code for Copy Track To select Copy Track enter 1 Do you know the code for Disable Auto Shut OFF To select Disable Auto Shut OFF enter 2 8 Press the Start k...

Page 112: ...splay enter 1 from the 10 Key Pad 3 Press the Start key Code Name Setting Setting Details Default Value A 1 Copy Track 0 Copy Track enabled 1 Copy Track disabled 2 A 2 Input Account Program a 3 digit account number A 3 Delete Account Delete a 3 digit account number previously stored A 4 Change Account Change a 3 digit account number previously stored A 5 Total Counter Display by Account Call to th...

Page 113: ...0 Key Pad 5 Press the Start key 6 Select whether to enable or disable Copy Track by entering the corresponding number from the 10 Key Pad Do you know the code for enabling Copy Track To enable Copy Track enter 0 Do you know the code for disabling Copy Track To disable Copy Track enter 1 7 Press the Start key ...

Page 114: ...appears on the Display enter 2 from the 10 Key Pad 5 Press the Start key 6 Enter the 3 digit account number from the 10 Key Pad Do you know the restrictions on entering the account number The account number must be in three digits ranging from 001 to 999 If an account number entered already exists the entry will be rejected Enter a different number 7 Press the Start key This stores the account num...

Page 115: ...that Ad appears on the Display enter 1 from the 10 Key Pad 3 Press the Start key 4 Making sure that A appears on the Display enter 3 from the 10 Key Pad 5 Press the Start key 6 Press or key to select the account number to be deleted 7 Press the Start key The selected account number will be deleted Do you know what to do to delete another account number Repeat steps 4 through 7 ...

Page 116: ...appears on the Display enter 1 from the 10 Key Pad 3 Press the Start key 4 Making sure that A appears on the Display enter 4 from the 10 Key Pad 5 Press the Start key 6 Press or key to select the account number to be changed 7 Press the Start key to delete the old account number 8 Enter the new account number from the 10 Key Pad 9 Press the Start key This stores the new account number ...

Page 117: ...ngs for the Administrator Mode p 7 16 2 Making sure that Ad appears on the Display enter 1 from the 10 Key Pad 3 Press the Start key 4 Making sure that A appears on the Display enter 5 from the 10 Key Pad 5 Press the Start key 6 Press or key to select the account number for which you want to check the Total Counter value 7 Press the Start key ...

Page 118: ...play will show something like that shown on the right Do you know how to reset the Total Counter value Press the Clear key 9 Press the Start key Then the Display returns to the status that allows you to select the account number in step 6 Do you know how to check or reset the Total Counter of another account successively Repeat steps 6 through 9 ...

Page 119: ...for the Administrator Mode p 7 16 2 Making sure that Ad appears on the Display enter 1 from the 10 Key Pad 3 Press the Start key 4 Making sure that A appears on the Display enter 6 from the 10 Key Pad 5 Press the Start key 6 Check that the Display shows CLr 7 Press the Start key This clears the Total Counter values of all accounts resetting them to 0 ...

Page 120: ...e selection of Auto Shut OFF disabled under User s Choice G The default value is not authorized Setting Disable Auto Shut OFF 1 Call the Administrator Mode to the Display Settings for the Administrator Mode p 7 16 2 Making sure that Ad appears on the Display enter 2 from the 10 Key Pad 3 Press the Start key 4 Press the Clear key This clears the current setting ...

Page 121: ...g the Utility Mode 7 D1531iD D1831iD 7 27 5 Enter the new setting from the 10 Key Pad Do you know the number for authorize Disable Auto Shut OFF Enter 0 6 Press the Start key This validates the new setting ...

Page 122: ...ing information G Total Counter Shows the total number of copies or printed pages produced since the installation of the copier G Size Counter Shows the number of copies or printed pages produced on paper of a preset size The size will be set by your Tech Rep Using the Meter Count Key 1 Press the Meter Count Key 2 Make sure that tc appears on the Display The Total Counter value is then displayed E...

Page 123: ... Meter Count key a second time 4 Check that Sc appears on the Display The Size Counter value is then displayed E g The Display looks like the one shown on the right when the value is 123 5 After you have checked the counter value or values press the Meter Count key Then the original display reappears ...

Page 124: ...is in the Interrupt mode Job Storing Procedure 1 Set up the job you want to store in memory 2 Press the Job Input key 3 Check that Jb1 appears on the Display If you want your job stored as Jb2 show it on the Display Do you know how to change the contents of the Display Each time the Job Input key is pressed the Display alternates between Jb1 and Jb2 Do you know what happens if another job has alre...

Page 125: ...Using the Utility Mode 7 D1531iD D1831iD 7 31 4 Press the Enter key 5 The Display changes as shown on the right indicating that the job has been stored in Jb1 ...

Page 126: ...4 1 2 Press the Job Recall key to show the job number to be recalled on the Display 3 Check that the Display shows the job number you want Do you know how to change the contents of the Display Each time the Job Recall key is pressed the Display alternates between Jb1 and Jb2 4 Press the Enter key 5 Press the Start key ...

Page 127: ...not available for the copy cycle in the Auto Paper mode Load the paper indicated by the blinking paper size indicator or press the Paper key to select another paper size A paper misfeed has occurred in the copier Identify the misfeed location on the control panel and remove the sheet of misfed paper Clearing a Paper Misfeed p 8 12 Paper exceeds capacity on the Upper and Lower Copy Tray of Job Tary...

Page 128: ...ument Feeder into position The Document Feeder Cover Doc Feed Cover of the Automatic Document Feeder is open Close the Document Feeder Cover Doc Feed Cover in position Memory is full when the image data is read Press the Panel Reset key Or turn OFF then ON the Power Switch This will erase all data that has so far been read Memory is full when image data is received from the personal computer Press...

Page 129: ...one as necessary The scheduled maintenance time has arrived Call your Tech Rep The Imaging Unit needs replacement Call your Tech Rep A malfanction has occurred in the copier Turning OFF then ON the copier will minor malfunciton If this does not reset the minor malfunction call your Tech Rep and give him or her the malfuncion code being shown on the Display E g C0510 Fusing malfunction Error Displa...

Page 130: ...t has run out of paper on the control panel Then following the procedure given in Adding Paper below add paper as necessary Adding Paper 1st Tray 1 Slide out the 1st Tray Do you know the special precautions to be used when the tray has been slid out Be careful not to touch the surface of the Paper Take Up Roller 2 Press down on the Paper Lifting Plate until it clicks into the locked position Paper...

Page 131: ...oo much paper in the tray Do not load so much paper that the top of the stack is higher than the Ä mark 4 Slide the Edge Guide and Trailing Edge Stop against the edges of the paper stack Do you know the special precautions to be used when loading paper Be sure that the Edge Guide and Trailing Edge Stop are pressed tightly up against the edges of the paper stack 5 Slide the tray back into the copie...

Page 132: ...f the paper the side facing up when the package was unwrapped faces up Have you loaded too much paper in the tray Do not load so much paper that the top of the stack is higher than the Ä mark 4 Slide the Edge Guide and Trailing Edge Stop against the edges of the paper stack Do you know the special precautions to be used when loading paper Be sure that the Edge Guide and Trailing Edge Stop are pres...

Page 133: ...w the special precautions to be used when loading the paper Be sure to face the surface to be copied onto down Do not load so much paper that the top of the stack is higher than the Ä mark Be sure to smooth any curl in the paper before loading it 2 Adjust the Paper Guides and the Bypass Tray Extender to the size of the paper ...

Page 134: ...e as soon as possible Note Use only the toner that has been manufactured specifically for this copier Never use any other types of toner as a malfunction could result For details ask your Tech Rep Do not throw away but keep the used Toner Bottle which will be collected by your Tech Rep Replacing the Toner Bottle 1 Open the Front Cover 2 Pull the Toner Bottle Holder to the front and gently pull out...

Page 135: ...utions to be used when peeling off the seal Slowly peel off the seal as some toner may puff out from the bottle 4 With the UP marking on top insert and push the bottle into position Do you know how much you need to insert the bottle Fit the protrusion on the Toner Bottle all the way into the recess in the holder as illustrated 5 Tap the bottom Toner Bottle three to four times ...

Page 136: ...r back in and then close the Front Cover Toner will be automatically supplied as soon as the Front Cover is closed Do you know what to do if the copy image density is still low immediately after the Toner Bottle has been replaced with a new one Run Toner Replenisher of Utility Mode p 7 13 ...

Page 137: ...feed Indications and Misfeed Locations A blinking lamp indicates that there is a misfed sheet of paper Different procedures are used to clear a misfed sheet of paper depending on the location First isolate the location then clear the misfeed according to the procedure applicable to the misfeed occurring at that particular location Please refer to the corresponding pages Automatic Document Feeder I...

Page 138: ... authorized knobs to reduce the risk of burns CAUTION There are a number of protrusions on the backside of the guide plate To avoid possible injury be careful not to touch any areas other than the paper 1 Open the Side Cover of the copier 2 Unlock the Pressure Lever of the Fusing Unit Do you know how to unlock the Pressure Lever Grasp the green lever to unlock the Pressure Lever Pressure Lever ...

Page 139: ...art to grasp Grasp the green portions to lower the guide plate Be careful not to touch the PC Drum green A malfunction could result 5 Turning the knob of the roller in the direction of the arrow gently pull out the sheet of paper Do you know which part to grasp to turn the roller Be sure to grasp the green knob to turn the roller 6 Lock the Pressure Lever into position PC Drum ...

Page 140: ...t in it Reload the paper stack in the 1st Tray 9 Slide the Edge Guide and Trailing Edge Stop against the edge of the paper stack Are you informed of special precautions to be used when loading paper Be sure that the Edge Guide and Trailing Edge Stop are pressed tightly up against the edges of the paper stack 10 Slide the 1st Tray back into the copier ...

Page 141: ...splays and Other Indicators 8 D1531iD D1831iD 8 15 Paper Feed Cabinet 1 Open the Side Cover of the Paper Feed Cabinet 2 Gently pull out the sheet of misfed paper 3 Close the Side Cover of the Paper Feed Cabinet ...

Page 142: ... paper stack from the Bypass Tray 2 Open the Side Cover of the copier 3 Gently pull out the sheet of misfed paper Do you know the precautions to be observed while performing this step Be careful not to touch the Transfer Roller A malfunction could result 4 Close the Side Cover Transfer Roller ...

Page 143: ...Error Displays and Other Indicators 8 D1531iD D1831iD 8 17 5 Load the paper stack back in the Bypass Tray ...

Page 144: ...rror Displays and Other Indicators 8 18 D1531iD D1831iD Automatic Document Feeder 1 Open the Document Feeder Cover 2 Unload the document from the Document Feeder Tray 3 Raise the Automatic Document Feeder ...

Page 145: ...Error Displays and Other Indicators 8 D1531iD D1831iD 8 19 4 Turning the document feed knob in the direction of the arrow gently pull out the original 5 Close the Document Feeder Cover ...

Page 146: ...icators 8 20 D1531iD D1831iD 6 Reload the document which has been unloaded in step 2 Do you know what to do if 1 is shown on the Display Merge the original which has been misfed with the remaining pages of the document for reloading ...

Page 147: ... p 8 4 The image is too dark The image density is set at Darker Adjust the image density to the lighter side p 5 16 The original is not placed firmly against the Original Glass Place the original in position so that it is placed firmly against the Original Glass p 4 6 The copy is blurry The paper is damp Change the paper p 8 4 The original is not placed firmly against the Original Glass Place the ...

Page 148: ...irty The Original Pad is dirty Wipe the Original Pad clean with a soft cloth dampened with neutral detergent p 10 5 You have selected paper of a size larger than the original when the zoom ratio is full size Select the same paper size as the original p 5 4 Or use Auto Size to enlarge the copy to the appropriate size p 5 12 The original is not placed in the correct position when the zoom ratio is f...

Page 149: ... p 4 3 The original may not be suitable for use in the Automatic Document Feeder Raise the Automatic Document Feeder and place the original on the Original Glass correctly against the Original Scale p 4 7 The Edge Guide and Trailing Edge Stop are not pressed up against the paper stack in the tray Slide the Edge Guide and Trailing Edge Stop up against the edges of the paper stack The paper has an e...

Page 150: ...edure given in To enter an account number p 3 20 No copies are produced even when the Start key is pressed An icon on the control panel is lit Take necessary action to correct the problem indicated by the lit icon p 3 14 p 8 1 The copier is still warming up The copier takes about 30 seconds to complete warming up after it has been turned ON Keys on the control panel do not respond The Interrupt in...

Page 151: ...sed for the 1st Tray and Bypass Tray Copy Paper Size For metric area 1st Tray A3 L to A5 C FLS 210 mm 330 mm Width 90 mm to 297 mm length 140 mm to 432 mm Inch system equivalent 11 17 L to 5 1 2 8 1 2 Width 90 mm to 297 mm length 140 mm to 432 mm When the Length is set 421 mm to 432 mm the maximum Width size that can be set becomes 279 mm When the Width is set 280 mm to 297 mm the maximum Length s...

Page 152: ...tric area Full size 100 Enlargement ratios 115 141 and 200 Reduction ratios 81 70 and 50 Variable ratios 50 to 200 in 1 increments For inch area Full size 100 Enlargement ratios 121 129 and 200 Reduction ratios 78 64 and 50 Variable ratios 50 to 200 in 1 increments Multiple Copies 1 to 99 copies Exposure Control Auto Exposure Mode Manual Exposure Mode and Photo Manual Exposure Mode Lost Image Lead...

Page 153: ... 11 17 L to 5 1 2 8 1 2 L Mixed Original Detection Mode A possible combination is 11 17 L and Letter C or Legal L and Letter L Capacity of Document Feeder Tray Max 50 sheets 80 g m2 20 lb Power Consumption 36 W or less Dimensions Width 602 mm 23 3 4 Depth 502 mm 19 3 4 Height 110 mm 4 1 4 Weight 6 2 kg 13 3 4 lb Specifications Kinds of Paper Plain paper 60 g m2 16 lb to 90 g m2 24 lb recycled pape...

Page 154: ...an A4 75 sheets Special paper 20 sheets For inch area Upper Copy Tray Plain paper 20 lb recycled paper Letter 100 sheets size other than Letter 50 sheets max height 3 4 Special paper 10 sheets Lower Copy Tray Plain paper 20 lb recycled paper Letter 150 sheets sizes other than Letter 75 sheets Special paper 20 sheets Power Consumption 63 W or less Specifications Kinds of Paper Plain paper 60 g m2 1...

Page 155: ...ld detergent Original Glass Wipe the surface of the Original Glass clean with a soft dry cloth Original Pad Wipe the surface of the Original Pad clean with a soft cloth dampened with alcohol Control Panel Wipe the surface of the control panel clean with a soft dry cloth Do you know if detergent can be used for cleaning NEVER use household detergent or glass cleaner as a damaged control key could r...

Page 156: ...ion 2 The functions can be combined The functions cannot be combined The function set first takes precedence The functions cannot be combined The function set last takes precedence A The function set first takes precedence if paper is loaded in the Bypass Tray B The functions can be combined in the Book Separation mode only The functions cannot be combined ...

Page 157: ...4 5 3 4 Name Size Inch Size Metric Ledger 11 17 279 mm 432 mm 11 14 11 14 279 mm 356 mm Computer 10 1 8 14 257 mm 356 mm 10 14 10 14 254 mm 356 mm 9 1 4 14 9 1 4 14 236 mm 356 mm Legal 8 1 2 14 216 mm 356 mm Foolscap Government Legal 8 1 2 13 216 mm 330 mm Foolscap 8 13 203 mm 330 mm Foolscap 8 2 3 13 220 mm 330 mm Foolscap Folio 8 1 4 13 210 mm 330 mm 8 1 4 11 3 4 8 1 4 11 3 4 210 mm 301 mm Lette...

Page 158: ...om Ratio A3 297 mm 420 mm 11 3 4 16 1 2 A4 70 A5 50 B4 86 B5 61 A4 210 mm 297 mm 8 1 4 11 3 4 A5 70 A6 50 B5 86 B6 61 A3 141 B4 122 A5 148 mm 210 mm 5 3 4 8 1 4 A6 70 B6 86 A4 141 A3 200 B4 173 B5 122 A6 105 mm 148 mm 4 1 4 5 3 4 A4 200 A5 141 B5 173 B6 122 B4 257 mm 364 mm 10 14 1 4 A4 81 A5 57 B5 70 B6 50 A3 115 ...

Page 159: ...e Paper Size Zoom Ratio Inch Areas Original Size Paper Size Zoom Ratio Ledger 11 17 279 4 mm 431 8 mm 11 14 82 Legal 77 Foolscap 75 Letter 64 5 1 2 8 1 2 50 11 15 279 4 mm 381 mm 11 14 93 Legal 77 Foolscap 75 Letter 73 5 1 2 8 1 2 50 11 14 279 4 mm 355 6 mm Legal 77 Foolscap 77 Letter 77 5 1 2 8 1 2 50 Legal 8 1 2 14 215 9 mm 355 6 mm Foolscap 92 Letter 78 5 1 2 8 1 2 60 11 17 121 ...

Page 160: ...0394 Inch Foolscap 8 1 4 13 210 mm 330 mm Letter 84 5 1 2 8 1 2 65 11 17 130 11 14 107 Letter 8 1 2 11 215 9 mm 279 4 mm 5 1 2 8 1 2 64 11 17 129 11 14 127 Invoice 5 1 2 8 1 2 139 7 mm 215 9 mm 11 17 200 11 14 164 Legal 154 Foolscap 150 Letter 129 Inch Areas Original Size Paper Size Zoom Ratio ...

Page 161: ...8 Auto Panel Reset 3 17 Auto Shut OFF 3 18 Auto Tray Switching 3 19 B Book Separation 6 2 C Care of the Copier 10 5 Change Account Procedure 7 22 Clear key 3 13 Clearing a Paper Misfeed 8 12 Control Panel 3 12 Copy Paper 3 22 Custom Size Input Bypass Tray 5 9 Custom Size Input Procedure 1st Tray 7 14 D Default Settings 3 16 Delete Account Procedure 7 21 E Enter key 3 13 Erase 6 10 ...

Page 162: ... Input Account Procedure 7 20 Interrupting a Copy Job 5 18 Interrupting Copy Jobs 3 19 L List of Paper Sizes and Zoom Ratios 10 7 Loading Originals 4 1 M Major Error Displays and Remedial Actions 8 1 Meter Count 7 28 Misfeed Indications and Misfeed Locations 8 11 Mixed Originals 4 4 N Neg Pos Reverse 6 13 P Panel Resetting 3 17 Paper Type 7 9 Photo mode 5 16 R Ratios set using Zoom key 5 11 ...

Page 163: ...er Setting 7 10 Specifications 10 1 Specifying the Zoom Ratio 5 11 Storing a Job 7 30 T Toner Replenisher Auxiliary Toner Replenishing 7 13 Turn ON OFF the Copier 3 15 U User s Choice 7 2 Using Auto Paper 5 3 Using the Utility Mode 7 1 W When the Copier is not Operating Correctly 9 4 When This Type of Copy is Produced 9 1 X X Y Zoom 5 11 ...

Page 164: ...Index Index 4 D1531iD D1831iD ...

Page 165: ...ined in this manual is subject to change without notice to incorporate improvements made on the product or products the manual covers DEVELOP GmbH Dieselstrasse 8 D 70839 Gerlingen Telefon 07156 208 0 Telefax 07156 208 180 D1531iD D1831iD User Manual 4021 7734 02 ...

Reviews: