background image

15


UPDATING SOFTWARE

OR TEST DATABASE

Flash Drive

The RDS-2500 can be updated using any of the following methods.

2. On the reader, navigate to the Unit Status page in the Side Menu. 

4. A box will appear on the screen prompting you to update the 

    software and/or test database. 

5. Click the desired update button and the reader will automatically 

    update and restart.

Wireless Cloud

Update Database

6/11/21

Update Software

2.2.1

Detekt offers a subscription service that allows updating of the 

software and test database files. If you are interested in this advanced 

feature, please contact Detekt.

1. Copy the zipped RDS-2500_X.X.XXX.tgz software update file or the 

    RDStinfo_YY_MM_DD.json database file into the root folder of a flash 

    drive. DO NOT unzip the .tgz file.

3. Insert the flash drive into the micro USB port on the right side of the 

    reader (the standard to micro USB converter is included in your box).

Note: You can only update one of the files at a time. To update both 

the software and test database, you will need to repeat these steps 

for the second update.

Summary of Contents for RDS2500

Page 1: ...2101 E Saint Elmo Rd Building 3 Suite 330 Austin TX 78744 512 912 0837 PRODUCT MANUAL ...

Page 2: ...rials Provided Getting Started Navigation Main Menu Side Menu Settings Unit Status User Preferences Diagnostic Check Testing Printing Updating Software Data Manager Safety Miscellaneous 2 3 4 6 6 7 8 9 10 10 11 14 15 16 23 24 ...

Page 3: ...o USB port for Data Transfer when Syncing Results to PC Power Supply Input Touchscreen Display with Haptic Feedback Micro USB port for Printing and Software and Test Database Updates Illuminated Physical Navigation Buttons QR Scanner for Data Input ...

Page 4: ...3 MATERIALS RDS 2500 Reader Diagnostic Cartridge Standard to Micro USB Converter Sync Cable for Data Transfer Power Supplies International Converters ...

Page 5: ... charging When the reader is on or in use while connected to power it will maintain its current power state Messages throughout the interface pages will alert the user when the battery is getting low They keypad at the base of the front of the reader allows for quick access to several key features Menu Power Home This button will open any menu available on the current page Press and hold to power ...

Page 6: ...afely navigate to the side menu and select Power From here the user can choose to Power off or Restart If the reader becomes unresponsive a hard reset may be required This can be done by pressing and holding the power button until the reader turns off Import result data and images to view and generate export files on the computer Updating Update software or test database from USB flash drive Print...

Page 7: ...nc Results to a PC via USB or Network Transfer The Main Menu can be accessed from any page by clicking the center physical home button or any home icon on the screen From the Main Menu you have access to several key features From this screen the user may access settings run a test and enter Data Transfer mode to sync the results to the PC Once Run Test is selected the reader will walk you through ...

Page 8: ...ss user preferences update the software and test database safely restart or power off the unit and check network connection status The battery status icon will display up to 4 bars indicating the level of charge and will show a lightning bolt if the reader is currently charging NAVIGATION Side Menu Access Saved Results Battery Status Users Data Time Brightness Volume Printers Restart or Power Off ...

Page 9: ...l advanced settings For select partners who wish to use Wi Fi to update the test database or software versions on their units software customization is required Contact Detekt to discuss the implementation of this feature Main Menu Scan Codes for Customization Change Reader Track Settings Scan New Lot ID Information Connect to Wifi Run Diagnostics Check Access Additional Settings ...

Page 10: ...erting a flash drive containing the updates into the right hand side USB port of the unit The used memory graphic indicates the number of test results stored on the reader Storing more than 2000 tests can result in slower operating performance Diagnostic Pass Date Current Software Version Current Test Database Memory Usage Indicator Download Updates via Wifi or USB ...

Page 11: ...references can be accessed such as the quantitative unit setting location and site ID tags external barcode scanner and automatic printing settings The RDS 2500 requires users to perform a diagnostic check annually to validate the system s optics module NAVIGATION Diagnostic Check can be found under Settings Diagnostic Check To perform the check insert the calibrator shown to the right into the re...

Page 12: ...e ID click the center button at the bottom of the keyboard to turn on the external scanner The test type is displayed at the top of the screen and the sample ID is shown at the bottom above the word Change The image of the test strip is shown at the top of the page The left edge of the image corresponds to the top of the strip The colored boxes around the test lines indicate the region of analysis...

Page 13: ...he top of the strip The colored boxes around the test lines indicate the region of analysis and match the color of the corresponding result box below If a compatible printer is connected you can print directly from this result page by selecting the printer icon on the screen 1 From the Home Screen select the Cassette you want to run 2 Insert the desired populated cassette into the reader 3 Select ...

Page 14: ...ide Menu Use the physical button right keypad button or the on screen button to open the Side Menu 2 Select View Results 3 Results will load in chronological order with the most recent results appearing at the top Use the up and down arrow keys at the bottom of the results page to scroll and view older test results 4 To view the test details click on the desired result summary 5 Only the most rece...

Page 15: ... manually print a live or saved result summary by clicking on the printer icon located at the bottom right live or top right saved of the result page OM2200 OmniPrint Battery Powered Portable LabelWriter 450 Turbo DYMO High volume paper capacity Desktop printer The RDS 2500 is compatible with the OM2200 and DymoLabel Writer 450 Turbo thermal printers To automatically print every result enable this...

Page 16: ...t offers a subscription service that allows updating of the software and test database files If you are interested in this advanced feature please contact Detekt 1 Copy the zipped RDS 2500_X X XXX tgz software update file or the RDStinfo_YY_MM_DD json database file into the root folder of a flash drive DO NOT unzip the tgz file 3 Insert the flash drive into the micro USB port on the right side of ...

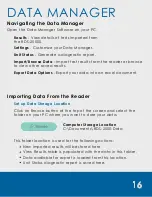
Page 17: ...her saved results Export Data Options Export your data into an excel document Set up Data Storage Location Computer Storage Location C Documents RDS 2500 Data Click on Browse button at the top of the screen and select the folder on your PC where you want to store your data This folder location is used for the following actions New imported results will be stored here View Results table is populate...

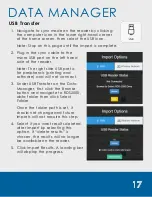
Page 18: ...e USB port is for peripherals printing and software and will not connect Under USB Transfer on the Data Manager first click the Browse button and navigate to RDS2500 data folder then click Select Folder Once the folder path is set it should not change and future imports will not require this step Select if you want results deleted after import by selecting this option If delete results is chosen t...

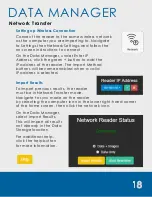
Page 19: ...the IP address of the reader The Import Method buttons will become enabled when a valid IP address is selected Import Results To import previous results the reader must be in Network Transfer mode Navigate to sync mode on the reader by selecting the computer icon in the lower right hand corner of the home screen then click the network icon On the Data Manager select Import Results This will import...

Page 20: ...ted To Import older results select Import Results Click the Start Real time button on the Data Manager to start importing new results Every minute the Data Manager will import any new results that are available Once the Real Time import has started the green start Real time button will change to a red Stop Real time button This button will flash indicating that the import process is working To sto...

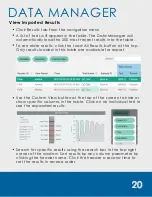
Page 21: ...ts button at the top Only results loaded in this table are available for export Use the Custom View button at the top of the screen to hide or show specific columns in the table Click on an individual test to see the expanded results Search for specific results using the search bar in the top right corner of the window Sort results by any column parameter by clicking the header name Click the head...

Page 22: ...port by specifying a date range and or selecting parameters from the dropdown options All available options will be present in the dropdown lists You can remove a filter by clicking on the associated green label Export results by selecting Export Excel File Use the file explorer on your PC to navigate to the folder where the file was saved and open it to view data ...

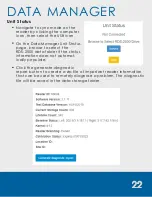
Page 23: ... Manager Unit Status page browse to select the RDS 2500 data folder if the status information does not automat ically populate Click the generate diagnostic report button to create a zip file of important reader information that can be used to remotely diagnose a problem The diagnostic file will be saved in the data storage folder ...

Page 24: ...ifficult for the user to operate the disconnecting device of the main power supply Do NOT replace the power supply with an inadequately rated power supply For a replacement contact Detekt Indoor use only Altitude up to 2 000m Temperatures 5 55 C Maximum relative humidity 80 for temperatures up to 31 C decreasing linearly to 40 relative humidity at 55 C Power Supply This device is designed for use ...

Page 25: ...rtridge overflows when it is dosed inside the device turn off the device and carefully remove the cartridge Keep the unit upright and allow any excess liquid to drain out of the holes at the bottom directly below the port openings Wipe up the liquid from under with a cloth For any remaining liquid inside the device use a long cotton swab to clean the internal incubators For minor spills on or arou...

Reviews: