New as of:
09.2019
Xios AE Sensor USB interface andsensors
Operating Instructions
English
Page 1: ...New as of 09 2019 Xios AE Sensor USB interface and sensors Operating Instructions English...
Page 2: ...ble free operation 12 2 7 Maintenance 12 2 8 Modifications and extensions of the system 13 2 9 Combination with other units 13 2 10 Additional instructions 13 2 10 1 Operate Sensor as Directed 13 2 10...
Page 3: ...11 Symbols 27 3 12 Position of the labels 28 4 Operation 29 4 1 Determine unit status 29 4 2 Connect the sensor 30 4 2 1 Connect sensor and USB interface 30 4 3 Register the patient 30 4 4 Slide the...
Page 4: ...hygienic protective sleeve from the sensor 61 5 1 1 With single use sensor holder system 61 5 1 2 With Aimright reusable sensor holder system 63 6 Edit exposures 64 6 1 Edit exposures in X ray series...
Page 5: ...or test 74 9 Maintenance and inspection 75 9 1 Hygiene 75 9 1 1 Care cleaning agents and disinfectants 75 9 1 2 USB interface and sensors 75 9 1 3 Sensor holders 76 9 2 Regular inspections 77 9 3 Repl...
Page 6: ...ty Xios AE sensors are available in three sizes 0 1 and 2 and use enhanced image processing functions in Sidexis 4 through special filters Depending on the indication a corresponding filter can be app...
Page 7: ...19 7 1 2 Contact information Customer Service Center In the event of technical queries please use our online contact form at the following address http srvcontact sirona com Authorized agent in the EU...
Page 8: ...rning and safety information Online portal for technical documents We have set up an online portal for the Technical Documents at www dentsplysirona com manuals There you can download these operating...
Page 9: ...ges produced are transferred to a PC and displayed on a monitor The images can be edited saved and printed on the PC The product must not be operated in hazardous areas 1 6 Indications and contraindic...
Page 10: ...t in serious bodily injury or death CAUTION A possibly dangerous situation that could result in slight bodily injury NOTE A possibly harmful situation which could lead to damage of the product or an o...
Page 11: ...rs and other persons The hygienic protective sleeves and sensor holder tabs are single use devices which must be renewed for each patient Do not use single use devices more than once The sterilizable...
Page 12: ...of the X rays to the patient data stored by Sidexis 4 2 6 Trouble free operation Use of this unit is permissible only if it works properly without malfunctions If trouble free operation cannot be ensu...
Page 13: ...contained in these operating instructions Do not attempt to modify the sensor or use it in system configurations not specified in this document Before each usage check the outer surface of the sensor...
Page 14: ...ipment that is not part of the system If however use with adjacent equipment is necessary normal operation should be observed and verified in that configuration 2 10 6 Ensure Proper System and PC Work...
Page 15: ...se them to become contaminated compromise their intended function and result in patient and user infection injury and or illness 2 10 11 Take Appropriate Precautions during X ray Operation Always obse...
Page 16: ...the ESD warning label We recommend that all persons working with this system are made aware of the significance of the ESD warning label A training course should also be held to inform users about th...
Page 17: ...rder to implement a wide variety of functions in a device The circuits must be miniaturized to a very high degree in order to include as many functions as possible on these chips This leads to structu...
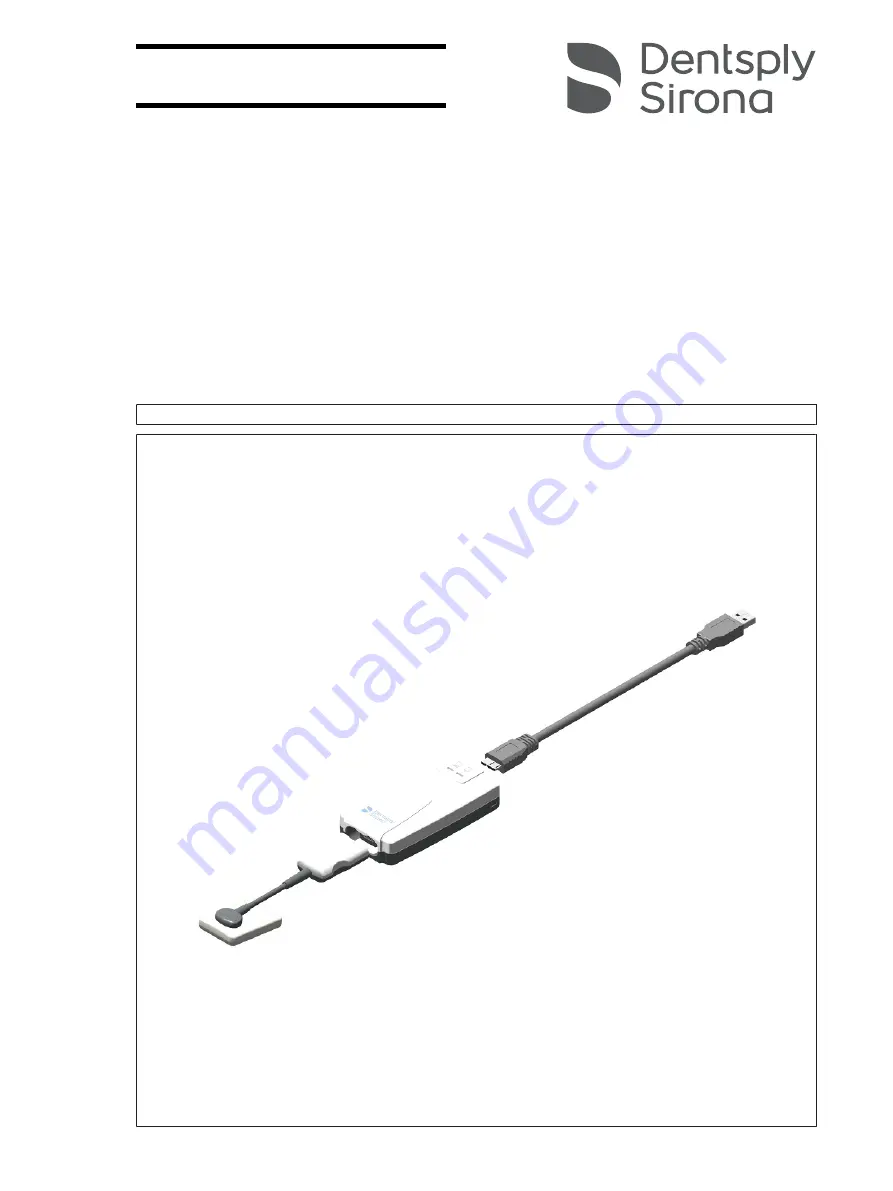
Page 18: ...E Sensor USB interface and sensors 18 67 29 433 D3780 D3780 201 01 01 02 09 2019 3 System description 3 1 System structure A USB interface B USB cable C Sensor size 0 1 or 2 with cable and plug D USB...
Page 19: ...The interface also provides important feedback on the status of the imaging system through its LEDs 3 3 USB cable A special USB cable is supplied It provides a USB 3 0 series A connection A to the PC...
Page 20: ...ements Type of protection against electric shock Protection class II USB standard 2 0 and 3 0 Power supply Separate power supply not bus powered Safety The USB hub must comply with standard IEC 62368...
Page 21: ...3 6 1 Single use sensor holder system There are different sensor holders available depending on the type of exposure The localizer rings and sensor holder tabs are color coded E D C B A A Blue for ant...
Page 22: ...lable depending on the type of exposure The sensor holders are color coded The same localizer ring is used for all sensor holders The sensor holders are available for sensor sizes 1 and 2 A Localizer...
Page 23: ...raoral X ray tube assembly with multipulse technology direct current 0 14 1 4 mAs at 60 70 kV and 8 cone This information must be modified accordingly for other tube lengths or single pulse X ray tube...
Page 24: ...rocessor 2 GHz DualCore RAM 4 GB Free hard disk storage 5 GB for Sidexis 4 installation and data base Removable medium CD DVD drive Graphics card 512 MB Screen suitable for diagnostics applications e...
Page 25: ...th 5 m Dimensions L x W x H 107 x 62 x 28 mm Weight approx 50 g Xios AE Sensors Technology CMOS APS Active Pixel Sensor Physical pixel size 15 m image acquisition in 15 m Line pairs 33 3 lp at 15 m Me...
Page 26: ...al Requirements for Safety IEC 60601 1 1 Medical electrical equipment Part 1 1 General requirements for safety 1 Collateral standard Safety requirements for medical electrical systems IEC 60601 1 2 Me...
Page 27: ...symbol indicates the need for the user to consult the instructions for use CE mark in accordance with Council Directive 93 42 EEC stating the manufacturer s Notified Body This identification signifies...
Page 28: ...rating Instructions Xios AE Sensor USB interface and sensors 28 67 29 433 D3780 D3780 201 01 01 02 09 2019 3 12 Position of the labels The following labels are attached to components of the Xios AE US...
Page 29: ...reen USB Interface is connected and powered and connection to PC is detected Connected Green breathing Ready for acquisition Connected Green pulsing Sidexis server not configured from Sensor Plugin Co...
Page 30: ...Connection status LED on the USB interface displays a green indication 2 Connect the sensor to the USB interface When attached the Sensor status LED on the USB interface also displays a green indicat...
Page 31: ...hly with disinfectant at least twice Refer to Hygiene WARNING The hygienic protective sleeves and sensor holder tabs are single use devices Patients may become sick due to unsterilized accessories Rep...
Page 32: ...eps manually Templates are available in Sidexis 4 for different intraoral exposure series A Example of selecting an exposure series There are two types of templates A template in which exposures of di...
Page 33: ...s 4 Sensor Plugin is installed The patient is registered The Exposure work phase is opened An intraoral device such as Xios AE is selected Work phase Exposure with selected intraoral sensor 1 Select t...
Page 34: ...ensor USB interface and sensors 34 67 29 433 D3780 D3780 201 01 01 02 09 2019 Bitewings exposure series 4 Take the X ray exposure Following the exposure the X ray image is displayed in the preview win...
Page 35: ...lso available after each exposure These include changing image orientation A using the Exposure meter B performing an image retake C and changing the tooth numbering D For more information about these...
Page 36: ...rface and sensors 36 67 29 433 D3780 D3780 201 01 01 02 09 2019 Exposure series complete Exposure series individual images and exam in the Timeline The individual exposures as well as the exposure ser...
Page 37: ...an image perform the following steps 1 Click on any image in the Acquisition view 2 Locate the Retake button below the Selected Image window and click on it 3 When the Retake image window is displaye...
Page 38: ...01 01 02 09 2019 4 5 1 3 Canceling an exposure series An exposure series can be canceled or closed at any time even if one or more of the exposure windows are not used during the patient exam and do...
Page 39: ...diness 67 29 433 D3780 D3780 201 01 01 02 09 2019 39 Empty exposure window in the Light box The empty exposure window B is displayed in the Light box of the Examination work phase along with the expos...
Page 40: ...n the compilation of the exposure series from the Timeline see the Opening exposures for examination section Continuing an exposure series 2 Right click on the placeholder of the exposure on which you...
Page 41: ...ue the series 4 Take the X ray exposure to continue with the exposure series The exposure series continues 4 5 2 Templates for the exposure series Use the menu Global tools Exposure Intraoral template...
Page 42: ...beam path of the cone strongly influences the image quality using the parallel technique with the Xios AE sensor holders is recommended for optimal positioning of the sensors Sensor holder tabs may be...
Page 43: ...r into the hygienic protective sleeve see section Slide the hygienic protective sleeve over the sensor 4 Glue the sensor holder tab onto the sensor s hygienic protective sleeve Place the tab in the ce...
Page 44: ...t lower jaw Glue the sensor holder tab onto the sensor s hygienic protective sleeve Place the tab in the center on the sensor The edge of the tab must lock with the edge of the sensor as shown in the...
Page 45: ...ue the sensor holder tab onto the sensor s hygienic protective sleeve Align the tab vertically to the sensor and place it in the center on the active sensor surface as shown in the diagram 5 For horiz...
Page 46: ...sensor as shown in the diagram 3 For anterior tooth exposures Glue the sensor holder tab onto the sensor s hygienic protective sleeve Align the tab to the sensor edge of the cable and place it in the...
Page 47: ...C 3 Slide the sensor into the hygienic protective sleeve see section Slide the hygienic protective sleeve over the sensor 4 Glue the sensor holder tab onto the sensor s hygienic protective sleeve Pla...
Page 48: ...1 Anterior tooth exposure Preparing the sensor holder For anterior tooth exposures use the blue sensor holder 1 Fasten the guide rod for the sensor holder C in the perforation B of the localizer ring...
Page 49: ...n the localizer ring 2 Position the sensor in the patient s mouth 3 Use light pressure to align the sensor so that it lies parallel with the lower front teeth 4 Ask the patient to close their mouth sl...
Page 50: ...sensor The sensor must be located centrally in front of the opening in the localizer ring 2 Position the sensor centrally in the oral cavity without it touching the roof of the mouth 3 Ask the patient...
Page 51: ...ns Select the exposure parameters for the X ray tube assembly and Releasing the exposure Also observe the operating instructions for the X ray tube assembly After the exposure 1 Ask the patient to ope...
Page 52: ...the right upper jaw and left lower jaw Fasten the guide rod for the sensor holder C in the perforation B of the localizer ring A 2 For the left upper jaw and right lower jaw Fasten the guide rod for...
Page 53: ...29 433 D3780 D3780 201 01 01 02 09 2019 53 Position the sensor 1 Look through the localizer ring to check the alignment of the sensor The sensor must be located centrally in front of the opening in th...
Page 54: ...ure Refer to sections Select the exposure parameters for the X ray tube assembly and Releasing the exposure Also observe the operating instructions for the X ray tube assembly After the exposure 1 Ask...
Page 55: ...Fasten the guide rod for the sensor C in the perforation B of the localizer ring A 2 Slide the sensor into the hygienic protective sleeve see section Slide the hygienic protective sleeve over the sens...
Page 56: ...ient s face 4 Align the cone of the X ray tube assembly parallel to the sensor directly on the localizer ring 5 Release an X ray exposure Refer to sections Select the exposure parameters for the X ray...
Page 57: ...leads to a poorer detection of details CAUTION Image degradations caused by overexposure of the sensor cannot be compensated using subsequent image processing Default setting for brightness and contr...
Page 58: ...02 09 2019 4 9 1 3 Heliodent Plus exposure times 4 9 1 3 1 Pre programmed exposure times for AE sensors with 200 mm 8 FHA cone 0 01 0 02 0 03 0 04 0 05 0 06 0 08 0 10 0 12 0 16 0 20 0 25 0 32 0 40 Upp...
Page 59: ...80 201 01 01 02 09 2019 59 4 9 1 3 2 Pre programmed exposure times for AE sensors with 300 mm 12 FHA cone 0 03 0 80 0 04 0 05 0 06 0 08 0 10 0 12 0 16 0 20 0 25 0 32 0 40 0 50 0 64 Upper jaw Lower jaw...
Page 60: ...d green Please refer to Determine unit status 2 Ensure that Sidexis 4 is ready for exposures The exposure window must be flashing green 3 Check that the X ray tube assembly is in the correct position...
Page 61: ...otective sleeve NOTE The sensor cable is sensitive to mechanical influences The cable may become damaged or may wear out prematurely Do not pull on the sensor cable when pulling the sensor out of the...
Page 62: ...Operating Instructions Xios AE Sensor USB interface and sensors 62 67 29 433 D3780 D3780 201 01 01 02 09 2019 3 Slide the sensor further out of the hygienic protective sleeve with your thumb 4 Hold th...
Page 63: ...r out of the hygienic protective sleeve Slide the sensor further out of the hygienic protective sleeve with your thumb as described below Avoid bending creasing or rotating the cable or exposing it to...
Page 64: ...that this exposure window is selected as the new destination for the image 3 Release the mouse button to finish swapping If the destination exposure window contains an image the two images will swap...
Page 65: ...lect it As tooth numbers are de selected the Tooth list is updated To clear all currently assigned tooth numbers in one action hover the mouse over the odontogram and when the clear selection button a...
Page 66: ...the following steps There is at least one image in the series 1 Click on an image in the Acquisition view 2 Locate the Retake button below the Selected Image window and click on it The Retake image w...
Page 67: ...priate degree of image enhancement The image reflects the filter setting selected 3 Adjust the dynamic sharpening slider located below the Task menu for further refinement The image reflects the sharp...
Page 68: ...per right area of Sidexis 4 2 In the Exposure section click on the Intraoral Enhancements AE link 3 Click on the Task menu to select an enhancement filter that will be used as the new default filter 4...
Page 69: ...to complete the exam if one was in progress In a typical recovery the issue is corrected whatever its cause and the images are saved automatically without further interaction from the clinician If the...
Page 70: ...Sensor Configuration page 4 Select the device in Rescue mode If several devices are connected choose the one in Rescue Mode 5 The Exposure Information area provides the number of unsaved images and p...
Page 71: ...on 6 Browse for the zip file select it and extract the contents IMPORTANT Before importing images into Sidexis check the patient information box located in the phase bar area This is the patient to wh...
Page 72: ...the sensor are connected to the PC workstation 1 In Sidexis 4 click on Settings Exposure Devices 2 2 Select the configuration button for the USB Interface to be upgraded If only the USB Interface is...
Page 73: ...SB Interfaces In almost all cases the preferred approach to updating firmware will be to follow the procedures described previously In specific instances as directed by support personnel this method m...
Page 74: ...ide the USB Interface If another USB Interface is available connecting it to the USB cable and repeating the USB Interface Test may help to identify the possible cause of the problem 8 2 2 Performing...
Page 75: ...Liquids can get into the USB module or the sensor during cleaning and disinfection The plug contacts may become wet The USB module sensor and PC can be damaged or destroyed by a short circuit Before...
Page 76: ...the sensor holder must not be exposed to high sterilization temperatures The plastics may melt warp or become brittle as a result of improper sterilization Sterilize metallic and plastic parts in sepa...
Page 77: ...connector housing is fastened securely at the sensor cable Annually The image quality must be assessed by the system owner or an appointed person at regular intervals at least once a year On digital s...
Page 78: ...ve grounded item e g a water faucet or a bare heating pipe NOTE No dirt or moisture must be allowed to get into the exposed plug contacts Dirt causes contacts faults moisture may lead to a short circu...
Page 79: ...y in the slot so that the sensor works Attach a replacement cable 1 Place the plug for the sensor cable properly on the sensor Both parts must interlock 2 Screw the sensor cable to the sensor using th...
Page 80: ...r holder tab for side tooth exposures posterior quantity 100 REF 61 76 528 Red sensor holder tab for bite wing exposures quantity 100 REF 61 76 536 Green sensor holder tab for endodontic exposures usi...
Page 81: ...Localizer ring red quantity 1 REF 65 45 599 Sensor holder for bite wing exposures red for sensor size 1 quantity 2 REF 65 45 557 Sensor holder for bite wing exposures red for sensor size 2 quantity 2...
Page 82: ...sensor sizes 1 and 2 Starter kits include the following 2 localizer rings 2 sensor holders for horizontal bite wing exposures red 2 sensor holders for posterior tooth exposures left upper jaw right lo...
Page 83: ...Radiated field limitation for HELIODENT PLUS Radiation field limitation for sensor size 0 white REF 64 00 142 Radiation field limitation for sensor size 1 black REF 62 42 007 Radiation field limitatio...
Page 84: ...ity of other devices If this proves to be unavoidable the UNIT should be monitored to check and make sure that it is used properly 11 2 Electromagnetic emission The UNIT is intended for operation in t...
Page 85: ...voltage 2 kV common mode voltage 1 kV differential mode voltage 2 kV common mode voltage The quality of the line power supply should be that of a typical commer cial or hospital environment Voltage di...
Page 86: ...mbol 1 The higher frequency range applies at 80 MHz and 800 MHz 2 The field strengths of fixed transmitters such as base stations of radiotelephones and mobile agricultural radio broadcast services am...
Page 87: ...tance conforms to IEC 61000 4 3 a For some radio services only the frequencies for the radio link between the mobile communication device and the base station en uplink have been recorded in the table...
Page 88: ...2 12 23 The recommended safety distance d in meters m can be determined for transmitters whose maximum power rating is not specified in the above table using the equation that belongs to the correspon...
Page 89: ...ny To initiate return of the electrical device please send a disposal request to enretec GmbH You have the following options here Use the Returning an electrical device button under the eom menu item...
Page 90: ...e required due to technical improvements Sirona Dental Inc Sprache englisch Printed in Germany D3780 201 01 01 02 09 2019 Nr 000 000 Sirona Dental Inc 30 30 47th Avenue Suite 500 Long Island City NY 1...