background image

H4KFWSD08DPX User Manual 


1

 / 

26


1


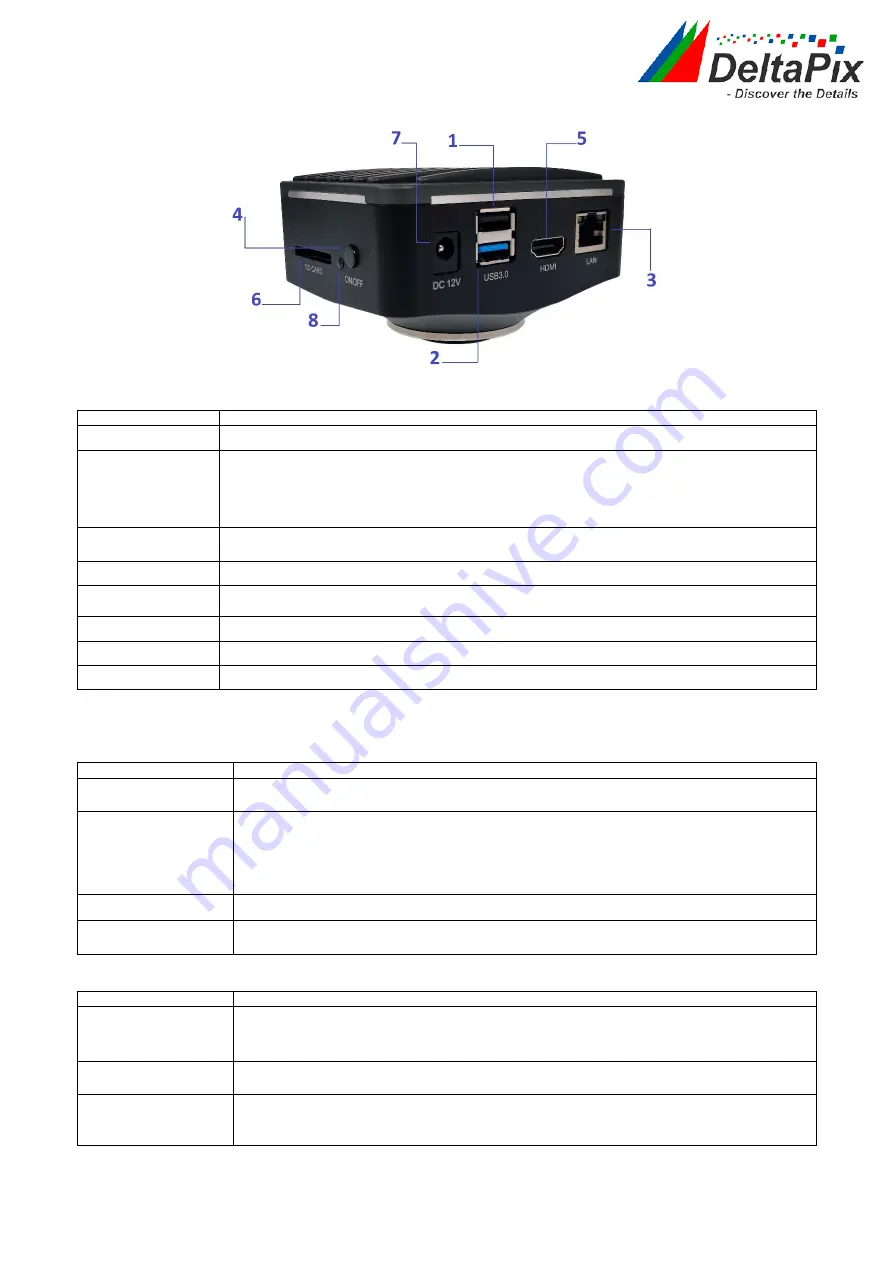
Available Ports on the Back of the Camera Body 


Figure 2-1 Available Ports on the Back Panel of the Camera  

Interface 

Function Description 

1.


USB Mouse 

Connect USB mouse for easy operation with embedded 4KView software. 

2.


USB3.0 

1.


Connect USB flash drive to save pictures and videos  

2.


Connect 5G WLAN modules to transfer video wirelessly in real time (AP/STA). 

3.


Connect computer with USB 3.0 connection to transfer video in real time and for advance 

image processing and analysis.  

3.


GE 

Gigabit Ethernet port to connect router and switch to transfer video.  

4.


On/Off 

Power switch.  

5.


HDMI 

Comply with HDMI2.0 standard. 4K/1080P format video output and supporting automatic 

switch between 4K and 1080P format according to the connected monitors.


6.


SD 

Comply with SDIO3.0 standard and SD card could be inserted for video and images saving.  

7.


12V 

Power adapter connection (12V/1A). 

8.


LED 

LED status indicator. 

2


HDMI 4K Camera Function Description 

2.1


Video Output 

Video Output Interface 

Function Description 

HDMI Interface 

1.


Comply with HDMI2.0 standard. 

2.


60fps@4K or 60fps@1080P(H4KFWSD08DPX

)


GE Interface 

1.


30ps@4K resolution. 

2.


H264 encoded video. 

3.


Bandwidth adjustment in real time. 

4.


DHCP configuration or manual configuration. 

5.


unicast/multicast configuration; 

WLAN Interface 

6.


Connecting 5G WLAN adapter (USB3.0 interface) in AP/STA mode;  

USB3.0 Interface 

1.


Connecting USB3.0 port of PC for video transfer using DeltaPix InSIght 

2.


MJPEG format video; 

2.2


Image Capture and Video Saving in SD card 

Function Name 

Function Description 

Video Saving 

1.


Video format

8.3MP (3840*2160) H264 encoded MP4 file


2.


Video saving frame rate

50~60fps(H4KFWSD08DPX)  (related  with  SD card 

and video resolution);


Image Capture 

3.


8.3MP  (3840*2160,  H4KFWSD08DPX) JPEG image  in SD card or USB flash 

disk 

Measurement Saving 

4.


Measurement information saved in different layer with image content


5.


Measurement information is saved together with image content in burn in 

mode. 

Summary of Contents for H4KFWSD08DPX

Page 1: ...H4KFWSD08DPX User Manual H4KFWSD08DPX User Manual...

Page 2: ...g with Pc software DeltaPix InSigh 4 4 3 Camera working in WLAN mode AP mode 4 4 4 Connecting camera to the PC with Gigabit Ethernet port coming soon 6 4 5 Connecting multi cameras to the router throu...

Page 3: ...connection 12V 1A 8 LED LED status indicator 2 HDMI 4K Camera Function Description 2 1 Video Output Video Output Interface Function Description HDMI Interface 1 Comply with HDMI2 0 standard 2 60fps 4K...

Page 4: ...ctions Function Name Function Description Embedded RTC Optional To support accurate time on board Restore Factory Settings Supported Multiple Language Support English Simplified Chinese Traditional Ch...

Page 5: ...nnection is not required to operate the camera in this mode The steps to start the camera are listed below Figure 7 1 H4KFWSD08DPX Camera with the HDMI Displayer Connect the camera to a HDMI displayer...

Page 6: ...eltaPix InSigh Install DeltaPix InSight to the PC Connect the camera to the Pc via the Included USB3 0 male to male cable Switch on the camera Drag and drop the included virtual dongle file into the I...

Page 7: ...select Host mode Note as long as in host mode the camera can not be connected to a PC via USB it needs to be changed back to device mode Network WLAN property page and choose the AP in the WiFi Mode...

Page 8: ...the camera and PC must be the same Figure 7 3 Connecting the H4KFWSD08DPX Camera with Ethernet Cable to the PC Start the camera according to Sec 7 1 after the camera is running clicking the button on...

Page 9: ...omputer through the USB to Ethernet adapter as shown below Connect the GE port with the Ethernet cable to the PC s network port Insert the supplied SD card USB flash disk USB3 0 interface into the HDM...

Page 10: ...gabit Ethernet Port WLAN Style The connection and configuration are just the same as in Sec 7 1 or Sec 7 3 But here users need to check DHCP If Multicast is disabled or is not supported users should o...

Page 11: ...I and clicking the button on the Camera Control Toolbar at the bottom of the video window a small window called Settings will pop up as shown below Clicking Network WLAN property page and choosing the...

Page 12: ...for those connected to router with WLAN STA mode Or plug the USB WLAN adapter into the camera s USB3 0 port for those connected to router with WLAN STA mode Finally as shown below 2 HDMI cameras are c...

Page 13: ...camera you are interested in To do so double click the camera s name in the Camera List tool window if you use the DeltaPix InSight software and the Camera Thumbnail is used in the 4KView App tap the...

Page 14: ...When user left clicks the Float Fixed button on the Measurement Toolbar the Measurement Toolbar will be fixed In this case the Camera Control Panel will not pop up automatically even if users move mo...

Page 15: ...eft or right to reduce or increase exposure time adjusting brightness of the video Gain Adjust Gain to reduce or increase brightness of video The Noise will be reduced or increased accordingly Red Sli...

Page 16: ...lbar on the upper Side of the Video Window Icon Function Float Fix switch of the Measurement Toolbar Show Hide Measurement Objects Select the desired Measurement Unit Select Magnification for Measurem...

Page 17: ...dragging the object with the mouse But more accurate movement could be done with the control bar The icons on the control bar mean Move Left Move Right Move Up Move Down Color Adjustment and Delete N...

Page 18: ...Browse Images and Videos in the SD Card Settings Check the Version of 4KView The Setting function is relatively more complicated than the other functions Here are more informations about it 5 4 1 Set...

Page 19: ...s system as well Users must manually configure their IP addresses on the camera side and computer side The IP addresses set on the camera side and computer side should be in the same network segment T...

Page 20: ...re the SSID is the router s SSID Password Camera Password for the AP mode Router Password for the STA mode 5 4 4 Setting Measurement This page is used for the define of the Measurement Object properti...

Page 21: ...lected magnification coincides with the scale alignment line on the microscope zoom knob Users could also edit the name of the magnification with other information for example microscope mode users na...

Page 22: ...ash Disk Select it to save the video and image to the SD card File System Format of the Storage Device List the file system format of the current storage device FAT32 The file system of SD card is FAT...

Page 23: ...the whole software into Japanese Italian Set language of the whole software into Italian 5 4 10 Setting Miscellaneous Figure 8 13 Comprehensive Miscellaneous Settings Page Clarity Factor Show Check th...

Page 24: ...H4KFWSD08DPX User Manual 22 26 6 Sample Photos Captured with H4KFWSD08DPX Series Camera Rabbit Emdryo captured H4KFWSD08DPX Ovary Captured with H4KFWSD08DPX...

Page 25: ...H4KFWSD08DPX User Manual 23 26 Cotton Stem captured with H4KFWSD08DPX Taste Bad Captured with H4KFWSD08DPX...

Page 26: ...H4KFWSD08DPX User Manual 24 26 MK54 40 Corn Leaf...

Reviews: