background image


v1.0.1


18 


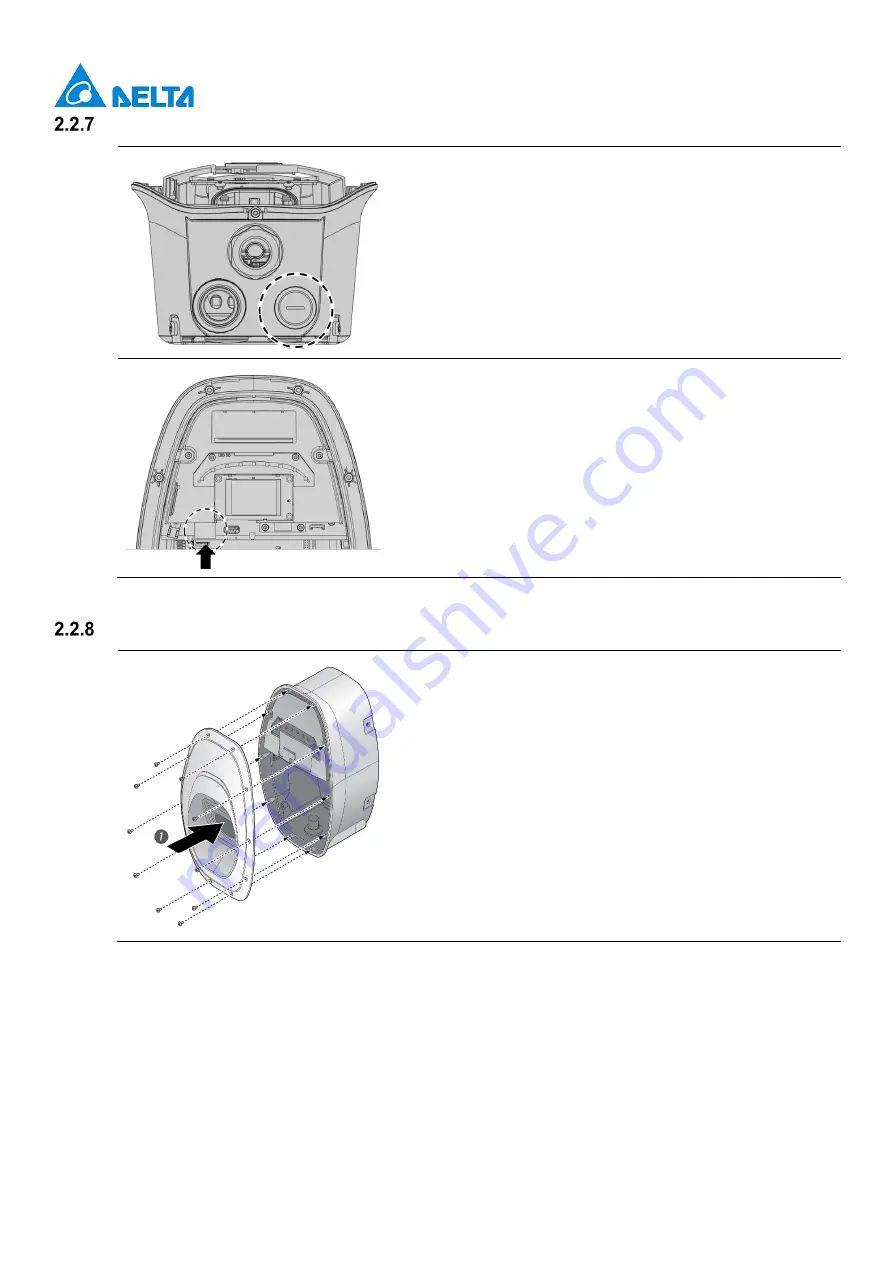
    (Optional) connect RJ45 port for Ethernet function


1.  Remove  the water proof cap  and pass through the 

Ethernet cable with appropriate conduit or cable gland.


2.  Connect the Ethernet cable into the RJ45 port. 


  Secure middle cover and front cover 


1.  Recover the middle cover on the EVSE and secure the 

middle cover by using Torx T20 screwdriver. 

Torque: 1.2 N·m (10.5 lb·in) 

Note:  rubber sealing shall be put  on the appropriate 
position before recovery. 

Summary of Contents for AC MAX

Page 1: ...Installation and operation manual AC MAX NA Smart version Version 1 0 1 Issue date 2022 02...

Page 2: ...1 Prepartion before start 11 2 2 Installation steps 12 3 Commissioning 19 3 1 Connection setting 19 3 2 Login 21 3 3 Configuration 22 3 4 Edit password 25 3 5 Maintenance 25 3 6 Forgot password 29 4 O...

Page 3: ...low to the letter Otherwise sources of danger may be produced or safety equipment may be rendered inoperable This device may only be used to charge Electric Vehicle EV or Plug In Hybrid Electric Vehic...

Page 4: ...g plug with the protective cap when not in use Damaged cables may only be replaced by electricians Do not use this EVSE if the enclosure or the vehicle connector is broken cracked open or shows any si...

Page 5: ...na or transmitter End users and installers must be provide with antenna installation instructions and transmitter operating conditions for satisfying RF exposure compliance 1 5 1 2 FEDERAL COMMUNICATI...

Page 6: ...RSS standard s Son fonctionnement est soumis aux deux conditions suivantes 1 cet appareil ne doit pas causer d interf rence et 2 cet appareil doit accepter toute interf rence notamment les interf renc...

Page 7: ...19 19 kW Indicates the nominated maximum output power 3 S Single phase T Three phase Indicates the phase of input rating 4 B Basic S Smart P Premium Indicates the version of EVSE 5 U SAE J1772 plug E...

Page 8: ...rview Scope of delivery Part Description Part Description EVSE 1x Mounting bracket 1x Template 1x Torx T30 mounting bolts 4x No 8 wood screws 2x 1 4 inch expansion bolts 2x Quick installation guide 1x...

Page 9: ...s or stand Torque screwdriver slotted Securing mounting bracket to masonry walls or stand Torx T20 screwdriver Securing front cover and middle cover Torx T30 screwdriver Securing mounting bracket Inst...

Page 10: ...el Circuit breaker specification EIAW U11K 60A min 240V min 2 poles EIAW U19K 100A min 240V min 2 poles 4 SIM card SIM card Width Height Depth 4G support band Micro SIM 15 mm 12 mm 0 76 mm Band 2 Band...

Page 11: ...ion conditions and protection at the site Follow local electrical regulation and installation standards Consider the emergency routes at the installation site Do not install the device at potentially...

Page 12: ...ight from grade such that the height of the storage means for the coupling device is located between 800 mm 31 5 inches and 1200 mm 48 inches from grade Front view Top view 2 2 Installation steps Remo...

Page 13: ...middle cover Optional insert SIM card for cellular function Insert the SIM card into the socket and ensure the connection is well connected Mark drill holes The EVSE is a stationary wall mounted equip...

Page 14: ...4 expansion bolts Torque 8 8 N m 78 lb in Finished walls supported by wood studs 8 wood screws of 2 or above screw length Torque 3 N m 26 lb in 2 Align the EVSE with the screw holes on the mounting br...

Page 15: ...tion mode Choose the pin 2 to configure the authorization mode for bluetooth availability Configuration Function Configuration Function Not available Bluetooth Default Bluetooth connection is reserved...

Page 16: ...m current setting Choose the pin 4 6 to configure the maximum output current ratings Configuration Max Current Ratings Configuration Max Current Ratings 10A Default 48A 20A 60A 30A 70A 40A 80A Depends...

Page 17: ...orce Note Rated current Copper wire type 48 A 4 AWG 90oC 80 A 2 AWG 90oC 2 Insert the input wire into the terminal accordingly The cord end terminal shall be inserted to the end without any deviation...

Page 18: ...with appropriate conduit or cable gland 2 Connect the Ethernet cable into the RJ45 port Secure middle cover and front cover 1 Recover the middle cover on the EVSE and secure the middle cover by using...

Page 19: ...Finish the installation process and power on the EVSE 2 Connect to the EVSE with your Laptop or smart phone If using the Ethernet connection please finish the connection during installation process 3...

Page 20: ...ask 255 255 255 0 Through WiFi connection 1 Click network icon in the Taskbar Open network and internet setting and choose the connected network SSID Delta serial number Password please refer to the l...

Page 21: ...er the web address and login Web address 192 168 123 123 Ethernet 192 168 5 1 WiFi User account admin Password please refer to the last page of Quick Installation Guide Only allow 5 times Failed login...

Page 22: ...ode When active EVSE is capable of commissioning through WiFi connection Operating with OCPP system User can configure the below information for EVSE Item Description Charge Box ID The Box ID shall be...

Page 23: ...tting please refer to below section Users are able to connect the OCPP system through either Ethernet WiFi or Cellular connection 3 3 2 1 Connection through Ethernet Choose the Network mode and enter...

Page 24: ...v1 0 1 24 3 3 2 2 Connection through WiFi Enter the information based on your wireless AP setting 3 3 2 3 Connection through Cellular Enter the information based on your contract with telecom operator...

Page 25: ...users are recommended to do the maintenance with following instruction Item Description Firmware update User can get the latest or improved function through firmware update and please contact the loc...

Page 26: ...v1 0 1 26 Firmware update 1 Press the button Browser Files s 2 Choose the correct path and file to upload Note please contact the local dealer or DELTA service partner for the latest firmware file...

Page 27: ...v1 0 1 27 3 Press the button Upload and restart charger to start uploading 4 Uploading the file 5 After uploading EVSE will restart automatically...

Page 28: ...file Note user may describe your question and copy the file when contacting the local dealer or DELTA service partner Factory reset User can restore the EVSE to factory setting by pressing the button...

Page 29: ...t the password please follow below to recover 1 Click the Forgot Password 2 Click the button Restore passwords to default values 3 Confirm if the user want to reset the password After clicking the but...

Page 30: ...ashes blue to indicate the charging is initiated 4 2 Stop charging 1 Stop charging session at the vehicle or swipe the RFID card again to stop the charging process 2 Disconnect the vehicle connector f...

Page 31: ...ent protection Unplug the vehicle connector and plug it again Red 5 Flashes Over temperature protection Wait for recovery and check if any heat source around the EVSE If yes please try to remove the h...

Page 32: ...r does not flash after plugging vehicle connector 1 Check if the vehicle connector is fully inserted to EV 2 Check if the battery is full on EV 3 If the problem persists contact customer support Indic...

Page 33: ...on Cold load pick up Randomized delay between 5 and 100 seconds before the charge resume after power outages Status indicators Blue green red yellow Network interface Bluetooth Ethernet WiFi or Cellul...

Page 34: ...clear water is highly recommended and make sure no water enters the vehicle connector 10 Warranty Customer service can provide more information on the terms of warranty However the following cases are...

Reviews: