background image

EN

8

9

1/ 

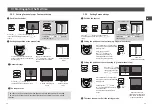
Motor fi tting

• Never hit the motor head or output shaft to fi t the motor into the tube. 
Never pierce the tube when the motor is installed.
• To attach the apron, use screws that do not enter the tube by more than 1 mm.

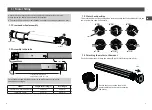
1.1 Crown and wheel assembly

1.2 Assembly in the tube

For attachment and driving accessories as well as mechanical parts,
consult our catalogue.

Model

Length for drilling (L)

Total length

TYMOOV 10 Nm and 20 Nm

395 mm

422 mm

TYMOOV 30 Nm

455 mm

482 mm

1

2

Crown

Motor head

Wheel

Tube

L: length for drilling wheel 
attachment by screws or rivet

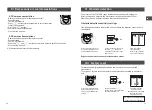
1.3 Motor head position

The motor head must be positioned on the mount such that the cable outlet is in the 
lower part when seen horizontally.

1.4 Attaching the motor to the mount

Push the tube/motor (A) onto the mount (B) until it locks into place (click).

NO

NO

NO

OK

OK

OK

Câble

(A)

(B)

“Click”

Ensure that you create a loop in the 
power cable to prevent water entering 
the motor

Summary of Contents for TYMOOV PERFORMANCE DXRP

Page 1: ...FR Gamme de moteurs tubulaires radio birectionnels EN Bidirectional Wireless Tubular Motor range DE Produktreihe Rohrmotor bidirektionale Funktechnologie TYMOOV PERFORMANCE XRP DXRP EFFICACITE XRE...

Page 2: ...a visible area Frequently check the equipment to detect any imbalances or signs of wear or damage to cables and springs Do not use the device when repairs or adjustments are required Preliminary eleme...

Page 3: ...the motor will operate again after a time period of approximately 30 seconds To operate again for 4 minutes the performance motor must have returned to room temperature If an attempt is made to raise...

Page 4: ...ops 12 4 Modifying stops 16 5 Associating another transmitter 16 6 Associating a smoke detector 17 7 Grouped command 17 8 Remove one or several associations 18 8 1 Remove an association 18 8 2 Remove...

Page 5: ...Length for drilling L Total length TYMOOV 10 Nm and 20 Nm 395 mm 422 mm TYMOOV 30 Nm 455 mm 482 mm 1 2 Crown Motor head Wheel Tube L length for drilling wheel attachment by screws or rivet 1 3 Motor h...

Page 6: ...ctivated once Once the motor has been found press briefly After a few seconds the shutter will be activated twice to confirm the association To exit association mode hold for 3 seconds You will then b...

Page 7: ...g 2 automatic stops It is possible that the shutter will move in the opposite direction to the button you press If that is the case you can reverse the direction by pressing button B on the front pane...

Page 8: ...position of the second stop e g lower manual stop The stops are now set Exit the settings mode Press the button until the shutter is in the required position then press to stop it Press the button un...

Page 9: ...d buttons at the same time for more than 3 seconds until the LED comes on The motor will briefly be activated twice You want to control the opening of roller shutters if smoke is detected 6 Associatin...

Page 10: ...until the LED turns on The motor will be activated briefly Once high sensitivity Twice low sensitivity Repeat the operations above to switch between modes Press button B on the front panel of the remo...

Page 11: ...ne the motor s operating mode Intruder surveillance will only be active if the alarm is activated and the shutter closed 12 1 Associating the motor intruder mode with the alarm control unit Set the al...

Page 12: ...rom one mode to another The motor will be activated briefly 13 Your remote control is lost or not functioning Initial condition The lost remote control was only associated with a single motor receiver...

Page 13: ...will move in the opposite direction to the button you press If that is the case you can reverse the direction by briefly pressing button B on the front panel of the remote control until the LED flashe...

Page 14: ...www deltadore com...

Reviews: