background image


5.


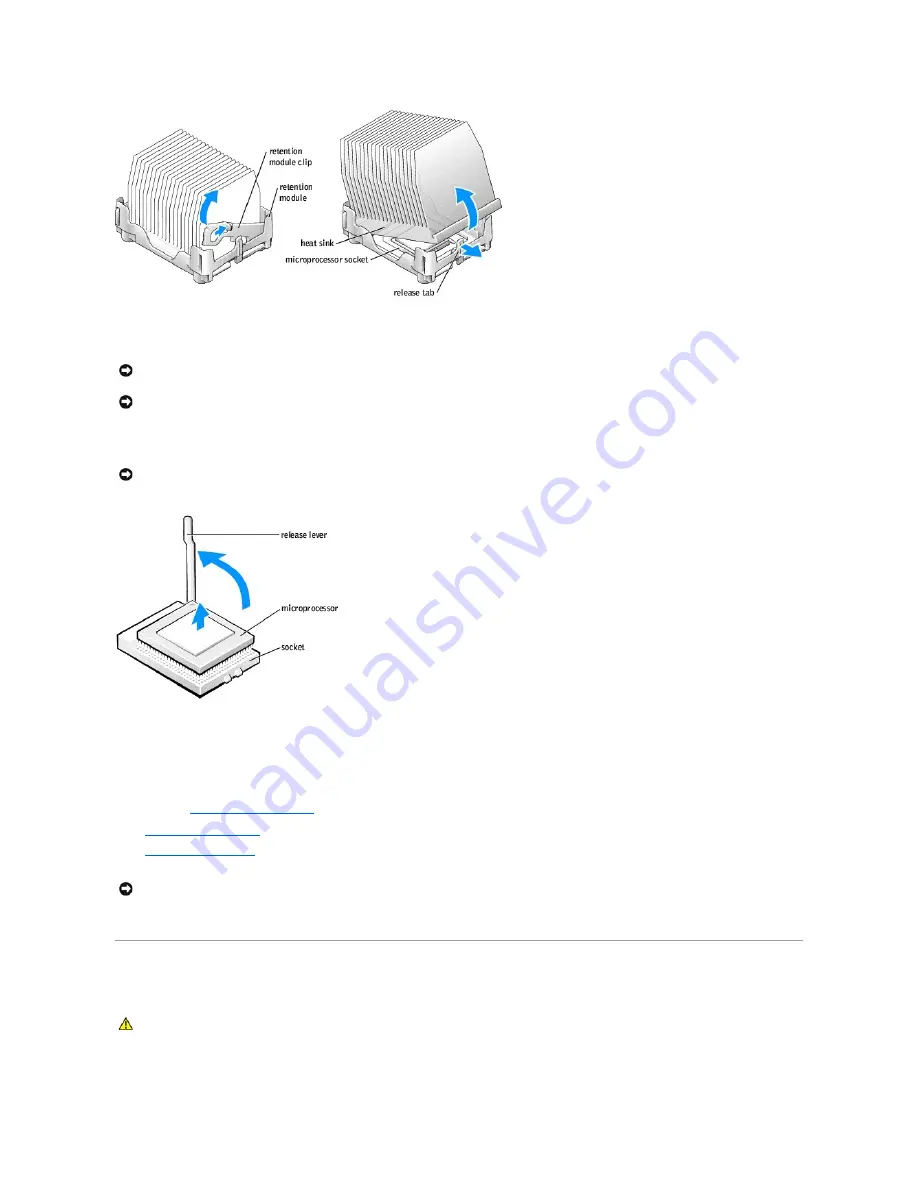
Pull the release lever straight up until the microprocessor is released.  


6.


Remove the microprocessor from the socket.  


If you are replacing the microprocessor, leave the release lever extended in the release position so that the socket is ready for the new microprocessor 
and go to "

Installing the Microprocessor

."  

7.


Replace the airflow shroud

.  


8.


Close the computer cover

.  


9.


Connect your computer and devices to electrical outlets, and turn them on.  


System Board 


Removing the System Board  

NOTICE: 

Lay the heat sink down with the thermal grease facing upward. 

NOTICE: 

If you are installing a microprocessor upgrade kit from Dell, discard the original heat sink. If you are 

not 

installing a microprocessor upgrade kit 

from Dell, reuse the original heat sink when you install your new microprocessor. 

NOTICE: 

Be careful not to bend any of the pins when you remove the microprocessor from the socket. Bending the pins can permanently damage the 

microprocessor. 

NOTICE: 

To connect a network cable, first plug the cable into the network wall jack and then plug it into the computer. 


CAUTION: 

Before you begin any of the procedures in this section, follow the safety instructions in your 

Owner's Manual

.

Summary of Contents for XPS /Dimension

Page 1: ... forbidden Trademarks used in this text Dell the DELL logo and Dimension are trademarks of Dell Computer Corporation Intel Pentium and Celeron are registered trademarks of Intel Corporation Microsoft and Windows are registered trademarks of Microsoft Corporation Other trademarks and trade names may be used in this document to refer to either the entities claiming the marks and names or their produ...

Page 2: ...the computer 4 If the problem persists see Contacting Dell in your Owner s Manual A possible expansion card failure has occurred 1 Determine if a conflict exists by removing a card not a video card and then restarting the computer 2 If the problem persists reinstall the card that you removed remove a different card and then restart the computer 3 Repeat this process for each card If the computer s...

Page 3: ...ossible system board resource and or hardware failure has occurred See Resolving Software and Hardware Incompatibilities in your Owner s Manual If the problem persists see Contacting Dell in your Owner s Manual A possible expansion card failure has occurred 1 Determine if a conflict exists by removing a card not a video card and restarting the computer 2 If the problem persists reinstall the card ...

Page 4: ...The hard drive is not working or is not configured correctly Ensure that the drive is installed correctly in the computer and defined correctly in the system setup program Cache Memory Bad Do Not Enable Cache The cache memory is not operating See Contacting Dell in your Owner s Manual for instructions on obtaining technical assistance CH 2 Timer Error An error is occurring on the timer on the syst...

Page 5: ...BIOS has detected a stuck key Ensure that nothing is resting on the keyboard if a key appears to be stuck carefully pry it up If the problem persists you may need to replace the keyboard KB Interface Error An error occurred with the keyboard connector Ensure that nothing is resting on the keyboard if a key appears to be stuck carefully pry it up If the problem persists you may need to replace the ...

Page 6: ...wer button for 4 seconds CAUTION Before you begin any of the procedures in this section follow the safety instructions in the Owner s Manual CAUTION Only a certified service technician should perform repairs on your computer Damage due to servicing that is not authorized by Dell is not covered by your warranty Read and follow the safety instructions in the Owner s Manual that came with the compute...

Page 7: ...ng steps to prevent damage from electrostatic discharge ESD l Do not remove components from their antistatic packing material until you are ready to install the component in your computer Just before unwrapping the antistatic packaging discharge static electricity from your body l When transporting an electrostatic sensitive component first place it in an antistatic container or packaging l Handle...

Page 8: ... the cover down and into position b Press down on the cover to close it c Once the cover is closed slide the cover release latch to the right until the latch clicks into place 4 If you are using a padlock to secure your computer install the padlock 5 Connect your computer and devices to electrical outlets and turn them on Back to Contents Page NOTICE To connect a network cable first plug the cable...

Page 9: ...ral online tools including l Solutions Troubleshooting hints and tips articles from technicians and online courses l Community Forum Online discussion with other Dell customers l Upgrades Upgrade information for components such as memory the hard drive and the operating system l Customer Care Contact information order status warranty and repair information l Downloads Drivers patches and software ...

Page 10: ...vanced technical reference material for experienced users or technicians l How to reinstall my operating system Operating System CD Windows XP is already installed on your computer when shipped from Dell You can use the CD to reinstall the operating system After you reinstall your operating system using the Operating System Reinstallation CD use the ResourceCD to reinstall drivers for the devices ...

Page 11: ...per and screen saver create shortcuts and position icons l Software access installation and removal l Basic file management such as finding copying deleting and renaming files l Tips on using your computer hardware Downloading the Help File 1 Right click the following link to the file Dell Dimension Help chm 700 KB 2 Click Save Target As in Microsoft Internet Explorer or Save Link As in Netscape N...

Page 12: ... are l A pair of matched memory modules installed in connectors DIMM1 and DIMM2 or l A pair of matched memory modules installed in connectors DIMM1 and DIMM2 and another matched pair installed in connectors DIMM3 and DIMM4 Additional memory recommendations include l Do not install ECC memory modules l If you install mixed pairs PC2700 DDR 333 MHz and PC3200 DDR 400 MHz of memory modules they funct...

Page 13: ... end of the connector Press firmly on the ends of the module until it snaps into place If you insert the module correctly the securing clips snap into the cutouts at each end of the module NOTICE If you remove your original memory modules from the computer during a memory upgrade keep them separate from any new modules that you may have even if you purchased the new modules from Dell You should in...

Page 14: ...5 If you are installing a new card remove the filler bracket to create a card slot opening Then continue with step 7 6 If you are replacing a card that is already installed in the computer remove the card If necessary disconnect any cables connected to the card Grasp the card by its top corners and ease it out of its connector 7 Prepare the card for installation See the documentation that came wit...

Page 15: ... that should be attached to the card See the documentation for the card for information about the card s cable connections 12 Close the computer cover 13 Connect your computer and devices to electrical outlets and then turn them on 14 Install any drivers required for the card as described in the card documentation CAUTION Some network adapters automatically start the computer when they are connect...

Page 16: ... electrical outlets and then turn them on 10 Remove the card s driver from the operating system AGP Cards Your Dell computer provides a connector for an AGP card Removing an AGP Card 1 Follow the instructions in Before You Begin 2 Open the computer cover 3 Press the lever on the card retention arm and raise the retention arm 4 Press out on the release tabs and pull the AGP card guide up and off of...

Page 17: ...3 Press the lever on the card retention arm and raise the retention arm 4 Gently press the card into the AGP connector until it clicks into place ensuring that the tab fits into the notch on the front end of the card 5 Align the AGP card guide with the base and press down on the indentation until the guide stops at the top of the AGP card ...

Page 18: ...nd turn them on Drives Overview Your computer supports one floppy drive and a maximum combination of up to four of any of the following drives l Two hard drives IDE Serial ATA l Two CD or DVD drives NOTICE To connect a network cable first plug the cable into the network wall jack and then plug it into the computer NOTE Install only IDE hard drives or serial ATA hard drives in your computer You can...

Page 19: ...r and hard drive cables from the drive 4 Press in on the tabs on each side of the drive and slide the drive up and out Installing a Hard Drive 1 Unpack the replacement hard drive and prepare it for installation CAUTION Before you begin any of the procedures in this section follow the safety instructions in your Owner s Manual ...

Page 20: ...ll the hard drive into the computer by gently sliding the drive into place until you hear it click securely 7 Connect the power and hard drive cables to the drive 8 Check all connectors to be certain that they are properly cabled and firmly seated 9 Close the computer cover 10 Connect your computer and devices to electrical outlets and turn them on See the documentation that came with the drive fo...

Page 21: ...computer cover 3 If you are replacing a drive and the the new drive does not have the bracket rails attached remove the rails from the old drive by removing the two screws that secure each rail to the drive Attach the bracket to the new drive by aligning the screw holes on the drive with the screw holes on the bracket rails and then inserting and tightening all four screws two screws on each rail ...

Page 22: ... 13 Press Enter 14 Highlight Integrated Devices LegacySelect Options and press Enter 15 Ensure that the Diskette Interface entry is set to Auto If necessary use the left and right arrows to set it to Auto 16 Press Enter 17 Press Esc 18 Press Enter to Save changes and Exit The computer restarts 19 See the documentation that came with the drive for instructions on installing any software required fo...

Page 23: ... setting 4 Connect the new drive to the set of rails that are attached to the inside of the cover If a set of rails is not attached inside the computer cover see Contacting Dell in your Owner s Manual 5 If you are installing a replacement drive and the new drive does not have the bracket rails attached remove the rails from the old drive by removing the two screws that secure each rail to the driv...

Page 24: ... cables out of the way to provide airflow for the fan and cooling vents 11 Close the computer cover 12 Connect your computer and devices to electrical outlets and turn them on See the documentation that came with the drive for instructions on installing any software required for drive operation Microprocessor Airflow Shroud Removing the Microprocessor Airflow Shroud 1 Follow the instructions in Be...

Page 25: ...airflow shroud If you are replacing a microprocessor see Removing the Microprocessor 4 If the release lever is not extended to the release position move it to that position NOTICE To connect a network cable first plug the cable into the network wall jack and then plug it into the computer CAUTION Before you begin any of the procedures in this section follow the safety instructions in your Owner s ...

Page 26: ...flow shroud 13 Close the computer cover 14 Connect your computer and devices to electrical outlets and turn them on Removing the Microprocessor 1 Follow the instructions in Before You Begin 2 Open the computer cover 3 Remove the microprocessor airflow shroud 4 Remove the microprocessor heat sink a Remove the retention module clip by pressing in on the tab and lifting the retention module clip up b...

Page 27: ...E Lay the heat sink down with the thermal grease facing upward NOTICE If you are installing a microprocessor upgrade kit from Dell discard the original heat sink If you are not installing a microprocessor upgrade kit from Dell reuse the original heat sink when you install your new microprocessor NOTICE Be careful not to bend any of the pins when you remove the microprocessor from the socket Bendin...

Page 28: ...ttings of the replacement system board 3 Set the jumpers on the replacement system board so they are identical to the ones on the existing board 4 Orient the replacement board by aligning the notches on the bottom of the board with the tabs on the computer 5 Slide the system board assembly toward the back of the computer until the assembly clicks into position 6 Replace any components and cables t...

Page 29: ... securing slots in the computer 6 While pressing the power supply release button slide the power supply toward the back of the computer CAUTION Before you begin any of the procedures in this section follow the safety instructions in your Owner s Manual NOTICE Before disconnecting a device from the computer wait 10 to 20 seconds after disconnecting the computer from its electrical outlet Before rem...

Page 30: ...ace the card fan guide into the four securing slots in the computer b Slide the card fan guide to the left until it locks into position 5 Connect the power supply cables and the card fan cable 6 Replace the card fan 7 Install the cards 8 Close the computer cover and restart the computer Front Panel Removing the Front Panel 1 Follow the instructions in Before You Begin 2 Open the computer cover 3 D...

Page 31: ...s socket with your fingers or with a blunt nonconducting object such as a plastic screwdriver 6 Insert the new battery into the socket with the side labeled facing up and snap the battery into place CAUTION Before you begin any of the procedures in this section follow the safety instructions in your Owner s Manual CAUTION A new battery can explode if it is incorrectly installed Replace the battery...

Page 32: ...sal in the safety instructions in your Owner s Manual Drive Door Removing the Drive Door 1 Open the drive door 2 Unsnap the top bracket hinge and pull the top of the drive door outward away from the computer NOTICE To connect a network cable first plug the cable into the network wall jack and then plug it into the computer CAUTION Before you begin any of the procedures in this section follow the s...

Page 33: ...ng perform the removal procedure in reverse If the drive door is open and it is opened too far instead of breaking away from the computer in one piece the drive door may disassemble into several smaller pieces If the drive door disassembles 1 If necessary reattach the door hinges to the door bracket Ensure that the hinge tabs are away from the door bracket 2 Attach the door bracket door hinge asse...

Page 34: ...3 Attach the drive door to the computer starting with the bottom bracket hinge Back to Contents Page ...

Page 35: ...toward the top of the computer b Raise the cover and pivot it toward the front of the computer Back to Contents Page CAUTION Before you begin any of the procedures in this section follow the safety instructions in your Owner s Manual CAUTION To guard against electrical shock always unplug your computer from the electrical outlet before opening the cover NOTICE Ensure that sufficient space exists t...

Page 36: ...memory 256 MB Maximum memory 2 GB BIOS address F0000h Computer Information Chip set Intel 875P DMA channels eight Interrupt levels 24 BIOS chip 4 Mb NIC integrated PCI network interface System clock 533 or 800 MHz data rate Video Type AGP 8X Expansion Bus Bus type PCI and AGP Bus speed PCI 33 MHz AGP 133 MHz AGP connector one connector size 172 pins connector data width maximum 32 bits bus protoco...

Page 37: ...ted network adapter green light for 10 Mb operation orange light for 100 Mb operation Activity light on integrated network adapter yellow blinking light Diagnostic lights four lights on the back panel Power DC power supply Wattage 460 W Heat dissipation 1000 BTU hr Voltage see the safety instructions in your Owner s Manual for important voltage setting information fixed voltage power supply 110 V ...

Page 38: ... in velocity of 20 inches sec 50 8 cm sec Storage nonoperating half sine pulse 105 G 2 ms nonoperating faired square wave 27 G with a velocity change of 508 cm sec 200 inches sec Altitude Operating 15 2 to 3048 m 50 to 10 000 ft Storage 15 2 to 10 668 m 50 to 35 000 ft ...

Page 39: ...example the user password Dell recommends that you write down the system setup program screen information for future reference Entering the System Setup Program Viewing Settings 1 Turn on or restart your computer 2 When the blue DELL logo appears press F2 immediately If you wait too long and the operating system logo appears continue to wait until you see the Microsoft Windows desktop Then shut do...

Page 40: ...n on the option that is selected highlighted Option Function System Time Displays the system time System Date Displays the system date Drive Configuration Displays drive configurations when Enter is pressed Boot Sequence Displays boot sequence when Enter is pressed Memory Information Displays amount of system memory when Enter is pressed CPU Information Displays CPU information when Enter is press...

Page 41: ...P Aperture Displays the amount of aperture memory The default is 128 MB Option Function Hyper Threading Enables Hyper Threading The default is Disabled CPU Speed Sets the CPU speed The default is Normal Bus Speed Displays the bus speed Processor 0 ID Displays processor ID Clock Speed Displays clock speed Cache Size Displays cache size Option Function Network Interface Controller Turns the network ...

Page 42: ...keys to move through the list of devices 4 Press the spacebar to enable or disable a device enabled devices have a checkmark Press plus or minus to move a selected device up or down the list Clearing Forgotten Passwords If you forget your user or setup password you cannot operate your computer or change settings in the system setup program until you clear the forgotten password s 1 Shut down the c...

Page 43: ...ower cable from the wall outlet and then press the power button to ground the system board 10 Open the computer cover 11 Reconnect the jumper plug to jumper PASSWORD on the system board 12 Close the computer cover 13 Connect your computer and devices to their electrical outlets and turn them on Turning on your computer with the PASSWORD jumper installed reenables the password feature Back to Conte...

Page 44: ...Manual Inside View of Your Computer System Board Components Power Supply DC Connector Pin Assignments Inside View of Your Computer System Board Components CAUTION To guard against electrical shock always unplug your computer from the electrical outlet before opening the cover ...

Page 45: ...Power Supply DC Connector Pin Assignments DC Power Connector P1 Pin Number Signal name 18 AWG Wire 1 5 VDC Red 2 COM Black ...

Page 46: ...OM Black 17 N C 18 5 VDC Red 19 N C 20 5 VDC Red 21 TSFC 1 Brown 22 5 VDC Red 23 3 3 VDC Blue and white 24 COM Black Pin Number Signal Name 18 AWG Wire 1 3 3 VDC Blue and white 2 3 3 VDC Blue and white 3 3 3 VDC Blue and white 4 3 3 VDC Blue and white 5 COM Black 6 COM Black 7 N C 8 COM Black 9 12 VA Yellow 10 COM Black 11 N C 12 12 VB Orange 13 12 VB Orange 14 12 VB Orange 15 COM Black 16 N C 17 ...

Page 47: ...8 AWG Wire 1 COM Black 2 12 VA Yellow 3 12 VA Yellow 4 COM Black 5 COM Black 6 5 VDC Red 7 5 VDC Red 8 N C 9 12 VB Orange 10 COM Black 11 COM Black 12 5 VDC Red Pin Number Signal Name 18 AWG Wire 1 N C 2 COM Black 3 COM Black 4 3 3 VDC Orange 5 5 VDC Red 6 12 VDC Yellow ...

Page 48: ...leron are registered trademarks of Intel Corporation Microsoft and Windows are registered trademarks of Microsoft Corporation Other trademarks and trade names may be used in this document to refer to either the entities claiming the marks and names or their products Dell Computer Corporation disclaims any proprietary interest in trademarks and trade names other than its own July 2003 Rev A02 Back ...

Page 49: ... the Start button and then click Turn Off Computer 2 In the Turn off computer window click Turn off The computer turns off after the shutdown process finishes Back to Contents Page NOTICE To avoid losing data turn off your computer by performing a Microsoft Windows operating system shutdown as described next rather than by pressing the power button ...

Reviews: