Base Cover
13
3
Base Cover
WARNING:
Before working inside your computer, read the safety information
that shipped with your computer and follow the steps in "Before You Begin" on
page 9. For additional safety best practices information, see the Regulatory
Compliance Homepage at dell.com/regulatory_compliance.
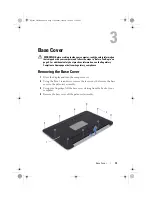
Removing the Base Cover
1
Close the display and turn the computer over.
2
Using the Torx 5 screwdriver, remove the ten screws that secure the base
cover to the palm-rest assembly.
3
Using your fingertips, lift the base cover starting from the back of your
computer.
4
Remove the base cover off the palm-rest assembly.
1
2
Spyder_OM_Book.book Page 13 Monday, January 16, 2012 11:02 AM
Summary of Contents for XPS 13
Page 8: ...8 Contents Spyder_OM_Book book Page 8 Monday January 16 2012 11 02 AM ...
Page 12: ...12 Before you Begin Spyder_OM_Book book Page 12 Monday January 16 2012 11 02 AM ...
Page 30: ...30 Solid State Drive Spyder_OM_Book book Page 30 Monday January 16 2012 11 02 AM ...
Page 44: ...44 I O Board Spyder_OM_Book book Page 44 Monday January 16 2012 11 02 AM ...
Page 50: ...50 System Board Spyder_OM_Book book Page 50 Monday January 16 2012 11 02 AM ...
Page 56: ...56 Keyboard Spyder_OM_Book book Page 56 Monday January 16 2012 11 02 AM ...
Page 62: ...62 Display Assembly Spyder_OM_Book book Page 62 Monday January 16 2012 11 02 AM ...
Page 66: ...66 Palm Rest Assembly Spyder_OM_Book book Page 66 Monday January 16 2012 11 02 AM ...


