background image

6

Contacting Dell

NOTE: If you do not have an active Internet connection, you can find contact information on your 

purchase invoice, packing slip, bill, or Dell product catalog.

Dell provides several online and telephone-based support and service options. Availability varies by 

country and product, and some services may not be available in your area. To contact Dell for sales, 

technical support, or customer service issues:

1.

Go to 

Dell.com/support.

2.

Select your support category.

3.

Verify your country or region in the 

Choose a Country/Region

 drop-down list at the bottom of the 

page.

4.

Select the appropriate service or support link based on your need.


48

Summary of Contents for Vostro 24-5460

Page 1: ...Dell Vostro 24 5460 Owner s Manual Regulatory Model W12C Regulatory Type W12C007 ...

Page 2: ... the problem WARNING A WARNING indicates a potential for property damage personal injury or death 2016 Dell Inc All rights reserved This product is protected by U S and international copyright and intellectual property laws Dell and the Dell logo are trademarks of Dell Inc in the United States and or other jurisdictions All other marks and names mentioned herein may be trademarks of their respecti...

Page 3: ...ound the system board 6 Remove the cover CAUTION Before touching anything inside your computer ground yourself by touching an unpainted metal surface such as the metal at the back of the computer While you work periodically touch an unpainted metal surface to dissipate static electricity which could harm internal components Recommended tools The procedures in this document require the following to...

Page 4: ...out 6 seconds to turn them off After working inside your computer After you complete any replacement procedure ensure that you connect any external devices cards and cables before turning on your computer 1 Replace the cover CAUTION To connect a network cable first plug the cable into the network device and then plug it into the computer 2 Connect any telephone or network cables to your computer 3...

Page 5: ...ve or install the components from your computer Removing the Stand 1 Follow the procedures in Before Working Inside Your Computer 2 Place the computer on a flat surface with the display facing downwards 3 Pry the hinge cover from the computer 4 Slide and lift the hinge cover from the computer 5 ...

Page 6: ...ft the stand from the computer 2 Installing the Stand 1 Align the stand to the screw holes on the back of the computer 2 Tighten the screws to secure the stand to the computer 3 Press the hinge cover on the computer until it clicks into place 4 Follow the procedures in After Working Inside Your Computer 6 ...

Page 7: ... Working Inside Your Computer 2 Remove the stand 3 Pry the edges of the back cover to release it from the tabs 4 Lift the back cover from the computer Installing the Back Cover 1 Align and press the back cover until it clicks into place 2 Install the stand 7 ...

Page 8: ...ur Computer 2 Remove a stand b back cover 3 Disconnect the hard drive cable from the hard drive 4 Perform the following a Remove the screw that secures the hard drive to the computer 1 b Slide 2 and lift the hard drive from the slot 3 5 Remove the screws that secure the hard drive to the bracket and lift the hard drive from bracket 1 2 8 ...

Page 9: ... 4 Tighten the screw that secures the hard drive to the computer 5 Connect the hard drive cable 6 Install a back cover b stand 7 Follow the procedures in After Working Inside Your Computer Removing the System Fan 1 Follow the procedures in Before Working Inside Your Computer 2 Remove a stand b back cover 3 Disconnect the system fan cable from the system board 9 ...

Page 10: ...nstalling the System Fan 1 Tighten the screws that secure the system fan to the computer 2 Connect the system fan cable to the system board 3 Install a back cover b stand 4 Follow the procedures in After Working Inside Your Computer Removing the Memory module 1 Follow the procedures in Before Working Inside Your Computer 2 Remove 10 ...

Page 11: ...own on the memory module until the retention clip spring back to secure them in place 3 Install a back cover b stand 4 Follow the procedures in After Working Inside Your Computer Removing the Heatsink 1 Follow the procedures in Before Working Inside Your Computer 2 Remove a stand b back cover 3 Remove the screws that secure the heatsink to the system board 1 2 3 4 5 6 7 NOTE Loosen the screws in t...

Page 12: ...5 6 as seen on the heatsink module 3 Install a back cover b stand 4 Follow the procedures in After Working Inside Your Computer Removing the WLAN Card 1 Follow the procedures in Before Working Inside Your Computer 2 Remove a stand b back cover 3 To remove the WLAN card a Remove the screw that secures the WLAN card 1 b Slide to remove the WLAN bracket from the system board 2 c Disconnect the antenn...

Page 13: ...ten the screw to secure the WLAN card to the system board 4 Install a back cover b stand 5 Follow the procedures in After Working Inside Your Computer Removing the Stand Cage 1 Follow the procedures in Before Working Inside Your Computer 2 Remove a stand b back cover 3 Perform the following a Remove the screws that secure the stand cage to the computer 1 b Lift the stand cage from the computer 2 1...

Page 14: ... Inside Your Computer Removing the Power Switch Board 1 Follow the procedures in Before Working Inside Your Computer 2 Remove a stand b back cover 3 Perform the following a Press the locking tab that secures the power switch to the computer 1 b Lift the power switch board to release it from the slot 2 4 Lift the lock tab and disconnect the power switch cable from the power switch board 1 2 14 ...

Page 15: ...ck cover b stand 4 Follow the procedures in After Working Inside Your Computer Removing the Speaker module 1 Follow the procedures in Before Working Inside Your Computer 2 Remove a stand b back cover 3 To release the speaker module a Remove the screws that secure the speaker cover to the computer 1 b Pry the edges of the speaker cover to release it from the tabs 2 15 ...

Page 16: ...4 Lift the speaker cover 5 To remove the speaker module a Disconnect the speaker cable from the system board 1 b Unroute the speaker cable 2 16 ...

Page 17: ...odule 1 Align the speakers on the system board 2 Route the speaker cables 3 Connect the speaker cable to the system board 4 Place the speaker cover on the computer 5 Tighten the screws to secure the speaker cover to the computer 6 Install a back cover b stand 17 ...

Page 18: ...g Inside Your Computer 2 Remove a stand b back cover 3 To release the camera module a Disconnect the camera cable from the system board 1 b Unroute the camera cables from the securing clips 2 4 To remove the camera module a Press the locking tab that secures the camera to the chassis 1 b Lift the camera from the system board 2 18 ...

Page 19: ...ow the procedures in After Working Inside Your Computer Removing the System Board 1 Follow the procedures in Before Working Inside Your Computer 2 Remove a stand b back cover c heatsink assembly d stand cage e WLAN card 3 Disconnect the following cables from the system board a display assembly cable b system fan cable c hard drive cable d hard drive power cable e speaker cable f camera cable 4 Lif...

Page 20: ...to release it from the computer 1 2 Installing the System Board 1 Align the system board on the computer 2 Tighten the screws to secure the system board to the computer 3 Connect the following cables to the system board a camera cable b display assembly cable c system fan cable d hard drive cable 20 ...

Page 21: ...orking Inside Your Computer System Board Layout The following image displays the system board layout of the computer 1 Processor connector 2 WLAN connector 3 Camera connector 4 Memory module 5 SD Card connector 6 USB 3 0 connector 7 Audio in connector 8 Jumper connector 9 Speaker connector 10 HDMI connector 11 USB 2 0 connector 12 Network connector 21 ...

Page 22: ... fan connector Removing the Display Assembly 1 Follow the procedures in Before Working Inside Your Computer 2 Remove a stand b back cover c heatsink assembly d stand cage e WLAN card f hard drive g speakers h camera i system fan j system board k power switch 3 Unroute and disconnect the following cables a Unroute the camera hard drive convertor board cables 1 2 3 b Disconnect the power cable 4 4 R...

Page 23: ...remove the display assembly a Push the securing tab to release the display assembly from the chassis 1 b Lift the display assembly chassis from the computer 2 6 Lift the display assembly from the computer 23 ...

Page 24: ...the display assembly chassis to the computer 4 Route the display assembly cable through the tabs on the display bracket 5 Connect the power cable 6 Install a power switch b system board c system fan d camera e speakers f hard drive g WLAN card h stand cage i heatsink assembly j back cover k stand 7 Follow the procedures in After Working Inside Your Computer 24 ...

Page 25: ...p Processor The basic information of the processor is displayed Verifying the processor usage in Task Manager 1 Press and hold the taskbar 2 Select Start Task Manager The Windows Task Manager window is displayed 3 Click the Performance tab in the Windows Task Manager window The processor performance details are displayed 25 ...

Page 26: ...n on the laptop 2 Go to Dell com support 3 Click Product Support enter the Service Tag of your laptop and then click Submit NOTE If you do not have the Service Tag use the autodetect feature or manually browse for your laptop model 4 Click Drivers and Downloads 5 Select the operating system installed on your laptop 6 Scroll down the page expand Chipset and select your chipset driver 7 Click Downlo...

Page 27: ...nually browse for your laptop model 4 Click Drivers and Downloads 5 Select the operating system installed on your laptop 6 Scroll down the page and select the graphic driver to install 7 Click Download File to download the graphic driver for your laptop 8 After the download is complete navigate to the folder where you saved the graphic driver file 9 Double click the graphic driver file icon and fo...

Page 28: ...quired resolution from the drop down list and tap Apply Rotating the display 1 Press and hold on the desktop screen A sub menu is displayed 2 Select Graphic Options Rotation and choose on of the following Rotate to Normal Rotate to 90 Degrees Rotate to 180 Degrees Rotate to 270 Degrees NOTE The Display can also be rotated using the following key combinations Ctrl Alt Up arrow key Rotate to normal ...

Page 29: ...and keep your display in a crisp clear pristine condition NOTE Never spray any cleaning solutions directly on the screen spray it to the cleaning cloth 4 Gently wipe the screen in a circular motion Do not press hard on the cloth NOTE Do not press hard or touch the screen with your fingers or you may leave oily prints and smears NOTE Do not leave any liquid on the screen 5 Remove all excess moistur...

Page 30: ...w dell com support 3 Click Product Support enter the Service Tag of your laptop and click Submit NOTE If you do not have the Service Tag use the autodetect feature or manually browse for your laptop model 4 Click Drivers and Downloads 5 Select the operating system installed on your laptop 6 Scroll down the page and expand Audio 7 Select the audio driver 8 Click Download File to download the latest...

Page 31: ...ap or click All Settings on the Windows 10 Charms Bar 2 Tap or click Control Panel select Device Manager and expand Disk drives The hard drive is listed under Disk drives Identifying the Hard Drive in the BIOS 1 Turn on or restart your laptop 2 When the Dell logo appears perform one of the following actions to enter the BIOS setup program With keyboard Tap F2 until the Entering BIOS setup message ...

Page 32: ...manager and tap to start it 2 Under Device Manager expand Imaging devices Starting the camera To start the camera open an application that uses the camera For instance if you tap the Dell webcam central software or the Skype software that is shipped with the laptop the camera turns on Similarly if you are chatting on the internet and the application requests to access the webcam the webcam turns o...

Page 33: ...ble in the apps list search for it Memory features This laptop supports 4 16 GB DDR4 SODIMM memory up to 2133 MHz Verifying system memory in Windows 10 1 Tap the Windows button and select All Settings System 2 Under System tap About 33 ...

Page 34: ...y information is displayed on the right pane Testing memory using ePSA 1 Turn on or restart your laptop 2 Perform one of the following actions after the Dell logo is displayed With keyboard Press F2 Without keyboard Press and hold the Volume Up button when the Dell logo is displayed on the screen When the F12 boot selection menu is displayed select Diagnostics from the boot menu and press Enter Th...

Page 35: ...drivers Before installation After installation Intel HD Graphics drivers Verify if the Intel HD Graphics drivers are already installed in the laptop Table 3 Intel HD Graphics drivers Before installation After installation 35 ...

Page 36: ...ower on Self Test POST when the Dell logo appears you can Access System Setup by pressing F2 key Bring up the one time boot menu by pressing F12 key The one time boot menu displays the devices that you can boot from including the diagnostic option The boot menu options are Removable Drive if available STXXXX Drive NOTE XXX denotes the SATA drive number Optical Drive Diagnostics NOTE Choosing Diagn...

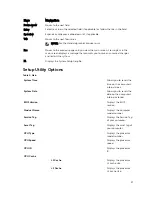
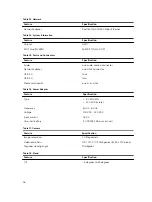
Page 37: ...the system F1 Displays the System Setup help file Setup Utility Options Table 4 Main System Time Allows you to resets the time on the computer s internal clock System Date Allows you to resets the date on the computer s internal calendar BIOS Version Displays the BIOS revision Product Name Displays the computer model number Service Tag Displays the Service Tag of your computer Asset Tag Displays t...

Page 38: ...llows you to enable or disable the Virtualization Default Enabled VT for Direct I O Allows you to enable or disable the VT for Direct I O Default Enabled Trusted Execution Allows you to enable or disable the Trusted Execution Default Disabled Integrated NIC Allows you to enable or disable the Integrated NIC Default Enabled SATA Operation Allows you to choose the SATA operation mode Default AHCI Ad...

Page 39: ...ot Disable Allows you to enable or disable the Boot Disable Default Disabled USB Debug Allows you to enable or disable the USB Debug Default Disabled SW Guard Extensions SGX Allows you to enable or disable the SW Guard Extensions SGX Default Enabled USB Configuration Rear USB Ports Allows you to enable or disable the rear USB ports Default Enabled Side USB Ports Allows you to enable or disable the...

Page 40: ...bled Table 6 Security Unlock Setup Status Allows you to enable an Unlock Setup Status Default Unlocked Admin Password Status Allows you to set change or delete the administrator admin password status System Password Status Allows you to set change or delete the system password status HDD Passwords Status Allows you to set change or delete the password on the system hard disk drive Asset Tag Admin ...

Page 41: ...ption Allows you to delete file browser boot option Secure Boot Enable or disable the Secure Boot Control Default Enabled Load Legacy Option ROM This option controls whether CSM should be loaded during POST Default Disabled Boot Option Priorities Boot Option 1 Allows you to select the 1st boot device preference Boot Option 2 Allows you to select the 2nd boot device preference Boot Option 3 Allows ...

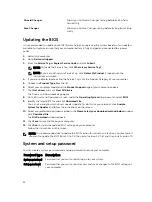
Page 42: ...Drivers and Downloads page opens 8 On the Drivers and Downloads screen under the Operating System drop down list select BIOS 9 Identify the latest BIOS file and click Download File You can also analyze which drivers need an update To do this for your product click Analyze System for Updates and follow the instructions on the screen 10 Select your preferred download method in the Please select your...

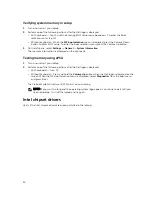
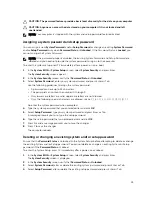
Page 43: ...characters The password can contain the numbers 0 through 9 Only lower case letters are valid upper case letters are not allowed Only the following special characters are allowed space Re enter the system password when prompted 4 Type the system password that you entered earlier and click OK 5 Select Setup Password type your system password and press Enter or Tab A message prompts you to re type t...

Page 44: ...enter the new password when promoted If you delete the System and or Setup password confirm the deletion when promoted 5 Press Esc and a message prompts you to save the changes 6 Press Y to save the changes and exit from System Setup The computer reboots 44 ...

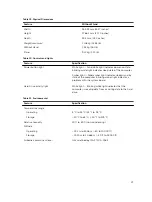
Page 45: ... Dual Core 6th Generation Intel core i3 i5 i7 series Table 10 Memory Feature Specification Type up to 1600 MHz Connectors two DIMM slots Capacity 2 GB 4 GB and 8 GB Minimum Memory 2 GB Maximum Memory 16 GB Table 11 Video Feature Specification Video Controller Integrated Intel HD 530 Graphics Discrete Nvidia GeForce 930M 2GB DDR3 Integrated video memory Shared system memory Table 12 Audio Feature S...

Page 46: ... RJ45 connector USB 2 0 four USB 3 0 two Media card reader one 4 in 1 slot Table 16 Power Adapter Feature Specification Type 90 W UMA 130 W Discrete Frequency 50 Hz 60 Hz Voltage 100 VAC 240 VAC Input current 2 60 A Coin cell battery 3 V CR2032 lithium coin cell Table 17 Camera Feature Specification Image resolution 2 0 Megapixels Video resolution HD 720P 0 92 Megapixel 1280 x 720 pixels Diagonal ...

Page 47: ...light Solid amber light indicates sleep stand by state of the computer blinking amber light indicates a problem with the system board Hard Drive activity light White light Blinking white light indicates that the computer is reading data from or writing data to the hard drive Table 21 Environmental Feature Specification Temperature range Operating 5 C to 35 C 41 F to 95 F Storage 40 C to 65 C 40 F ...

Page 48: ...upport and service options Availability varies by country and product and some services may not be available in your area To contact Dell for sales technical support or customer service issues 1 Go to Dell com support 2 Select your support category 3 Verify your country or region in the Choose a Country Region drop down list at the bottom of the page 4 Select the appropriate service or support lin...

Reviews: