Dell V305 User Manual Download Page 12

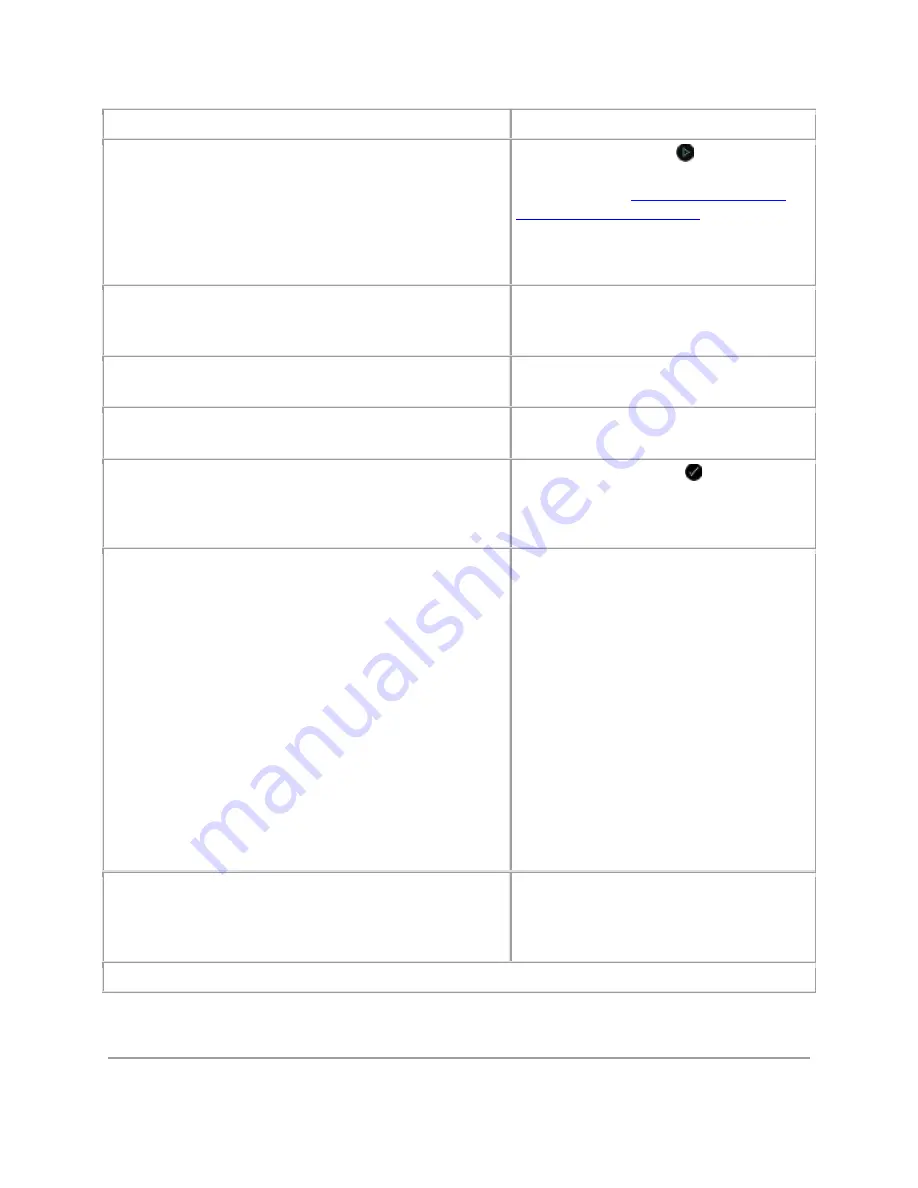
Photo menu item 

Setting 

Print DPOF 

NOTE: 

This menu item is only available when a memory 

card with Digital Print Order Format (DPOF) images is 
inserted into the printer or when a PictBridge-enabled 
digital camera with DPOF images is connected to the 
PictBridge port. 

Press the Start button 

to print all DPOF 

images on a memory card. For more 
information, see 

Printing Photos From a 

PictBridge-Enabled Camera

Photo Color 

*Color 
Black & White 
Sepia 

Auto Enhance 

*Off 
On 

Save To 

Computer 
Network 

Print Images 

Press the Select button 

to print all 

images stored on a memory card, USB 
key, or a PictBridge-enabled digital 
camera. 

Photo Size 

*4 x 6 in. 
5 x 7 in. 
8 x 10 in. 

2L 
6 x 8 cm 
10 x 15 cm 
13 x 18 cm 
8.5 x 11 in. 
A4 
A5 
B5 
A6 
Hagaki 
Wallet 
3.5 x 5 in. 

Quality 

*Automatic 
Draft 
Normal 
Photo 

* Default factory setting 


Summary of Contents for V305

Page 1: ...rinter How to contact Dell Owner s Manual Safety information for preparing to operate my printer Regulatory information Warranty information Product Information Guide Supported paper type and sizes How to select and store print media How to load printable media into my printer How to configure printer settings How to view and print documents and photos from memory cards and USB keys How to set up ...

Page 2: ...ow to find the Express Service Code to direct your call when contacting support Service Tag and Express Code Stickers These labels are located on your printer For more information about their location see Understanding the Printer Parts Solutions Troubleshooting hints and tips frequently asked questions documentation driver downloads and product upgrades Upgrades Upgrade information for components...

Page 3: ...rrier that holds two ink cartridges one color and the other black or photo For more information see Replacing Ink Cartridges 8 Supplies Reorder Label To order ink cartridges or paper visit www dell com supplies 9 Memory card slots Slots into which you insert a memory card containing digital photos 10 Express Service Code and Service Tag number Identify your printer when you use support dell com or...

Page 4: ...er cable into the wall outlet 14 USB connector Slot into which you plug the USB cable sold separately The other end of the USB cable plugs into your computer Number Part Description 15 PictBridge port The port into which you attach the connector of a PictBridge enabled digital camera Bluetooth adapter or a USB key 16 Operator panel Panel on the printer you use to control copying scanning and print...

Page 5: ...ue option Scroll through photos and Microsoft Office files on a memory card or digital camera 3 Back button Return to the previous menu 4 Select button Access the currently displayed menu Select a menu option Initiate a paper feed or paper eject by holding the button for three seconds 5 Power button Turn your printer on or off NOTE Pressing the power button does not turn off your printer if a Pict...

Page 6: ...r LED Check if there is an error 9 Wi Fi LED Check if Wi Fi is activated Off indicates that the printer is not turned on Orange indicates that the printer is ready for wireless connection but not connected Orange blinking indicates that the printer is configured but unable to communicate with the wireless network Blue indicates that the printer is connected to a wireless network ...

Page 7: ...nu use the left and right Arrow buttons to scroll to COPY 2 Press the Select button 3 Use the left and right Arrow buttons until the heading you want appears on the display and then press the Select button 4 Use the left and right Arrow buttons to scroll through the available menu items 5 When the setting you want appears on the display press the Select button to save the setting Copy menu item Se...

Page 8: ...ting Paper Setup Paper Size Paper Type Zoom 50 100 150 200 Custom Fit to Page 2 x 2 Poster 3 x 3 Poster 4 x 4 Poster Repeat Image 1 Per Page 4 Per Page 9 Per Page 16 Per Page Collate Off On N Up 1 Up 2 Up 4 Up Original Size Automatic 8 5 x 11 in 2 25 x 3 25 3 x 5 in 3 5 x 5 in 4 x 6 in 4 x 8 in 5 x 7 in 8 x 10 in L 2L Hagaki A6 A5 B5 A4 60x80 mm ...

Page 9: ...de The Scan Mode menu is only available if the printer is connected to a computer or a network adapter Main Menu Mode Main Menu Scan Scan Color Scan To Computer Scan To Network Scan To Memory Device Quality Original Size To view or change the Scan Mode menu settings 1 From the main menu use the left and right Arrow buttons to scroll to SCAN 2 Press the Select button 3 Use the left and right Arrow ...

Page 10: ...lor Color Black Scan To Computer App List Scan To Network PC Name Scan To Memory Device Place document on scanner and press the right Arrow button Quality Automatic 75 dpi 150 dpi 300 dpi 600 dpi 1200 dpi Original Size Automatic 8 5 x 11 in 2 25 x 3 25 3 x 5 in 3 5 x 5 in 4 x 6 in 4 x 8 in 5 x 7 in 8 x 10 in L 2L Hagaki A6 A5 B5 A4 60x80 mm 9x13 cm 10x15 cm 10x20 cm 13x18 cm 20x25 cm Default facto...

Page 11: ...e actively reading writing or printing from these devices Data corruption can occur 2 If the memory card or USB key contains photo files only the display automatically changes to PHOTO Use the left and right Arrow buttons until the heading you want appears on the display and then press the Select button If the memory card or USB key contains both documents and photos the printer asks which files t...

Page 12: ...l DPOF images on a memory card For more information see Printing Photos From a PictBridge Enabled Camera Photo Color Color Black White Sepia Auto Enhance Off On Save To Computer Network Print Images Press the Select button to print all images stored on a memory card USB key or a PictBridge enabled digital camera Photo Size 4 x 6 in 5 x 7 in 8 x 10 in L 2L 6 x 8 cm 10 x 15 cm 13 x 18 cm 8 5 x 11 in...

Page 13: ... the heading you want appears on the display and then press the Select button 2 Use the left and right Arrow buttons to scroll through the available menu items 3 When the setting you want appears on the display press the Select button to save the setting PictBridge menu item Settings Paper Setup Press the Select button to access the Paper Setup Menu Photo Size 4 x 6 in Wallet 3 5 x 5 in 5 x 7 in 8...

Page 14: ...the printer is connected to a configured internal network adapter The printer recognizes files that have the following file extensions doc Microsoft Word xls Microsoft Excel ppt Microsoft PowerPoint pdf Adobe Portable Document Format rtf Rich Text Format docx Microsoft Word Open Document Format xlsx Microsoft Excel Open Document Format pptx Microsoft PowerPoint Open Document Format wps Microsoft W...

Page 15: ...s and then press the Select button to print If the memory card or USB key contains both documents and photos the display asks which files to print Use the left and right Arrow buttons to scroll to Documents and then press the Select button 4 Use the left and right Arrow buttons until the heading you want appears on the display and then press the Select button Office File menu item Settings Select ...

Page 16: ...display in this format DellV305 service tag NOTE The name appears on the printer list of devices that connect to your computer using the Bluetooth wireless specification Security Level High Low NOTE The Enter Passcode submenu is displayed if you choose High Use the left and right Arrow buttons to scroll through the numbers 0 9 for each digit of the passcode Press the Select button to select a numb...

Page 17: ...the left and right Arrow buttons to scroll to the available menu items and then press the Select button to save your settings Scan menu item Settings Paper Setup Paper Size Paper Type Device Setup Language Country Power Save Clear Settings Timeout Defaults Photo Print Size Set Defaults Network Setup Print Setup Page Wi Fi Protected Setup Wireless Information TCP IP Menu Reset Network Adapter Defau...

Page 18: ... 2 Press the Select button 3 Use the left and right Arrow buttons until the heading you want appears on the display and then press the Select button Maintenance menu item Settings Ink Levels Press the Select button Clean Cartridges Press the Select button Align Cartridges Press the Select button Print Test Page Press the Select button ...

Page 19: ... one paper guide is moved the other adjusts accordingly NOTE Do not force paper into the printer The paper should be flat against the paper support surface and the edges should be flush against both paper guides Print Media Guidelines Load up to Make sure 100 sheets of plain paper The paper guides rest against the edges of the paper You load letterhead paper with the print side facing up and the t...

Page 20: ... behind the printer and feed in the first sheet The paper guides rest against the edges of the paper You select A4 Banner or Letter Banner paper size 10 envelopes The print side of the envelope faces up The paper guides rest against the edges of the envelope You print the envelopes with Landscape orientation NOTE If you are mailing within Japan the envelope can be printed in Portrait orientation w...

Page 21: ...You select Automatic Normal or Photo print quality 25 greeting cards index cards postcards or photo cards The print side of the cards faces up The paper guides rest against the edges of the cards You select Automatic Normal or Photo print quality 25 sheets of photo glossy paper The print side of the paper faces up The paper guides rest against the edges of the paper You select Automatic Normal or ...

Page 22: ...r type sensor that detects the following paper types Plain heavyweight matte Transparency Photo glossy If you load one of these paper types the printer detects the paper type and automatically adjusts the Quality Speed settings Paper type Quality Speed settings Black and Color Cartridges Installed Photo and Color Cartridges Installed Plain heavyweight matte Normal Photo Transparency Normal Photo P...

Page 23: ...pens 2 Click Preferences Properties Options or Setup depending on the program or operating system The Printing Preferences dialog box opens 3 On the Print Setup tab select the paper type 4 Click OK To turn off the automatic paper type sensor for all print jobs 1 In Windows Vista a Click Control Panel b Click Hardware and Sound c Click Printers In Windows XP click Start Control Panel Printers and O...

Page 24: ...ents on the Scanner Glass 1 Open the top cover 2 Place the document face down on the scanner glass NOTE Ensure that the upper left corner of the front of the item aligns with the arrow on the printer 3 4 Close the top cover ...

Page 25: ...our document open click File Print The Print dialog box opens 4 Click Preferences Properties Options or Setup depending on the program or operating system The Printing Preferences dialog box opens 5 On the Print Setup and Advanced tabs make any necessary changes for your document 6 After customizing your settings click OK The Printing Preferences dialog box closes 7 Click OK or Print ...

Page 26: ...settings for the photo from the drop down menu NOTE To print borderless photos click the Borderless check box on the Print Setup tab and then select the borderless paper size from the drop down menu on the Advanced tab Borderless printing is only performed if you are using photo glossy paper The printout on non photo paper contains a 2 mm margin on all sides 6 On the Print Setup and Advanced tabs ...

Page 27: ...uter and a PictBridge camera is connected to your printer some of the functions of your printer operator panel buttons may be unavailable These functions become available after you disconnect the PictBridge camera from your printer 4 Turn on your digital camera The printer automatically enters PictBridge mode 5 See the instructions included with your camera to begin printing photos NOTICE Do not r...

Page 28: ...rs pane open the folder that contains your photos 7 Click to select the photo or photos you want to print 8 Click Photo Prints 9 From the drop down lists select the print quality paper size and paper type settings you want 10 To select multiple prints of a photo or to select photo sizes other than 10 x 15 cm 4 x 6 in select the options you want in the table Use the drop down list in the last colum...

Page 29: ...er size and paper type settings you want 10 From the last column of the table select the number of prints you want 11 Click Print Now Creating Photo Greeting Cards 1 Turn on your computer and printer and ensure that they are connected 2 Load the paper For more information see Loading Paper into the Paper Support 3 In Windows Vista a Click Programs b Click Dell Printers c Click Dell V305 In Windows...

Page 30: ...ur photo greeting card attached Printing From a Bluetooth Enabled Device This printer is compliant with Bluetooth Specification 2 0 It supports the following profiles Object Push Profile OPP Serial Port Profile SPP Basic Print Profile BPP and PCL3 printing Check with your Bluetooth enabled device manufacturers cellular phone or PDA to determine their hardware compatibility and interoperability It ...

Page 31: ...the contents of the Bluetooth device list For more information see Bluetooth Mode The name of the Bluetooth device you are using is automatically deleted from the Bluetooth device list When the Bluetooth security level is set to High the printer saves a list of up to 8 Bluetooth devices that have previously set up a connection with the printer If there are already 8 devices on the list and then yo...

Page 32: ... device to set up a connection to the printer Refer to the instructions included with the device for Bluetooth connection information NOTE If the Bluetooth Security Level on the printer is set to High you must enter a pass key For more information see Setting the Bluetooth Security Level Setting the Bluetooth Security Level 1 Turn on the printer 2 Insert a Bluetooth USB adapter into the USB port N...

Page 33: ...ass key and then press the Select button Printing From a Bluetooth Enabled Device 1 Turn on the printer 2 Insert a USB Bluetooth adapter into the USB port NOTE A Bluetooth adapter is not included with the printer 3 Make sure the Bluetooth mode is turned on For more information see Bluetooth Mode 4 Make sure the printer is set up to receive Bluetooth connections For more information see Setting up ...

Page 34: ...ing Preferences dialog box opens 5 On the Print Setup tab select Envelope and then choose the size of the envelope from the Paper size drop down menu NOTE If you are mailing within Japan the envelope can be printed in portrait orientation with the stamp in the lower right corner or in landscape orientation with the stamp in the lower left corner If you are mailing internationally print landscape o...

Page 35: ...rinter and ensure that they are connected 2 Load the paper For more information see Loading Paper into the Paper Support 3 With your document open click File Print 4 Click Preferences Properties Options or Setup depending on the program or operating system The Printing Preferences dialog box opens 5 On the Advanced tab select N up from the Layout drop down list 6 From the Pages per sheet drop down...

Page 36: ...ating system The Printing Preferences dialog box opens 5 On the Advanced tab select Poster from the Layout drop down list 6 Select the size of the poster 7 On the Print Setup tab and Advanced tab make any additional changes for your document 8 After customizing your settings click OK The Printing Preferences dialog box closes 9 Click OK or Print Printing a Banner 1 Turn on your computer and printe...

Page 37: ...ies of Your Document 1 Turn on your computer and printer and make sure they are connected 2 Load the paper For more information see Loading Paper into the Paper Support 3 With your document open click File Print The Print dialog box opens 4 Click Preferences Properties Options or Setup depending on the program or operating system The Printing Preferences dialog box opens 5 On the Print Setup tab s...

Page 38: ... bundle NOTE A bundle is a set number of sheets of paper folded together The printed bundles are stacked one on top of the other keeping the correct page order The stacked bundles can be bound to make a booklet When printing with a heavier paper stock select a smaller number of Sheets per bundle 7 Click OK to close any printer software dialog boxes that are open 8 Print the document NOTE For help ...

Page 39: ...ages of the document on the back sides of the paper 1 Turn on your computer and printer and ensure that they are connected 2 Load the paper For more information see Loading Paper into the Paper Support 3 With your document open click File Print 4 Click Preferences Properties Options or Setup depending on the program or operating system 5 Click the Advanced tab and then select the 2 sided printing ...

Page 40: ...con 3 Click Open 4 Select the job you want to cancel from the list that appears 5 From the Document menu click Cancel From the Printing Status window The Printing Status window automatically opens at the bottom right part of your screen when you send a print job Click Cancel Printing to cancel the current print job From the Taskbar 1 Double click the printer icon at the bottom right portion of you...

Page 41: ...Click Open 4 Select the job you want to cancel from the list that appears 5 From the Document menu click Cancel Changing Printing Preferences Defaults When you send a document or photo to print you can specify various settings such as print on both sides of the paper print in higher or lower quality print only in black and white and more If you have preferred settings you can make these the defaul...

Page 42: ...e default print quality to Draft Normal or Photo Change the default media type and paper size Make black and white printing and borderless printing the default setting Change the default orientation Change the default number of copies From the Advanced tab you can Specify layouts that you want to set as default From the Maintenance tab There are no print settings to set as default from the Mainten...

Page 43: ...dge may also be used for accessing information stored on USB keys NOTICE Do not remove the memory card or USB key or touch the printer near the area of the memory card or USB key while actively reading writing or printing from these devices Data corruption can occur NOTE Do not insert a USB key if there is already a memory card inserted in the printer When you insert a memory card or USB key the p...

Page 44: ... 4 Follow the instructions on the Memory Card Manager dialog box on how to transfer the photos to your computer Printing Photos From a CD or Flash Memory Device 1 Turn on your computer and printer and ensure that they are connected 2 Load the paper For more information see Loading Paper into the Paper Support 3 Insert a CD or connect a flash memory device such as a flash drive memory card or digit...

Page 45: ...lect One Click Auto Fix Automatic Red Eye Reduction or Automatic Brightness Fix to let the software edit your photo automatically Click More Retouch Tools to go to the photo editing window After completing your edits click Return with edits in the bottom right corner to return to the print window 13 Click Print Now Printing All Photos 1 Insert the memory card or USB key If the memory card or USB k...

Page 46: ...ry card into the printer memory card slots 1 Load photo glossy paper with the print side facing up NOTE Make sure the size of the paper loaded is not smaller than the size you specified in the DPOF selection 2 Insert the memory card The printer automatically switches to PHOTO mode NOTE Do not insert more than one memory card or USB key at a time 3 Use the left and right Arrow buttons to scroll to ...

Page 47: ...cent photos on the proof sheet Date Range Print only photos created in a certain date range 5 6 Press the Start button The proof sheet prints 7 Follow the instructions on the proof sheet to select which photos to print and to choose a layout and paper type to use Fill in the circle with the red eye icon below a photo to reduce the red eye effect on the printout NOTE Ensure that you completely fill...

Page 48: ... 2 Insert a memory card into a card slot or a USB key into the PictBridge port If the memory card or USB key contains documents only the printer automatically switches to OFFICE FILE mode If the memory card or USB key contains documents and photos the display asks which files to print Use the left and right Arrow buttons to scroll to Documents and then press the Select button For information on wh...

Page 49: ...nge the copy settings For more information see Copy Mode 6 Press the Start button NOTE If you press the Start button without changing the copy settings from the copy submenus the copy is printed in the current default settings Using Your Computer 1 Turn on your computer and printer and ensure that they are connected 2 Load the paper For more information see Loading Paper into the Paper Support 3 L...

Page 50: ...re you scanning dialog box opens 7 Select Document 8 Click Custom Settings if you want to adjust how your document will be scanned before creating a copy or copies 9 Click Start The document appears in the right pane of the Copy dialog box 10 On the left pane of the Copy dialog box select the copy settings that you want 11 Click Copy Now Copying Photos Using the Operator Panel 1 Turn on the printe...

Page 51: ...facing up For more information see Loading Paper into the Paper Support 3 Load your original photo on the scanner glass For more information see Loading Original Documents on the Scanner Glass 4 In Windows Vista a Click Programs b Click Dell Printers c Click Dell V305 In Windows XP or Windows 2000 Click Start Programs or All Programs Dell Printers Dell V305 5 Select Dell Imaging Toolbox The Dell I...

Page 52: ...he right pane of the Copy dialog box 10 From the drop down lists select the print quality paper size and paper type settings that you want 11 To select multiple prints of a photo or to select photo sizes other than 10 x 15 cm 4 x 6 in select the options you want in the table Use the drop down list in the last column to view and select other sizes 12 Click Copy Now ...

Page 53: ... Use the left and right Arrow buttons to scroll through the available applications to which your scan can be sent b When the application you want to use appears on the display press the Select button If your printer is connected to a network c Use the left and right Arrow buttons to scroll through the available computers to which your scan can be sent d When the computer you want to use appears on...

Page 54: ...l Imaging Toolbox dialog box opens 5 From the Home screen click Scan The What are you scanning dialog box opens 6 Select the Photo option If you want to scan a document without changing the text and you do not want to make a PDF selecting the Photo option scans the document as an image and sends it to the Library instead of your default word processing application 7 Click Start Setting the Compute...

Page 55: ...e instructions on the screen 6 After you specify a computer name or a PIN click OK Scanning Multiple Photos Into a Single File NOTE Some programs do not support multiple page scanning 1 Turn on your computer and printer and ensure that they are connected 2 Load your original photos on the scanner glass For more information see Loading Original Documents on the Scanner Glass NOTE For best results l...

Page 56: ...ter along with your printer software 1 Turn on your computer and printer and ensure that they are connected 2 Load your original document facedown on the scanner glass For more information see Loading Original Documents on the Scanner Glass 3 In Windows Vista a Click Programs b Click Dell Printers c Click Dell V305 In Windows XP and Windows 2000 Click Start Programs or All Programs Dell Printers D...

Page 57: ... Dell Imaging Toolbox opens 5 From the Home screen click Activities 6 Click Edit Picture 7 Select the Photo or Several Photos option 8 Click Start The image appears in the Save or Edit dialog box 9 Select editing options from the left pane to edit your photos Saving Photos on Your Computer 1 Turn on your computer and printer and ensure that they are connected 2 Load your original photo or multiple...

Page 58: ... change how the image is saved a Select one or more of the following To save to another folder click Browse select a folder and then click OK To rename the file type the name in the File Name area To save the photo as another file type select the file type from the File Type drop down list To select a date for the photo click the drop down list and select a date from the calendar b Click Save Resi...

Page 59: ...t to resize If you are using a saved image e From the Folders pane in the Library dialog box open the folder that contains the file that you want to resize The thumbnails of all photos and documents in the folder appear in the preview area f Select the photo that you want to resize 7 Click Next The Image Resolution Size dialog box opens 8 Select the size of your new image using the preset photo si...

Page 60: ...en scanning a document for e mailing choose Photo or Several Photos If you select Document the scan opens in your default word processing application instead of the Library 7 Click Start The scanned image appears in the right pane of the Save or Edit dialog 8 Adjust your scanned image using the settings on the left pane of the Save or Edit dialog box 9 Save your scanned image 10 With your scanned ...

Page 61: ...photo or document that you want to add and then click E mail 6 If you are sending one or more photos select a photo size 7 Click Create E mail to create an e mail message with your file attached Creating a PDF From a Scanned Item 1 Load an original document facedown on the scanner glass 2 In Windows Vista a Click Programs b Click Dell Printers c Click Dell V305 In Windows XP and Windows 2000 Click...

Page 62: ...ges by clicking on them in the preview pane b Click Add Files when you have made your selections 11 Select Save all images as one PDF file or Save each image as individual PDF file 12 Click Create PDF The software prepares your PDF and opens a Save dialog box 13 Type a file name for your PDF and select a storage location 14 Click Save From a Saved Item 1 In Windows Vista a Click Programs b Click D...

Page 63: ...by clicking on them in the preview pane b Click Add Files when you have made your selections 8 Select Save all images as one PDF file or Save each image as individual PDF file 9 Click Create PDF The software prepares your PDF and opens a Save dialog box 10 Enter a file name for your PDF and select a storage location 11 Click Save Customizing Scan Settings 1 In Windows Vista a Click Programs b Clic...

Page 64: ...en scanning Make your selections permanent by selecting the check box 6 Changing the Scan Settings Preferences 1 In Windows Vista a Click Programs b Click Dell Printers c Click Dell V305 In Windows XP and Windows 2000 Click Start Programs or All Programs Dell Printers Dell V305 2 Select Dell Imaging Toolbox The Dell Imaging Toolbox dialog box opens 3 From the Home screen click Settings and then cl...

Page 65: ...ert images to text Click OK The printer software includes Dell Imaging Toolbox Allows you to perform various scan copy and print operations with newly scanned and previously saved documents and images Printing Preferences Allows you to adjust printer settings Dell Service Center Provides step by step troubleshooting help maintenance tasks and customer support Dell Ink Management System Warns you w...

Page 66: ...needs Select the quantity and quality of your copies Preview images you want to print scan or copy Manage photos in a digital photo album E mail scanned documents and photos Check ink levels Order supplies online To access the Dell Imaging Toolbox 1 In Windows Vista a Click Programs b Click Dell Printers c Click Dell V305 In Windows XP and Windows 2000 ...

Page 67: ...plished using the operator panel Resize your copies Photos My Photo Album Manage saved photos in a photo album Print saved photos Create photo greeting cards Create posters from saved photos Attach a saved photo to e mail messages Convert saved photos to PDF Activities Resize an image Edit pictures Scan multiple photos Convert a scanned document to text using OCR Scan multiple images into a single...

Page 68: ...1 Click File Print The Print dialog box opens 2 Click Preferences Properties Options or Setup depending on the program or operating system The Printing Preferences dialog box opens To access Printing Preferences when a document is not open 1 In Windows Vista a Click Control Panel b Click Hardware and Sound c Click Printers In Windows XP click Start Settings Control Panel Printers and Other Hardwar...

Page 69: ...hotos Orientation Select how the document is arranged on the printed page You can print using portrait or landscape orientation Envelope Select the check box if you want to print an envelope The Paper Size area lists the envelope sizes available for printing Copies Customize how the printer prints several copies of a single print job Collated Normal or Print Last Page First Advanced 2 sided Printi...

Page 70: ...ncountered while using the printer It also contains links to printer maintenance tasks and customer support To access the Dell Service Center you can use either of these methods From an error message dialog box Click the For additional assistance use the Dell Service Center link From the Start Menu 1 In Windows Vista a Click Programs b Click Dell Printers c Click Dell V305 In Windows XP and Window...

Page 71: ...A Print before clicking the Continue Printing button If you select Complete A Print and click Continue Printing Process Black is used for all black printing until the black cartridge is replaced or the option is cleared from More Options located on the Advanced tab of the Printing Preferences The Reserve Tank dialog does not display again until after the low ink cartridge has been replaced The Com...

Page 72: ...s you to display manage edit print and save photos from your memory card or USB memory key to your computer To launch Memory Card Manager 1 Insert a memory card into the memory card slot or a USB key into the PictBridge port on the front of the printer ...

Page 73: ... Software If your printer does not function properly or communication error messages appear when using your printer you can remove and reinstall the printer software 1 In Windows Vista a Click Programs b Click Dell Printers c Click Dell V305 In Windows XP and WIndows 2000 Click Start Programs or All Programs Dell Printers Dell V305 2 Click Uninstall Dell V305 3 Follow the instructions on the scree...

Page 74: ...he Optional XPS Driver The XML Paper Specification XPS driver is an optional printer driver designed to make use of the advanced XPS color and graphics features that are only available for Windows Vista users In order to use XPS features you must install the XPS driver as an additional driver after you install your printer NOTE Before installing the XPS driver complete the steps on the Setting Up ...

Page 75: ...ction make sure the printer is connected to the network and then do the following a Click Add a network wireless or Bluetooth printer b Select your printer from the list c If your printer is not in the list click The printer that I want isn t listed d Select Add a printer using a TCP IP address or hostname and then click Next e To locate your printer IP address print a Network Setup Page from the ...

Page 76: ...e From the Install From Disk dialog box click OK Click Next on the following two dialog boxes Wireless Networking ...

Page 77: ...ne of the following operating systems o Windows Vista o Microsoft Windows XP o Microsoft Windows 2000 Wireless Network Settings Some wireless network settings may be needed to configure the adapter that has been installed in the printer Here are some of the settings that you may need Network Name also known as SSID Service Set ID BSS Basic Service Set Type the type of wireless network you use Ad H...

Page 78: ... a Wireless Network recommended for most users Before configuring the printer on a wireless network ensure that Your wireless network is set up and working properly The computer you are using is connected to the same wireless network where you want to set up the printer 1 If you are using your printer with a new Dell computer Connect the USB cable between the port on the back of the printer and th...

Page 79: ...facturer s documentation If you do not enable your wireless network security configuring your printer using WPS may change your wireless network settings You will then be required to reconnect your computer to your router with your new wireless network settings Using the PIN Method 1 If you are using your printer with a new Dell computer Connect the USB cable between the port on the back of the pr...

Page 80: ...rnet service provider 8 On your printer operator panel use the left or right arrow button to scroll to Setup and then press the Select button 9 Use the left or right arrow button to scroll to Network Setup and then press the Select button 10 Use the left or right arrow button to scroll to Wi Fi Protected Setup and then press the Select button 11 Use the left or right arrow button to scroll to PIN ...

Page 81: ... Setup Successful appears on the printer operator panel Check if the printer s Wi Fi LED turns blue For more information see Wi Fi LED Continue with step 14 If setup is not successful or times out perform step 8 to step 13 again 14 Close the router WPS page 15 Follow the instructions on the installation screen to complete setup Using the Push Button Method ...

Page 82: ...om the Welcome screen click Next 4 Select I Agree to the terms of this license agreement and then click Next 5 From the Select Connection Type screen select Wireless Connection and then click Next 6 Wait until the Configure Wireless screen appears 7 Using an Internet browser type in your router IP address and press Enter Navigate to the WPS Webpage NOTE You may be prompted to enter your username a...

Page 83: ...ght arrow button to scroll to Push Button and then press the Select button 12 Press the Select button to continue 13 Click Push Button on your router WPS page within two minutes If setup is successful Wi Fi Protected Setup Successful appears on the printer operator panel Check if the printer s Wi Fi LED turns blue For more information see Wi Fi LED Continue with step 14 If setup is not successful ...

Page 84: ...ess printer to a computer by USB cable and launching the Drivers and Utilities CD If you need to adjust the wireless adapter settings after installation the CD is not required Launch the Wireless Setup Utility In Windows Vista 1 Click Programs 2 Click Dell Printers 3 Click Dell V305 4 Click Dell Wireless Setup Utility 5 Follow the instructions on your screen to change wireless settings In Windows ...

Page 85: ...The Wireless Setup Utility steps you through the configuration process The wizard can automatically detect wireless network settings or allow you to manually enter the network configuration settings ...

Page 86: ...formation see Adding the Shared Printer on Other Network Computers Sharing the Printer on the Network On the host computer or network computer where the printer is directly connected by USB cable share the printer In Windows Vista 1 Click Control Panel 2 Click Hardware and Sound 3 Click Printers 4 Right click your printer icon and then select Sharing 5 Click Change sharing options 6 Click Continue...

Page 87: ...Select a shared printer by name and then type the printer share name To view the name of the computer that you want to share the printer with go to the host computer a Click Control Panel b Click System and Maintenance c Click System 8 Click Next 9 Follow instructions on the computer screen to complete the installation In Windows XP and Windows 2000 1 In Windows XP click Start Settings Control Pan...

Page 88: ...name To view the name of the computer that you want to share the printer with go to the host computer a In Windows XP click Start Settings Control Panel Performance and Maintenance System In Windows 2000 click Start Settings System b From the System Properties dialog box click the Computer Name tab 7 Click Next ...

Page 89: ...TION It is recommended that Dell ink cartridges be used for your printer Dell does not provide warranty coverage for problems caused by using accessories parts or components not supplied by Dell Replacing Ink Cartridges 1 Turn on your printer 2 Lift the scanner base unit The ink cartridge carrier moves and stops at the loading position unless the printer is busy 3 Press down on the ink cartridge l...

Page 90: ...ge NOTICE Do not touch the gold contact area on the side or the metal nozzles on the bottom of the ink cartridges 7 Insert the new ink cartridges Make sure the black or photo ink cartridge is secure in the left ink cartridge carrier and the color ink cartridge is secure in the right ink cartridge carrier NOTE For normal printing use a black cartridge and a color cartridge For photo printing replac...

Page 91: ... align the ink cartridges from the operator panel 1 Load plain paper For more information see Loading Paper into the Paper Support 2 Use the left and right Arrow buttons to scroll to MAINTENANCE and then press the Select button 3 Use the left and right Arrow buttons to scroll to Align Cartridges and then press the Select button An alignment page prints The ink cartridges align when the page prints...

Page 92: ...ent page when the alignment is complete Cleaning the Ink Cartridge Nozzles You may need to clean the nozzles when White lines appear in graphics or solid black areas Print appears smudged or too dark Colors fade do not print or do not print correctly Vertical lines appear jagged or edges appear rough To clean the nozzles from the operator panel 1 Load plain paper For more information see Loading P...

Page 93: ...ck Clean Again 8 Print your document again to verify the improved print quality If you are still not satisfied with the print quality wipe the nozzles with a clean dry cloth and then print your document again Cleaning the Exterior of the Printer 1 Make sure that the printer is turned off and unplugged from the wall outlet CAUTION To avoid the risk of electric shock unplug the power cord from the w...

Page 94: ...row buttons to scroll to SETUP and then press the Select button 4 Use the left and right Arrow buttons to scroll to Defaults and then press the Select button 5 Use the left and right Arrow buttons to scroll to Set Defaults and then press the Select button 6 Use the left and right Arrow buttons to scroll to Use Current and then press the Select button The current settings on the operator panel are ...

Page 95: ...5 Use the left and right Arrow buttons to scroll to Use Factory and then press the Select button 6 Select the correct language and country ...

Page 96: ... the USB cable Ensure that the USB cable is firmly connected to your printer and your computer Shut down the computer reconnect the USB cable as shown on the Setting Up Your Printer poster and then restart the computer If the software installation screen does not appear automatically install the software manually 1 Insert the Drivers and Utilities CD 2 In Windows Vista click Computer In Windows XP...

Page 97: ...he printer Unplug the printer power cable from the electrical outlet Reconnect the printer power cable into the electrical outlet and turn on the printer Restart your computer If the problem still exists replace the USB cable Set your printer as the default printer 1 In Windows Vista a Click Control Panel b Click Hardware and Sound c Click Printers In Windows XP click Start Control Panel Printers ...

Page 98: ...our Printers folder ensure you always plug the USB cable back into the same USB port that was originally used for the printer Also do not install printer drivers multiple times from the Drivers and Utilities CD Printer Problems Ensure the printer power cable is firmly connected to the printer and the electrical outlet Determine if the printer has been held or paused 1 In Windows Vista a Click Cont...

Page 99: ...Save to Computer option when the printer is not connected to a computer or the computer is not turned on Ensure that your printer is connected to your computer This function is not supported using this network connection Attempting to print Office files from a memory card or USB key when the printer is connected to a network adapter and not directly attached to the computer Connect the printer dir...

Page 100: ... or photo cartridge in the left cartridge carrier and a color cartridge in the right carrier For more information see Replacing Ink Cartridges Black Ink Low Order Ink WWW DELL COM SUPPLIES Press to continue Color Ink Low Order Ink WWW DELL COM SUPPLIES Press to continue Photo Ink Low Order Ink WWW DELL COM SUPPLIES Press to continue Black and Color Ink Low Order Ink WWW DELL COM SUPPLIES Press to ...

Page 101: ...functioning button is pressed while the printer is in PictBridge mode Remove the PictBridge connection to be able to use the printer for other functions Load PLAIN 8 5x11 and press Or Load PLAIN A4 paper and press A paper type other than plain paper is loaded into the paper support when attempting to print an alignment page a cleaning page or a network setup page Load plain paper and then press th...

Page 102: ...of sheet has been deleted or removed from the memory card Reprint the proof sheet select your options and scan it again Error NNNN If the display shows Error followed by a four digit number an advanced error has occurred Contact Customer Support For more information go to http support dell com support Clearing Paper Jams Paper jam in the paper path 1 Pull the paper firmly to remove it If you canno...

Page 103: ...nto the Paper Support Make sure that the media is properly loaded in the input tray Do not overload the input tray Do not remove media from the input tray while printing Flex fan and straighten the paper before loading Do not use creased damp or curled paper Orient the media according to the instructions for the printer Paper Problems Make sure you loaded the paper correctly For more information s...

Page 104: ...each sheet as it exits and allow it to dry Photo glossy paper Transparencies Labels Envelopes Iron on transfers Free up memory resources on your computer when print speed is slow Close all applications not in use Try minimizing the number and size of graphics and images in your document Consider purchasing more Random Access Memory RAM for your computer Remove fonts that you rarely use from your s...

Page 105: ...ndows XP or Windows 2000 Click Start Programs or All Programs Dell Printers Dell V305 2 Select Dell Imaging Toolbox The Dell Imaging Toolbox dialog box opens 3 From the Home screen click My Photo Album 4 Click File Open to select the image that you want to edit 5 With an image open click the Advanced tab 6 Click Image Patterns The Image Patterns dialog box opens 7 Select Remove image patterns from...

Page 106: ...marks background noise on color documents 8 Move the slider from left to right to adjust the quantity of background noise on your scanned document 9 Click OK Make sure the document or photo is loaded correctly on the scanner glass For more information see Loading Original Documents on the Scanner Glass Check paper sizes Make sure the paper size being used matches the size you selected on the opera...

Page 107: ...between the printer and the computer Remove and then reconnect the USB cable from your printer and your computer Turn off the printer Unplug the printer power cable from the electrical outlet Reconnect the printer power cable into the electrical outlet and turn on the printer Restart your computer Change the scan resolution to a lower value if scanning takes too long or freezes the computer 1 In W...

Page 108: ...00 Click Start Programs or All Programs Dell Printers Dell V305 2 Select Dell Imaging Toolbox The Dell Imaging Toolbox dialog box opens 3 From the Home screen click Scan The What are you scanning dialog box opens 4 Click Custom Settings 5 From the Scan Resolution drop down menu select a higher scan resolution 6 To make this setting the default for all scan jobs select Always use these settings whe...

Page 109: ... From the What patterns need to be removed drop down menu select a pattern depending on your scanned item 9 Click OK Reduce background noise on scanned documents 1 In Windows Vista a Click Programs b Click Dell Printers c Click Dell V305 In Windows XP or Windows 2000 Click Start Programs or All Programs Dell Printers Dell V305 2 Select Dell Imaging Toolbox The Dell Imaging Toolbox dialog box opens...

Page 110: ... power Ensure that the printer power light is on Check cable Ensure that the power cable is connected to the printer and to the electrical outlet Ensure that the USB cable is not connected Check your network connection Ensure that the printer is connected to a working network connection Ensure that the computer is connected to a working network connection before sending a print job Reboot the comp...

Page 111: ...ee Printing Photos From a PictBridge Enabled Camera Improving Print Quality If you are not satisfied with the print quality of your documents there are several different ways to improve the print quality Use the appropriate paper For example use Dell Premium Photo Paper if you are printing photos with a photo ink cartridge Select a higher print quality To select a higher print quality 1 With your ...

Page 112: ...e paper in its packaging until you are ready to use it Place cartons on pallets or shelves not on the floor Do not place heavy objects on top of the media whether or not it is packaged Keep paper away from moisture or other conditions that can cause it to wrinkle or curl Store unused paper at temperatures ranging between 15 C and 30 C 59 F and 86 F The relative humidity should be between 10 and 70...

Page 113: ...s Temperature Relative Humidity Condition Temperature Relative humidity non condensing Operation 60 to 90 F 40 to 80 Storage 34 to 140 F 5 to 80 Shipping 40 to 140 F 5 to 100 Power Consumption and Requirements Rated AC input 100 to 240 V Rated frequency 50 Hz 60 Hz Minimum AC input 90 VAC Maximum AC input 255 VAC Maximum input current 0 6 A Average power consumption Standby mode Operational mode 1...

Page 114: ...o and mono scan 300 x 300 dpi color scan 4800 x 1200 dpi 1200 x 1200 dpi Operating System Support The printer supports Windows Vista Microsoft Windows XP Professional x64 Microsoft Windows XP Microsoft Windows 2000 Memory Specifications and Requirements Your operating system must meet the minimum system requirements Operating System Processor speed MHz RAM MB Hard disk MB Windows Vista AMD Athlon ...

Page 115: ... Envelopes 114 x 162 mm DL Envelopes 110 x 220 mm Chokei 3 Envelopes 120 x 235 mm Chokei 4 Envelopes 90 x 205 mm Chokei 40 Envelopes 90 x 225 mm Kakugata 3 Envelopes 216 x 277 mm Kakugata 4 Envelopes 197 x 267 mm Kakugata 5 Envelopes 190 x 240 mm Kakugata 6 Envelopes 162 x 229 mm 10 envelopes Greeting cards index cards postcards or photo cards Photo Post card 4 x 6 inches Index card 3 x 5 inches 2...

Page 116: ...Cables Your printer uses a Universal Serial Bus USB cable sold separately ...

Page 117: ...d peripherals Support for third party software and peripherals is provided by the original manufacturer including those purchased and or installed through Software Peripherals DellWare ReadyWare and Custom Factory Integration CFI DellPlus Contacting Dell You can access Dell Support at support dell com Select your region on the WELCOME TO DELL SUPPORT page and fill in the requested details to acces...

Page 118: ...standards IEEE 802 11b 1999 Standard on 2 4 GHz Wireless LAN IEEE 802 11g Standard on 2 4 GHz Wireless LAN Wireless Fidelity Wi Fi certification as defined by the WECA Wireless Ethernet Compatibility Alliance Warranty and Return Policy The Dell Wireless Printer Adapter like other radio devices emits radio frequency electromagnetic energy The level of energy emitted by this device however is less t...

Page 119: ...n or attachment of connecting cables and equipment other than that specified by Dell Inc The correction of interference caused by such unauthorized modification substitution or attachment is the responsibility of the user Dell Inc and its authorized resellers or distributors are not liable for any damage or violation of government regulations that may arise from the user failing to comply with the...

Page 120: ...f other electronics Consult the dealer or an experienced radio technician for help NOTE This Dell Wireless Printer Adapter must be installed and used in strict accordance with the manufacturer s instructions as described in the user documentation that comes with the product Any other installation or use will violate FCC Part 15 regulations Modifications not expressly approved by Dell could void yo...

Page 121: ... in source and binary forms with or without modification are permitted provided that the following conditions are met 1 Redistributions of source code must retain the above copyright notice this list of conditions and the following disclaimer 2 Redistributions in binary form must reproduce the above copyright notice this list of conditions and the following disclaimer in the documentation and or o...

Page 122: ... to deny you these rights or to ask you to surrender the rights These restrictions translate to certain responsibilities for you if you distribute copies of the software or if you modify it For example if you distribute copies of such a program whether gratis or for a fee you must give the recipients all the rights that you have You must make sure that they too receive or can get the source code A...

Page 123: ...files to carry prominent notices stating that you changed the files and the date of any change b You must cause any work that you distribute or publish that in whole or in part contains or is derived from the Program or any part thereof to be licensed as a whole at no charge to all third parties under the terms of this License c If the modified program normally reads commands interactively when ru...

Page 124: ... place counts as distribution of the source code even though third parties are not compelled to copy the source along with the object code 4 You may not copy modify sublicense or distribute the Program except as expressly provided under this License Any attempt otherwise to copy modify sublicense or distribute the Program is void and will automatically terminate your rights under this License Howe...

Page 125: ...ss new problems or concerns Each version is given a distinguishing version number If the Program specifies a version number of this License which applies to it and any later version you have the option of following the terms and conditions either of that version or of any later version published by the Free Software Foundation If the Program does not specify a version number of this License you ma...

Page 126: ...Free Software Foundation Inc 59 Temple Place Suite 330 Boston MA 02111 1307 USA Everyone is permitted to copy and distribute verbatim copies of this license document but changing it is not allowed This is the first released version of the Lesser GPL It also counts as the successor of the GNU Library Public License version 2 hence the version number 2 1 Preamble The licenses for most software are d...

Page 127: ... Most GNU software including some libraries is covered by the ordinary GNU General Public License This license the GNU Lesser General Public License applies to certain designated libraries and is quite different from the ordinary General Public License We use this license for certain libraries in order to permit linking those libraries into non free programs When a program is linked with a library...

Page 128: ...imitation in the term modification Source code for a work means the preferred form of the work for making modifications to it For a library complete source code means all the source code for all modules it contains plus any associated interface definition files plus the scripts used to control compilation and installation of the library Activities other than copying distribution and modification a...

Page 129: ... based on the Library with the Library or with a work based on the Library on a volume of a storage or distribution medium does not bring the other work under the scope of this License 3 You may opt to apply the terms of the ordinary GNU General Public License instead of this License to a given copy of the Library To do this you must alter all the notices that refer to this License so that they re...

Page 130: ...st supply a copy of this License If the work during execution displays copyright notices you must include the copyright notice for the Library among them as well as a reference directing the user to the copy of this License Also you must do one of these things a Accompany the work with the complete corresponding machine readable source code for the Library including whatever changes were used in t...

Page 131: ...the Library or any work based on the Library you indicate your acceptance of this License to do so and all its terms and conditions for copying distributing or modifying the Library or works based on it 10 Each time you redistribute the Library or any work based on the Library the recipient automatically receives a license from the original licensor to copy distribute link with or modify the Libra...

Page 132: ...ting the sharing and reuse of software generally NO WARRANTY 15 BECAUSE THE LIBRARY IS LICENSED FREE OF CHARGE THERE IS NO WARRANTY FOR THE LIBRARY TO THE EXTENT PERMITTED BY APPLICABLE LAW EXCEPT WHEN OTHERWISE STATED IN WRITING THE COPYRIGHT HOLDERS AND OR OTHER PARTIES PROVIDE THE LIBRARY AS IS WITHOUT WARRANTY OF ANY KIND EITHER EXPRESSED OR IMPLIED INCLUDING BUT NOT LIMITED TO THE IMPLIED WAR...

Page 133: ...1 April 1990 Lexmark International Inc That s all there is to it ...

Reviews: