Dell SP190SFP User Manual Download Page 10

Great user manuals database on 

UserManuals.info

where people could trip over it.  

l

Be sure to grasp the plug, not the cable, when disconnecting the monitor from an electric socket.  

l

Openings in the monitor cabinet are provided for ventilation. To prevent overheating, these openings should not be blocked or covered. Avoid using the 
monitor on a bed, sofa, rug, or other soft surface, as doing so may block the ventilation openings in the bottom of the cabinet. If you place the monitor 
in a bookcase or an enclosed space, be sure to provide adequate ventilation and air flow.  

l

Place your monitor in a location with low humidity and minimum dust. Avoid places similar to a damp basement or dusty hallway.  

l

Do not expose the monitor to rain or use it near water (in kitchens, next to swimming pools, etc.). If the monitor accidentally gets wet, unplug it and 
contact an authorized dealer immediately. You can clean the monitor with a damp cloth when necessary, being sure to unplug the monitor first.  

l

Place the monitor on a solid surface and treat it carefully. The screen is made of glass and can be damaged if dropped or hit sharply.  

l

Locate your monitor near an easily accessible electric outlet.  

l

If your monitor does not operate normally - in particular, if there are any unusual sounds or smells coming from it - unplug it immediately and contact an 
authorized dealer or service center.  

l

Do not attempt to remove the back cover, as you will be exposed to an electrical shock hazard. The back cover should only be removed by qualified 
service personnel.  

l

High temperatures can cause problems. Don't use your monitor in direct sunlight, and keep it away from heaters, stoves, fireplaces, and other sources 
of heat.  

l

Unplug the monitor when it is going to be left unused for an extended period of time.  

l

Unplug your monitor from the electric outlet before any service is performed.  

l

Hg Lamp(s) inside this product contains mercury and must be recycled or disposed of according to local, state or federal laws. For more information, Go 
Or contact the electronic industries alliance: 

http://www.eiae.org/

 for more information.  

Contacting Dell 

You can contact Dell through the Internet and by phone:  

l

For support through the web, go to support.dell.com.  

l

For worldwide support through the web, use the Choose A Country/Region menu near the bottom of the page, or see the web addresses listed in the 
following table.  

l

support.dell.com (support)  

For specific web addresses for your country, find the appropriate country section in the table below.  


NOTE:

 Toll-free numbers are for use within the country for which they are listed.


NOTE:

 In certain countries, support specific to Dell XPS™ portable computers is available at a separate telephone number listed for participating countries. If 

you do not see a telephone number listed that is specific for XPS portable computers, you may contact Dell through the support number listed and your call will be 
routed appropriately.  

l

For support by phone, use the phone numbers and codes provided in the following table. If you need assistance in determining which codes to use, 
contact a local or an international operator.  


NOTE:

The contact information provided was deemed correct at the time that this document went to print and issubject to change. 
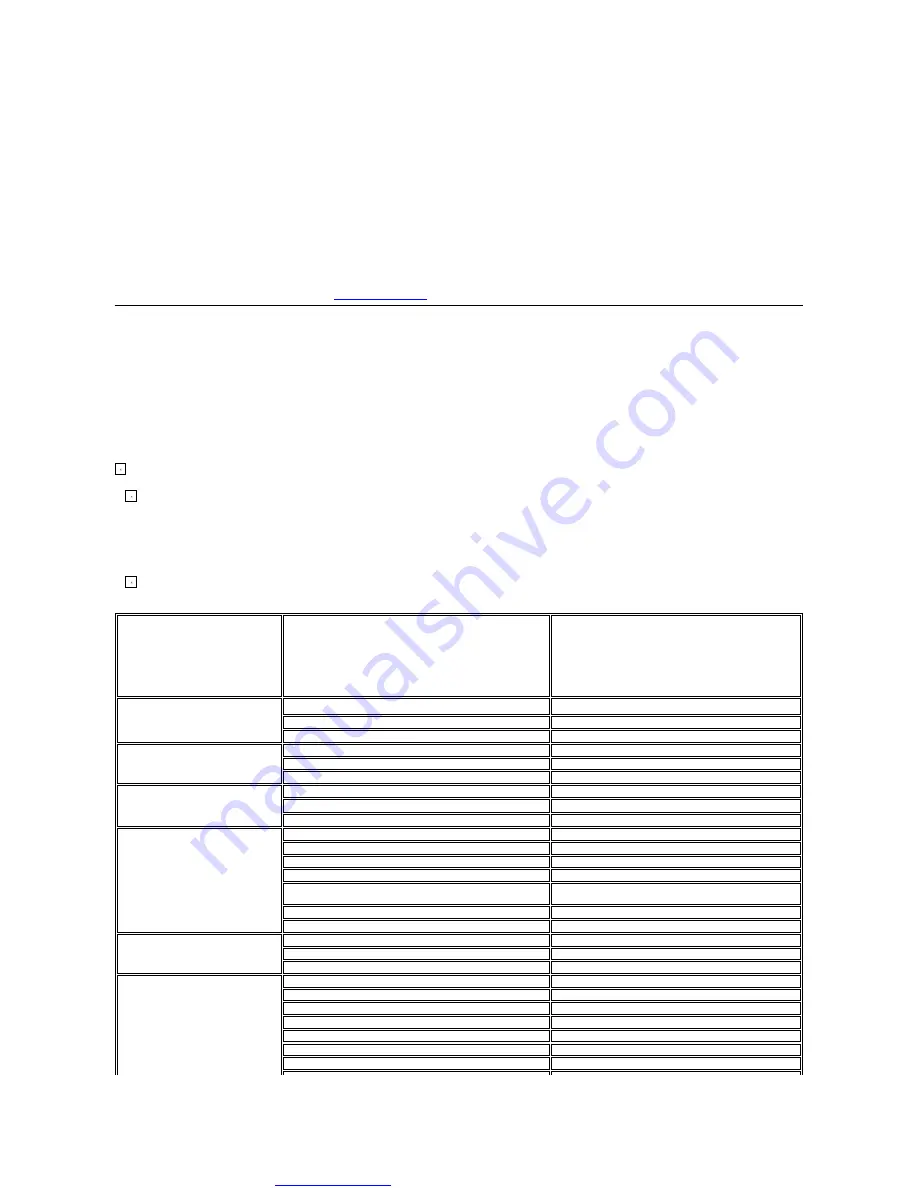


Country (City) 

International Access Code  

Country Code 
City Code 


 Service Type 


Area Codes, 

Local Numbers, and 

Toll-Free Numbers 

Website and E-Mail Address 


Anguilla


Online Support  


www.dell.com/ai


E-mail Address


[email protected]


Technical Support, Customer Service, Sales


toll-free: 800-335-0031 


Antigua and Barbuda


Online Support 


www.dell.com.ag 


[email protected] 


Technical Support, Customer Service, Sales 


1-800-805-5924 


Aomen


Country Code: 853 


Technical Support 


toll-free: 0800-105 


Customer Service (Xiamen, China) 


34 160 910 


Transaction Sales (Xiamen, China) 


29 693 115 


Argentina (Buenos Aires)


International Access Code: 00


Country Code: 54


City Code: 11


Online Support 


www.dell.com.ar


E-mail for Desktops and Portables 

  la

[email protected]


E-mail for Servers and EMC

® 

Storage Products

  [email protected]


Customer Service 

  toll

-free: 0-800-444-0730 


Technical Support 


Dell PowerApp™, Dell PowerEdge™, Dell 

PowerConnect™, and Dell PowerVault™ 


toll-free: 0-800-222-0154


Technical Support Services


toll-free: 0-800-444-0724 


Sales 


0-810-444-3355 


Aruba


Online Support 


www.dell.com.aw 


[email protected] 


Technical Support, Customer Service, Sales 


toll-free: 800-1578 


Australia (Sydney)


International Access Code: 0011


Country Code: 61


City Code: 2


Online Support 

  support.ap.dell.com 


  support.ap.dell.com/contactus 


Technical Support 


Technical Support for XPS computers only 


toll-free: 1300 790 877 


Home and Home Office 


toll-free: 1300-655-533 


Medium and Large Business 


toll-free: 1800-633-559 


Small Business, Education, Local Government 


toll-free: 1800-060-889 

Summary of Contents for SP190SFP

Page 1: ...names may be used in this document to refer to either the entities claiming the marks and names or their products Dell Inc disclaims any proprietary interest in trademarks and trade names other than its own Model SP1908FP July 2007 Rev A01 About Your Monitor Front View Back View Side View Bottom View Monitor Specifications Cleaning Your Monitor Using Your Adjustable Monitor Stand Attaching the Sta...

Page 2: ...SP1908FP Flat Panel Monitor User s Guide Front View Back View Bottom View Side View Monitor Specifications Cleaning Your Monitor Front View Back View 1 Video input select 2 OSD menu select button 3 Brightness Contrast Down button 4 Auto Adjust Up button 5 Power button with power light indicator ...

Page 3: ...ch the optional Dell Soundbar 5 Regulatory rating label List the regulatory approvals 6 Stand removal button Press to release the stand 7 Cable management hole Help organize cables by placing them through the hole 1 Power connector Insert the power cable 2 Dell Soundbar power connector Connect the power cord for the Soundbar optional 3 DVI connector Connect your computer DVI cable 4 VGA connector ...

Page 4: ...umption Normal operation with Dell Soundbar and USB active Active Active Active Green 75 W maximum Normal operation Active Active Active Green 35 W typical Active off mode Inactive Inactive Blanked Amber Less than 2 W Switch off Off Less than 1 W NOTE The OSD only functions in the normal operation mode One of the following messages appears when the menu or plus buttons are pressed when in Active o...

Page 5: ... Pin Signal Assignment 1 T M D S Data 2 9 T M D S Data 1 17 T M D S Data 0 2 T M D S Data 2 10 T M D S Data 1 18 T M D S Data 0 3 T M D S Data 2 Shield 11 T M D S Data 1 Shield 19 T M D S Data 0 Shield 4 No Connect 12 No Connect 20 No Connect 5 No Connect 13 No Connect 21 No Connect 6 DDC Clock 14 5V Power 22 T M D S Clock Shield 7 DDC Data 15 Self Test 23 T M D S Clock 8 No Connect 16 Hot Plug De...

Page 6: ...rizontal Frequency kHz Vertical Frequency Hz Pixel Clock MHz Sync Polarity Horizontal Vertical VESA 720 x 400 31 5 70 0 28 3 VESA 640 x 480 31 5 60 0 25 2 VESA 640 x 480 37 5 75 0 31 5 VESA 800 x 600 37 9 60 3 49 5 VESA 800 x 600 46 9 75 0 49 5 VESA 1024 x 768 48 4 60 0 65 0 VESA 1024 x 768 60 0 75 0 78 8 VESA 1152 x 864 67 5 75 0 108 VESA 1280 x 1024 64 0 60 0 108 VESA 1280 x 1024 80 0 75 0 135 0...

Page 7: ...Height 16 56 inches 420 5 mm Width 16 15 inches 410 1 mm Depth 7 17 inches 182 0 mm Dimensions without stand Height 13 31 inches 338 1 mm Width 16 15 inches 410 1 mm Depth 2 59 inches 65 9 mm Stand dimensions Height 12 66 inches 321 5 mm Width 10 26 inches 260 7 mm Depth 5 74 inches 145 7 mm Weight with packaging 15 11 lbs 6 86 kg Weight with stand assembly and cables 11 9 lbs 5 4 kg Weight withou...

Page 8: ...Great user manuals database on UserManuals info Back to Contents Page ...

Page 9: ... l Company name Dell Inc Worldwide Regulatory Compliance Environmental Affairs One Dell Way Round Rock TX 78682 USA 512 338 4400 CAUTION Safety Instruction Read and follow these instructions when connecting and using your computer monitor l To help avoid damaging your computer be sure that the voltage selection switch on the power supply for the computer is set to match the alternating current AC ...

Page 10: ...n menu near the bottom of the page or see the web addresses listed in the following table l support dell com support For specific web addresses for your country find the appropriate country section in the table below NOTE Toll free numbers are for use within the country for which they are listed NOTE In certain countries support specific to Dell XPS portable computers is available at a separate te...

Page 11: ...ty Code 51 Online Support www dell com br BR TechSupport dell com Customer Service and Tech Support 0800 90 3355 Technical Support Fax 51 2104 5470 Customer Service Fax 51 2104 5480 Sales 0800 970 3390 British Virgin Islands Technical Support Customer Service Sales toll free 1 866 278 6820 Brunei Country Code 673 Technical Support Penang Malaysia 604 633 4966 Customer Service Penang Malaysia 604 6...

Page 12: ... Technical Support Customer Service Sales 0800 012 0231 Czech Republic Prague International Access Code 00 Country Code 420 Online Support support euro dell com czech_dell dell com Technical Support 22537 2727 Customer Service 22537 2707 Fax 22537 2714 Technical Fax 22537 2728 Switchboard 22537 2711 Denmark Copenhagen International Access Code 00 Country Code 45 Online Support support euro dell co...

Page 13: ...chnical Support Customer Service Sales toll free 1 866 540 3355 Guatemala Online Support www dell com gt la techsupport dell com Technical Support Customer Service Sales 1 800 999 0136 Guyana Online Support la techsupport dell com Technical Support Customer Service Sales toll free 1 877 270 4609 Hong Kong International Access Code 001 Country Code 852 Online Support support ap dell com support del...

Page 14: ...omer Service 02 577 825 55 Fax 02 575 035 30 Switchboard 02 577 821 Jamaica Online Support la techsupport dell com Technical Support Customer Service Sales dial from within Jamaica only 1 800 440 9205 Japan Kawasaki International Access Code 001 Country Code 81 City Code 44 Online Support support jp dell com Technical Support XPS computers only toll free 0120 937 786 Technical Support outside of J...

Page 15: ...e 1 800 888 213 Mexico International Access Code 00 Country Code 52 Online Support www dell com mx la techsupport dell com Technical Support 001 866 563 4425 Sales 50 81 8800 or 001 800 888 3355 Customer Service 001 877 384 8979 or 001 877 269 3383 Main 50 81 8800 or 01 800 888 3355 or 001 866 851 1754 Montserrat Online Support la techsupport dell com Technical Support Customer Service Sales toll ...

Page 16: ...ll com vc la techsupport dell com Technical Support Customer Service Sales toll free 1 866 464 4353 Singapore Singapore International Access Code 005 Country Code 65 NOTE The phone numbers in this section should be called from within Singapore or Malaysia only Online Support support ap dell com Technical Support XPS computers only toll free 1800 394 7464 Technical Support Dimension Inspiron and El...

Page 17: ... Servers and Storage toll free 0080 160 1256 Customer Service toll free 0080 160 1250 option 5 Transaction Sales toll free 0080 165 1228 Corporate Sales toll free 0080 165 1227 Thailand International Access Code 001 Country Code 66 Online Support support ap dell com Technical Support OptiPlex Latitude and Dell Precision toll free 1800 0060 07 Technical Support PowerApp PowerEdge PowerConnect and P...

Page 18: ...550 K 12 Education toll free 1 888 977 3355 Higher Education toll free 1 800 274 7799 Printers Projectors PDAs and MP3 Players toll free 1 877 459 7298 Customer Service toll free 1 800 624 9897 Automated Order Status toll free 1 800 433 9014 Small Business toll free 1 800 456 3355 Medium and Large Business toll free 1 877 671 3355 State and Local Government toll free 1 800 981 3355 Federal Governm...

Page 19: ... disconnect the power cable 2 Connect either the white DVI or the blue VGA cables to the connectors on the computer and the monitor 3 Connect the USB cable that was included with your monitor to the computer and the upstream USB connector on the monitor Once this cable is connected to the computer and the monitor you can use the USB connectors on the monitor 4 Connect any USB devices 5 Connect the...

Page 20: ... sense a video signal Using the input select button select the desired input to be tested either Analog Input or Digital Input Disconnect the video cable from the video card and the Dell Self test Feature Check dialogue box will appear if the display is operating correctly or or OSD menu select The Menu button is used to open and exit the on screen display OSD and exit from menus and sub menus See...

Page 21: ...he monitor on and off The green light indicates the monitor is on and fully functional An amber light indicates power save mode NOTE If you change the settings and then either proceed to another menu or exit the OSD menu the monitor automatically saves those changes The changes are also saved if you change the settings and then wait for the OSD menu to disappear Main Menu for Auto Detect Analog VG...

Page 22: ...d Image Settings are only available when you are using the analog VGA connector Icon Menu and Submenus Description Exit Select to exit the Main menu Brightness Contrast Brightness adjusts the luminance of the backlight Adjust Brightness first then adjust Contrast only if further adjustment is necessary Push the button to increase luminance and push the button to decrease luminance min 0 max 100 Co...

Page 23: ... monitor to your preference Select Image Settings in the main OSD menu to access these settings Use the and buttons to make adjustments Minimum 0 Maximum 100 If satisfactory results are not obtained using the Phase adjustment use Pixel Clock Coarse and then use Phase fine again NOTE This function may change the width of the display image Use the Horizontal function of the Position menu to center t...

Page 24: ...ns active after the last time you pressed a button Use the and buttons to adjust the slider in 5 second increments from 5 to 60 seconds OSD Lock Controls user access to adjustments When Yes is selected no user adjustments are allowed All buttons are locked except the menu button NOTE When the OSD is locked pressing the menu button takes the user directly to the OSD settings menu with OSD Lock sele...

Page 25: ...e monitor select LCD Conditioning to help eliminate any image retention Using the LCD Conditioning feature may take several hours Severe cases of image retention are known as burn in the LCD Conditioning feature does not remove burn in Below warning message appears when you select Enable LCD Conditioning DDC CI Enable the DDC CI control function DDC CI Display Data Channel Command Interface allows...

Page 26: ...1280 x 1024 4 Click OK If you do not see 1280 x 1024 as an option you may need to update your graphics driver Depending on your computer complete one of the following procedures If you have a Dell desktop or portable computer Go to support dell com enter your service tag and download the latest driver for your graphics card If you are using a non Dell computer portable or desktop Go to the support...

Page 27: ... 1 Power volume control 2 Power indicator 3 Headphone connectors 1 Working from the rear of the monitor attach the Soundbar aligning the two slots with the two tabs along the bottom rear of the monitor 2 Slide the Soundbar to the left until it snaps into place 3 Plug in the power cord from the Soundbar into the connector on the back of the monitor 4 Insert the lime green mini stereo plug from the ...

Page 28: ... and reconnect the video cable then turn on both your computer and the monitor If your monitor screen remains blank after you use the previous procedure check your video controller and computer system your monitor is functioning properly OSD Warning Messages One of the following warning messages may appear on the screen indicating that the monitor is out of synchronization CAUTION Before you begin...

Page 29: ...r on off l These are pixels that are permanently off and this is a natural defect that occurs in LCD technology Brightness Problems Picture too dim or too bright l Perform monitor reset l Push Auto Adjust button l Adjust brightness contrast controls Geometric Distortion Screen not centered correctly l Perform monitor reset on Position Settings Only l Push Auto Adjust button l Adjust the centering ...

Page 30: ...rols to their maximum l Play some audio content on the computer i e audio CD or MP3 l Turn the Power Volume knob on the Soundbar clockwise to a higher volume setting l Clean and reseat the audio line in plug l Test the Soundbar using another audio source i e portable CD player Distorted Sound Computer s sound card is used as the audio source l Clear any obstructions between the Soundbar and the us...

Page 31: ...Great user manuals database on UserManuals info Back to Contents Page ...

Page 32: ...onitor to the two tabs on the stand 2 Lower the monitor until it locks in to place on the stand Organizing Your Cables After attaching all necessary cables to your monitor and computer See Connecting Your Monitor for cable attachment use the cable hole to neatly organize all cables as shown above Using the Tilt With the built in pedestal you can tilt the monitor for the most comfortable viewing an...

Page 33: ...on 2 Lift the stand up and away from the monitor Back to Contents Page NOTE Stand is detached when the monitor is shipped from the factory NOTE After placing the monitor panel on a soft cloth or cushion complete the following step to remove the stand ...

Reviews: