background image

5.

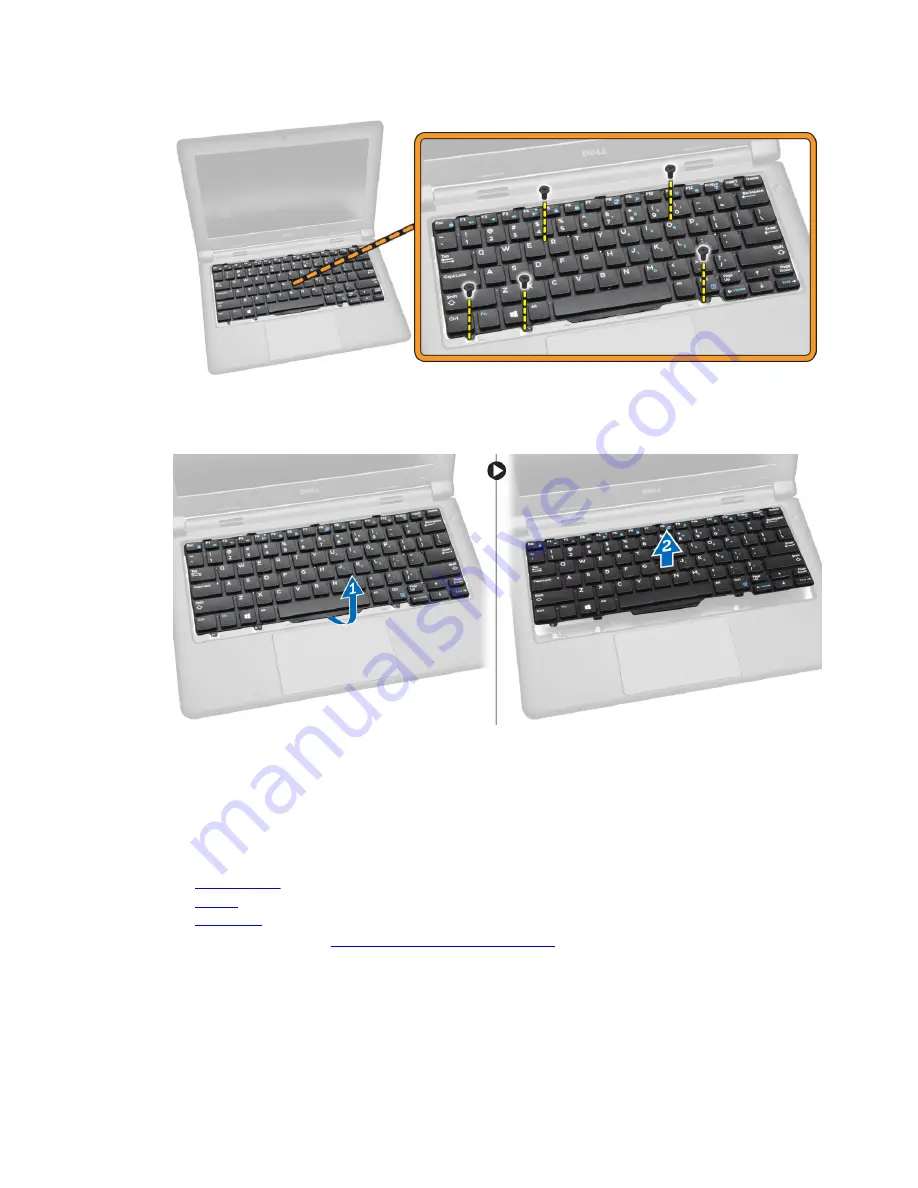
Perform the following steps:
a. Pry the keyboard to release it from the computer [1].
b. Remove the keyboard from the computer [2].

Installing the Keyboard

1.

Place the keyboard to align with the screw holders on the computer.

2.

Flip the computer and connect the keyboard cable to its connector on the system board.

3.

Tighten the screws to secure the keyboard to the computer.

4.

Install the:
a.

keyboard trim

b.

battery

c.

base cover

5.

Follow the procedures in 

After Working Inside Your Computer

.

25

Summary of Contents for Latitude 3150

Page 1: ...Dell Latitude 3150 Owner s Manual Regulatory Model P21T Regulatory Type P21T001 ...

Page 2: ...problem WARNING A WARNING indicates a potential for property damage personal injury or death Copyright 2015 Dell Inc All rights reserved This product is protected by U S and international copyright and intellectual property laws Dell and the Dell logo are trademarks of Dell Inc in the United States and or other jurisdictions All other marks and names mentioned herein may be trademarks of their res...

Page 3: ... Installing the Display Bezel 14 Removing the Display Panel 15 Installing the Display Panel 16 Removing the Camera 16 Installing the Camera 17 Removing the Power Connector Port 17 Installing the Power Connector Port 18 Removing the Hard Drive Assembly 18 Installing the Hard Drive Assembly 20 Removing the LED Board 21 Installing the LED Board 21 Removing the Memory 21 Installing the Memory 22 Remov...

Page 4: ...gation Keys 31 System Setup Options 32 Updating the BIOS 40 System and Setup Password 40 Assigning a System Password and Setup Password 41 Deleting or Changing an Existing System and or Setup Password 41 4 Technical Specifications 42 5 Diagnostics 47 Enhanced Pre Boot System Assessment ePSA Diagnostics 47 Device Status Lights 48 Battery Status Lights 49 6 Contacting Dell 50 4 ...

Page 5: ...ge due to servicing that is not authorized by Dell is not covered by your warranty Read and follow the safety instructions that came with the product CAUTION To avoid electrostatic discharge ground yourself by using a wrist grounding strap or by periodically touching an unpainted metal surface such as a connector on the back of the computer CAUTION Handle components and cards with care Do not touc...

Page 6: ...r computer from the electrical outlet before opening the display CAUTION Before touching anything inside your computer ground yourself by touching an unpainted metal surface such as the metal at the back of the computer While you work periodically touch an unpainted metal surface to dissipate static electricity which could harm internal components 12 Remove any installed ExpressCards or Smart Card...

Page 7: ...e any replacement procedure ensure you connect any external devices cards and cables before turning on your computer CAUTION To avoid damage to the computer use only the battery designed for this particular Dell computer Do not use batteries designed for other Dell computers 1 Connect any external devices such as a port replicator or media base and replace any cards such as an ExpressCard 2 Connec...

Page 8: ... Phillips screwdriver 1 Phillips screwdriver Small plastic scribe Removing the Base Cover 1 Follow the procedures in Before Working Inside Your Computer 2 Perform the following steps to remove the base cover from the computer a Remove the screws that secure the base cover to the computer b Pry the base cover to release it from the computer NOTE You may need a sharp tool to pry the base cover aroun...

Page 9: ...ter Removing the Battery 1 Follow the procedures in Before Working Inside Your Computer 2 Remove the base cover 3 To release the battery from the computer a Peel the adhesive tape that secures the battery cable 1 b Disconnect the battery cable from its connector on the system board 2 4 Perform the following steps a Remove the screws that secure the battery to the computer 1 b Remove the battery fr...

Page 10: ...e computer 5 Install the base cover 6 Follow the procedures in After Working Inside Your Computer Removing the Audio Board 1 Follow the procedures in Before Working Inside Your Computer 2 Remove the a base cover b battery 3 Perform the following steps a Disconnect the audio board cable from its connector on the system board 1 b Remove the screw that secures the audio board to the computer 2 c Remo...

Page 11: ...Working Inside Your Computer Removing the Display Assembly 1 Follow the procedures in Before Working Inside Your Computer 2 Remove the a base cover b battery 3 To release the display assembly from the computer a Disconnect the network cable from its connector on the system board 1 b Remove the screws that secure the metal bracket to the system board 2 c Remove the metal bracket to access the displ...

Page 12: ...4 Remove the screws that secure the display hinges to the computer 1 and open the display 2 5 Pull the keyboard base assembly away from the display assembly to separate them 12 ...

Page 13: ...splay cable and tighten the screws to secure the metal bracket 6 Connect the network cable to its connector on the system board 7 Install the a battery b base cover 8 Follow the procedures in After Working Inside Your Computer Removing the Display Bezel 1 Follow the procedures in Before Working Inside Your Computer 2 Remove the a base cover b battery c display assembly 3 Perform the following step...

Page 14: ...he display bezel on the display assembly 2 Starting from the top corner press on the display bezel and work around the entire bezel until it snaps on to the display assembly 3 Tighten the screws to secure the display bezel to the display assembly 4 Fix the plastic adhesive to secure the display bezel screws 5 Install the a display assembly 14 ...

Page 15: ...e Working Inside Your Computer 2 Remove the a base cover b battery c display assembly d display bezel 3 To release the display panel from the display assembly a Remove the screws that secure the display panel to the display assembly 1 b Lift and flip the display panel to access the eDP cable 2 4 Peel the adhesive 1 to access the eDP cable 2 15 ...

Page 16: ... the display panel to the display assembly 4 Install the a display bezel b display assembly c battery d base cover 5 Follow the procedures in After Working Inside Your Computer Removing the Camera 1 Follow the procedures in Before Working Inside Your Computer 2 Remove the a base cover b battery c display assembly d display bezel 3 To remove the camera from the display assembly a Disconnect the cam...

Page 17: ...ttery d base cover 4 Follow the procedures in After Working Inside Your Computer Removing the Power Connector Port 1 Follow the procedures in Before Working Inside Your Computer 2 Remove the a base cover b battery c display assembly 3 Perform the following steps a Disconnect the power connector port cable from its connector on the system board 1 b Remove the power connector port from the computer ...

Page 18: ...ssembly b battery c base cover 4 Follow the procedures in After Working Inside Your Computer Removing the Hard Drive Assembly 1 Follow the procedures in Before Working Inside Your Computer 2 Remove the a base cover b battery 3 Perform the following steps a Disconnect the hard drive cable from its connector on the system board 1 b Remove the screws that secure the hard drive assembly to the compute...

Page 19: ...4 Remove the hard drive assembly from the computer 5 Pull to release the hard drive cable from its connector on the hard drive assembly 19 ...

Page 20: ...thin the hard drive assembly align the screw holders and tighten the screws to secure the hard drive bracket 2 Connect the hard drive cable to its connector on the hard drive 3 Place the hard drive assembly into its slot on the computer 4 Connect the hard drive cable to its connector on the system board 5 Tighten the screws to secure the hard drive assembly to the computer 6 Install the 20 ...

Page 21: ...move the screw that secures the LED board to the computer 3 c Remove the LED board from the computer 4 Installing the LED Board 1 Insert the LED board into its place on the computer 2 Tighten the screw to secure the LED board to the computer 3 Connect the LED board cable to its connector on the system board 4 Install the a hard drive assembly b battery c base cover 5 Follow the procedures in After...

Page 22: ...es in After Working Inside Your Computer Removing the Coin Cell Battery 1 Follow the procedures in Before Working Inside Your Computer 2 Remove the a base cover b battery 3 Perform the following steps a Disconnect the coin cell battery cable from its connector on the system board 1 b Peel the adhesive tape to release the coin cell battery cable 2 c Release the coin cell battery cable from its rout...

Page 23: ...e 4 Connect the coin cell battery cable to its connector on the system board 5 Install the a battery b base cover 6 Follow the procedures in After Working Inside Your Computer Removing the Keyboard Trim 1 Follow the steps in Before Working Inside Your Computer 2 Pry the keyboard trim from its edges NOTE You may need a sharp tool to pry the keyboard trim from its edges 3 Remove the keyboard trim fr...

Page 24: ...the Keyboard 1 Follow the procedures in Before Working Inside Your Computer 2 Remove the a battery b base cover c keyboard trim NOTE After removing the keyboard trim flip the computer to access the keyboard cable 3 Disconnect the keyboard cable from its connector on the system board 1 2 4 Flip the computer and remove the screws that secure the keyboard to the computer 24 ...

Page 25: ...eyboard 1 Place the keyboard to align with the screw holders on the computer 2 Flip the computer and connect the keyboard cable to its connector on the system board 3 Tighten the screws to secure the keyboard to the computer 4 Install the a keyboard trim b battery c base cover 5 Follow the procedures in After Working Inside Your Computer 25 ...

Page 26: ...onnector on the system board 2 Connect the WLAN cables to their connectors on the WLAN card 3 Insert the metal bracket to secure the WLAN cables 4 Tighten the screw to secure the WLAN card to the system board 5 Install the a battery b base cover 6 Follow the procedures in After Working Inside Your Computer Removing the Heatsink 1 Follow the procedures in Before Working Inside Your Computer 2 Remov...

Page 27: ... 4 Installing the Heatsink 1 Insert the heatsink into its place on the system board 2 Place the metal bracket and tighten the screws to secure the metal bracket to the system board 3 Tighten the screws to secure the heatsink to the system board 4 Install the a battery b base cover 5 Follow the procedures in After Working Inside Your Computer 27 ...

Page 28: ...wing cables from the system board 1 2 a keyboard b touchpad c LED board d network and speaker 3 e hard drive assembly 4 f coin cell battery and power connector port 5 g display 6 4 Perform the following steps to remove the system board from the computer a Remove the screws that secure the system board to the computer 1 b Remove the system board from the computer 2 28 ...

Page 29: ...d drive assembly d network and speaker e LED board f touchpad g keyboard 4 Install the a heatsink b memory c battery d base cover 5 Follow the procedures in After Working Inside Your Computer Removing the Speaker 1 Follow the procedures in Before Working Inside Your Computer 2 Remove the a base cover b battery c memory d heatsink e system board 3 Perform the following steps a Remove the screws tha...

Page 30: ...e speaker into its place on the computer 2 Tighten the screws to secure the speaker to the computer 3 Install the a system board b heatsink c memory d battery e base cover 4 Follow the procedures in After Working Inside Your Computer 30 ...

Page 31: ...on Self Test POST when the Dell logo appears you can Access System Setup by pressing F2 key Bring up the one time boot menu by pressing F12 key The one time boot menu displays the devices that you can boot from including the diagnostic option The boot menu options are Removable Drive if available STXXXX Drive NOTE XXX denotes the SATA drive number Optical Drive Diagnostics NOTE Choosing Diagnostic...

Page 32: ...he system F1 Displays the System Setup help file System Setup Options NOTE Depending on your computer and its installed devices the items listed in this section may or may not appear Table 2 General Option Description System Information This section lists the primary hardware features of your computer System Information Memory Information Processor Information Device Information Battery Informatio...

Page 33: ...ng features to use the enabled NICs You may have to disable the Enabled w PXE to use this option SATA Operation Allows you to configure the internal SATA hard drive controller The options are Disabled AHCI Default Setting NOTE SATA is configured to support AHCI mode Drives Allows you to configure the SATA drives on board The option is SATA 0 SATA 1 Default Setting Both drives are enabled SMART Rep...

Page 34: ...lt Setting All devices are enabled Table 4 Video Option Description LCD Brightness Allows you to set the panel brightness when the ambient sensor is Off Table 5 Security Option Description Admin Password Allows you to set change or delete the administrator admin password NOTE You must set the admin password first if an admin password is used with a system password and or hard drive password NOTE S...

Page 35: ...an administrator password is set The option is disabled Allows Wireless Switch Changes TPM Security Allows you to control whether the Trusted Platform Module TPM in the computer is enabled and visible to the operating system When you disable this option the BIOS will not turn on the TPM during POST and the TPM will be non functional and invisible to the operating system When you enable this option...

Page 36: ...Replace from File Replaces the current key with a key from a user selected file Append from File Adds a key to the current database from a user selected file Delete Deletes the selected key Reset All Keys Resets to default setting Delete All Keys Deletes all the keys NOTE If you disable the Custom Mode all the changes made will be erased and the keys will restore to default settings Table 7 Perfor...

Page 37: ...d in the operating system This feature only works when the computer is connected to AC power supply Disabled Default Setting LAN Only WLAN Only LAN or WLAN Block Sleep Allows you to block the computer from entering into the sleep state Option is disabled by default Block Sleep S3 Peak Shift Peak Shift minimizes AC power usage at times of peak demand Option is disabled by default Advance Battery Ch...

Page 38: ...ed by default Enable Fn Key Emulation Fn Lock Options This option when enabled allows the hot key combination Fn Esc toggle the primary behavior of F1 F12 between their standard and secondary functions Fn Lock Hot Key Default Setting Standard Default Setting Secondary Fastboot Allows you to speed up the boot processes The options are Minimal Thorough Default Setting Auto Extend BIOS POST Time This...

Page 39: ...f the system Always Off Led Indicates Wireless Activity Default Setting Table 12 Maintenance Option Description Service Tag Displays the Service Tag of your computer Asset Tag Allows you to create a system asset tag if an asset tag is not already set This option is not set by default BIOS Downgrade Allows you to control the flashing of the system firmware to the previous revisions This option is e...

Page 40: ...S 9 Identify the latest BIOS file and click Download File You can also analyze which drivers need an update To do this for your product click Analyze System for Updates and follow the instructions on the screen 10 Select your preferred download method in the Please select your download method below window click Download File The File Download window appears 11 Click Save to save the file on your c...

Page 41: ...Select Setup Password type your system password and press Enter or Tab A message prompts you to re type the setup password 6 Type the setup password that you entered earlier and click OK 7 Press Esc and a message prompts you to save the changes 8 Press Y to save the changes The computer reboots Deleting or Changing an Existing System and or Setup Password Ensure that the Password Status is Unlocke...

Page 42: ...e processor Processor Type Intel Pentium Intel Celeron Video Video type Integrated on system board Data bus Integrated video Video controller Intel Pentium Intel Integrated HD Graphics Intel Celeron Memory Memory connector One SODIMM slot Memory capacity 2 GB 4 GB and 8 GB Memory type 1333 MHz DDR3L Minimum memory 2 GB Maximum memory 8 GB Audio Type Two channel high definition audio Controller Rea...

Page 43: ...o One 19 pin HDMI connector Network adapter One RJ 45 network adapter USB One USB 2 0 compliant connectors One USB 3 0 PowerShare connector Memory card reader SD 3 0 Memory card reader Camera Resolution 1280 x 720 pixels Video Resolution maximum 1280 x 720 pixels Diagonal viewing angle 74 Display Type Non Touch HD Anti Glare Size 11 60 inches Active area X Y 256 12 mm x 144 00 mm 10 08 inches x 5 ...

Page 44: ...hes Battery Type 3 cell Li polymer 3 43 AHr 38 Whr Dimensions Depth 3 cell 233 00 mm 9 17 inches Height 3 cell 7 05 mm 0 28 inch Width 3 cell 94 80 mm 3 73 inches Weight 3 cell 265 00 g 0 58 lb Voltage 3 cell 11 1 VDC Approximate charge time of battery with computer off ExpressCharge 0 15 C 4 hours 16 45 C 2 hours 46 60 C 3 hours Temperature range Operating 0 C to 35 C 32 F to 95 F Non operating 4...

Page 45: ...6 00 mm 2 60 inches 47 00 mm 1 90 inches 47 00 mm 1 90 inches 52 00 2 00 inches Depth 106 00 mm 4 17 inches 108 00 mm 4 30 inches 108 00 mm 4 30 inches 128 00 5 00 inches Temperature range Operating 0 C to 40 C 32 F to 104 F Non Operating 40 C to 70 C 40 F to 158 F Physical Height with a WLED panel 22 90 mm 0 90 inch Width 301 00 mm 11 85 0 inches Depth 212 00 mm 8 35 inches Weight Minimum 1 68 kg...

Page 46: ...ronmental Maximum vibration Operating 0 66 Grms 2 Hz 600 Hz Storage 1 30 Grms 2 Hz 600 Hz Maximum shock Operating 110 G Storage 160 G Airborne contaminant level G1 or lower as defined by ISA S71 04 1985 46 ...

Page 47: ...ion about the failed device s View status messages that inform you if tests are completed successfully View error messages that inform you of problems encountered during testing CAUTION Use the system diagnostics to test only your computer Using this program with other computers may cause invalid results or error messages NOTE Some tests for specific devices require user interaction Always ensure ...

Page 48: ... on when the computer reads or writes data Turns on steadily or blinks to indicate battery charge status Turns on when wireless networking is enabled The device status LEDs are usually located either on the top or left side of the keyboard They display the storage battery and wireless devices connectivity and activity Apart from that they can be useful as a diagnostic tool when there s a possible ...

Page 49: ...r is connected to an electrical outlet the battery light operates as follows Alternately blinking amber light and white light An unauthenticated or unsupported non Dell AC adapter is attached to your laptop Alternately blinking amber light with steady white light Temporary battery failure with AC adapter present Constantly blinking amber light Fatal battery failure with AC adapter present Light of...

Page 50: ...upport and service options Availability varies by country and product and some services may not be available in your area To contact Dell for sales technical support or customer service issues 1 Go to dell com support 2 Select your support category 3 Verify your country or region in the Choose a Country Region drop down list at the bottom of the page 4 Select the appropriate service or support lin...

Reviews: